¶ First Glance & Connecting
¶ Introduction
Let us begin by thank you for purchasing this product. It is an all-in-one automation tool, that allows Network Engineers to be more affective in deploying and identify topologies. With the Netool’s “Switch Discovery” mode, engineers will be able to capture discovery protocols and view them, in an easy to ready and to share format. Along with Netool’s “capture to PCAP” mode, which allows engineers to capture PCAP files and share them in many ways. Engineers will be able to save and deploy configurations as well as protect configuration with assigned passwords. With Netool’s “Switch Configuration”, engineers will be able to deploy full topologies rapidly, effectively, and securely. In all Netool is designed to facilitate network engineering.
¶ Hardware
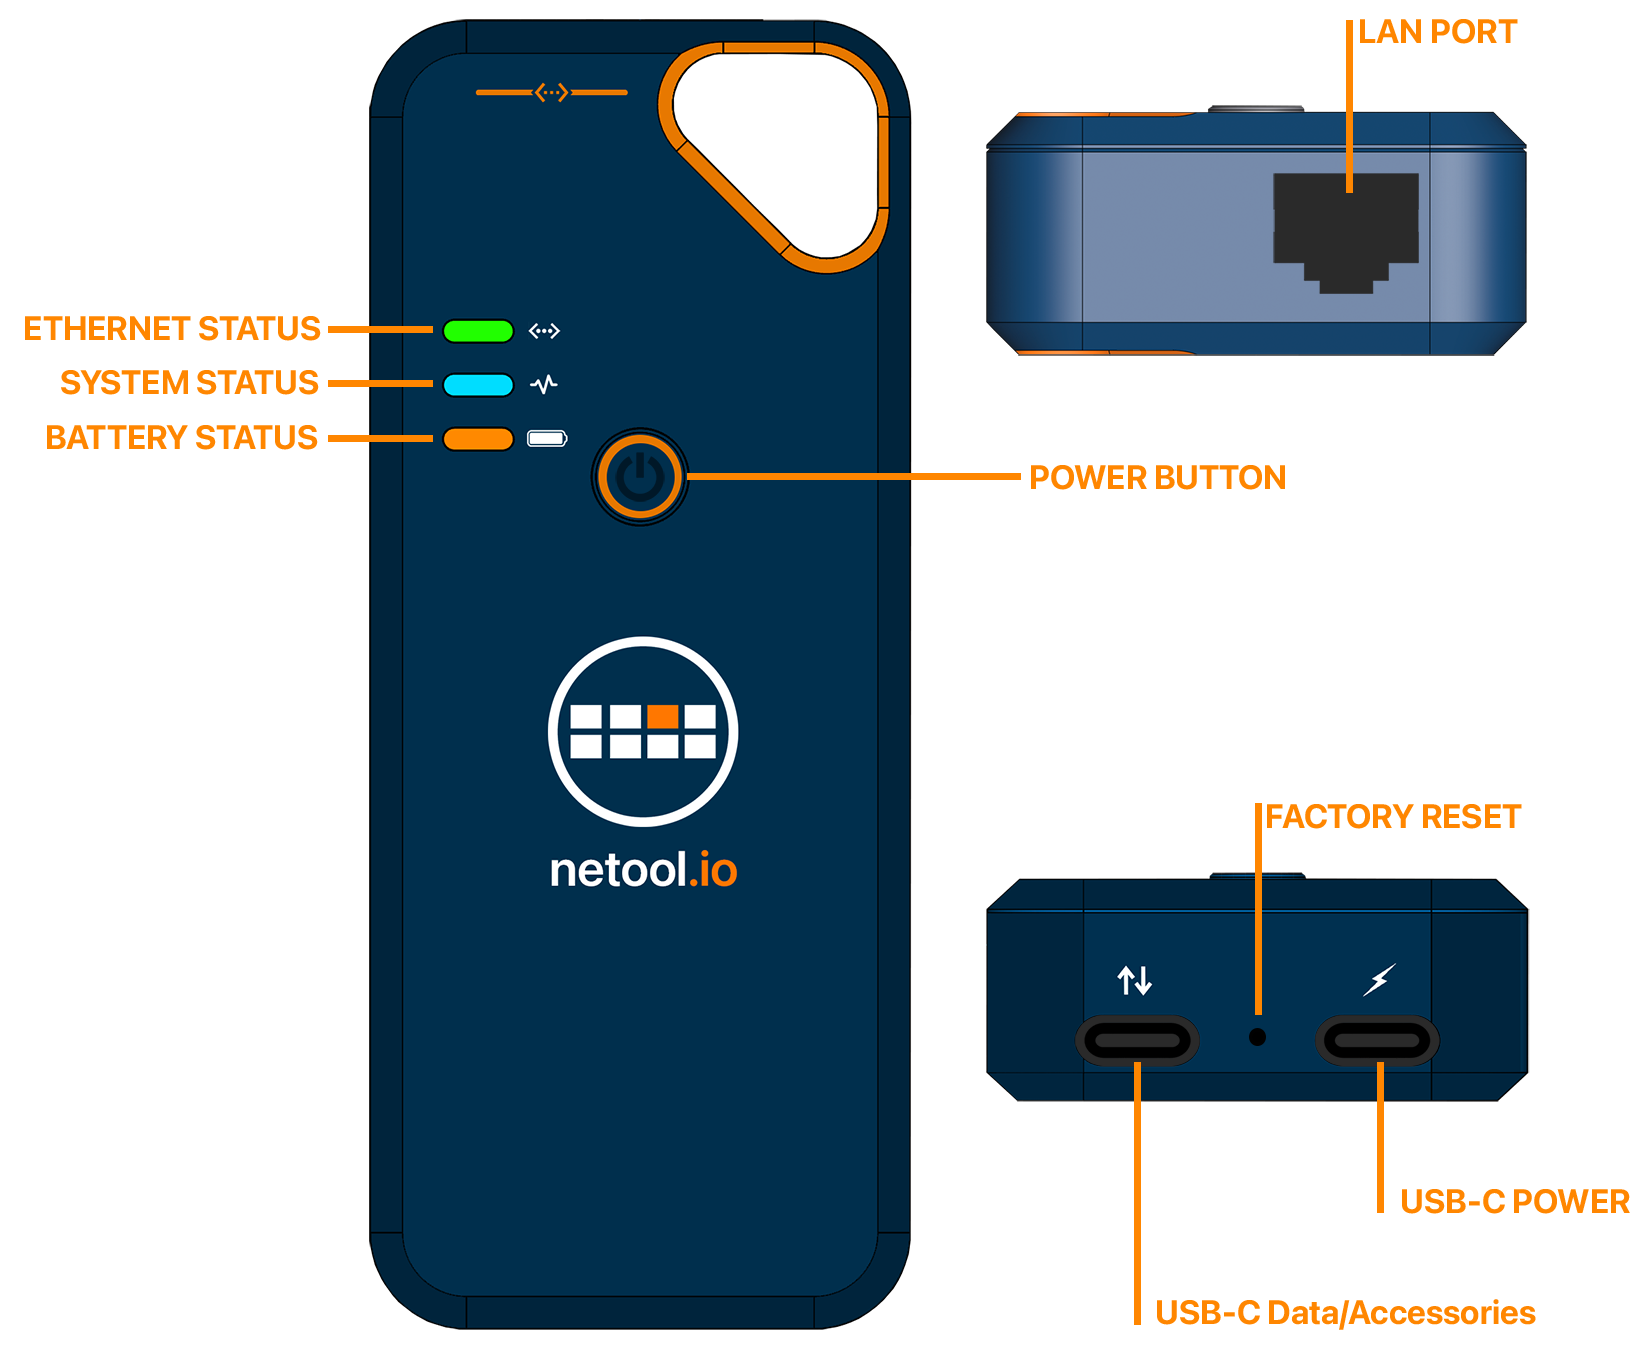
- Light Indicators:
- Ethernet status: If flashing green, it is connected and data is passing through.
- System Status: If solid blue, netoolPro2 is on.
- Battery Status:
- Green: battery is full.
- Orange: battery has used a quarter of power.
- Amber: there is a quarter of power left.
- Red: when flashing red, 5% of the battery charge is left.
- Power Button: Hold for 5 seconds and it will turn on, do the same to turn it off.
- Ethernet port
- 2 USB-C ports: one for data transfer and another for charging.
¶ What's in the box?
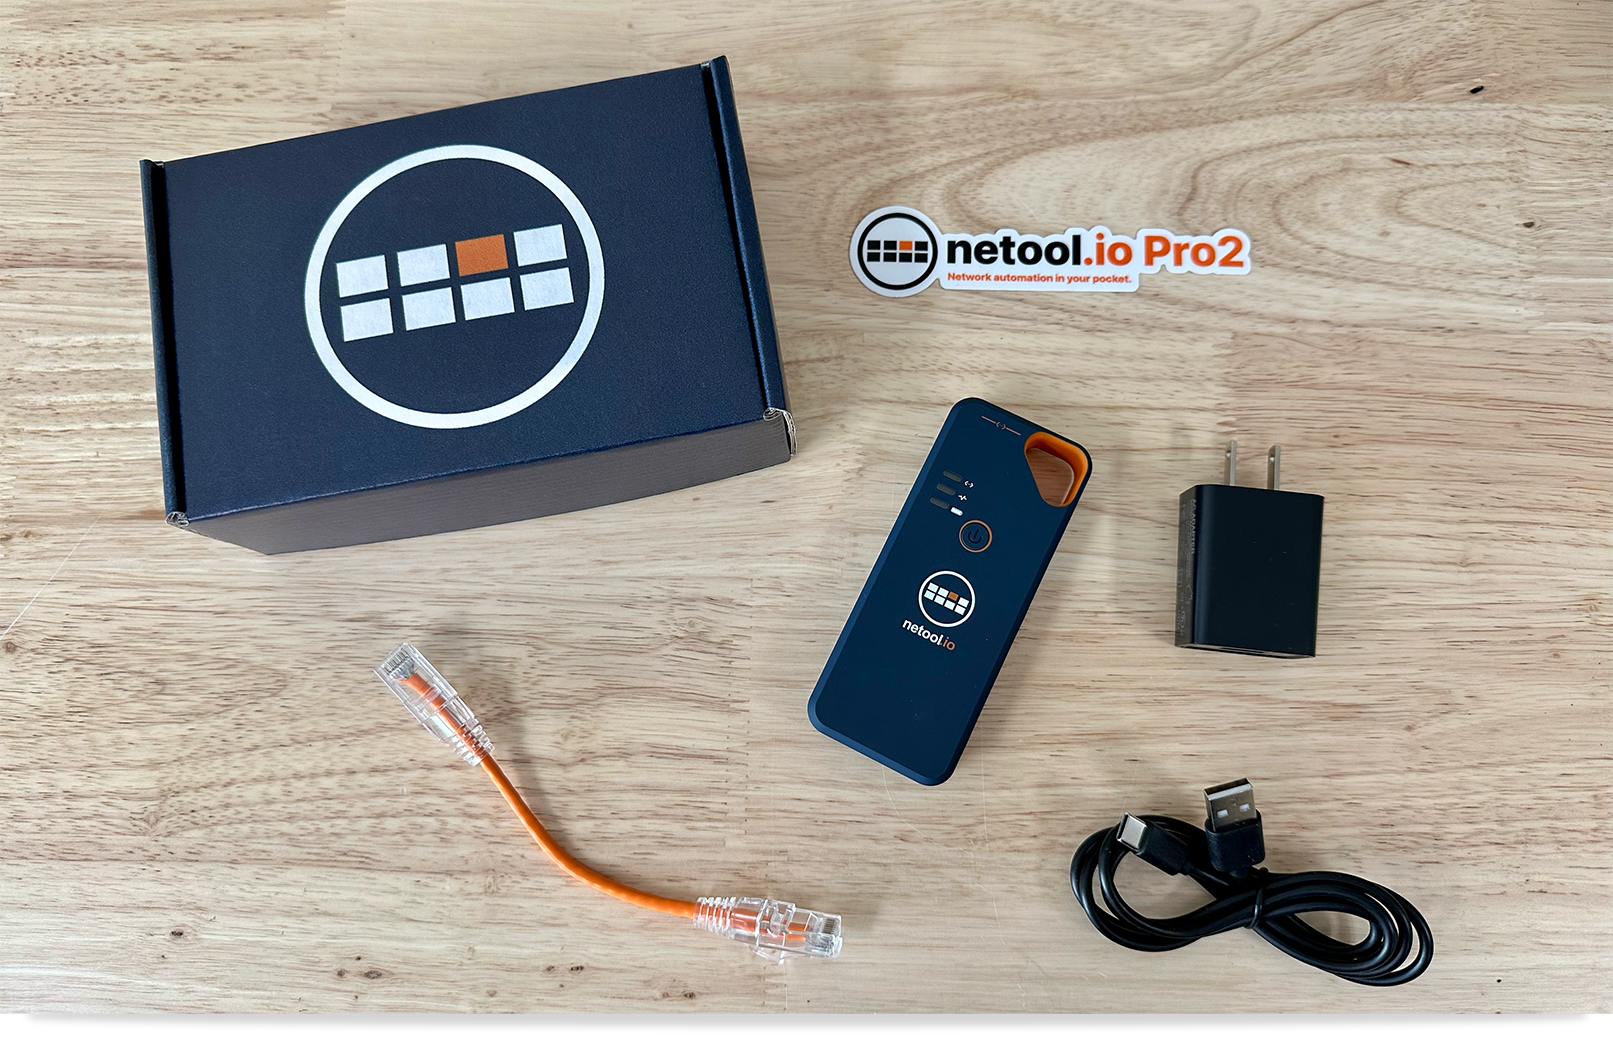
- netoolPro2
- USB-C Charger
- 3" Cat6 cable
¶ Requirements
Smartphone or tablet
netool Pro2 application
¶ Application connection
- Download the application for the netool Pro2.
- Boot up the netoolPro2.
- Once device is on, and the application is installed, look for “netoolpro-XXXXXX” SSID on your device, where XXXXXX is your Netool Pro2 serial number.
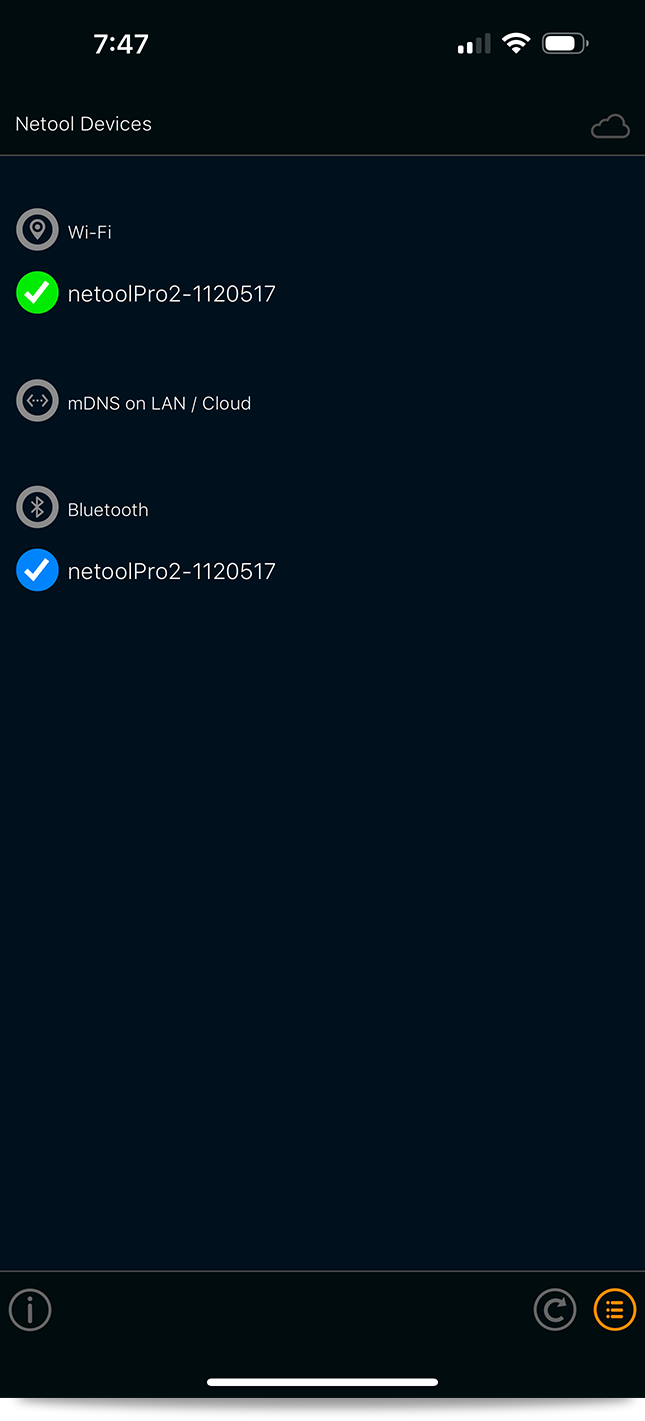
- Once connected to the SSID, start application. You are connected to the Netool Pro2. Tap on the icon on the left-bottom corner, to see the list of available netoolPro2s.
- Another way to connect is through Bluetooth.
- Simply start netoolPro2 device and start the application. If the device, in which the App is installed, has Bluetooth capabilities, open the application and tap the bottom left-hand corner icon and under Bluetooth, the netoolPro2 is now available to be selected.
- A video example of how to connect to you Pro2
¶ Application & Settings
¶ Main Menu
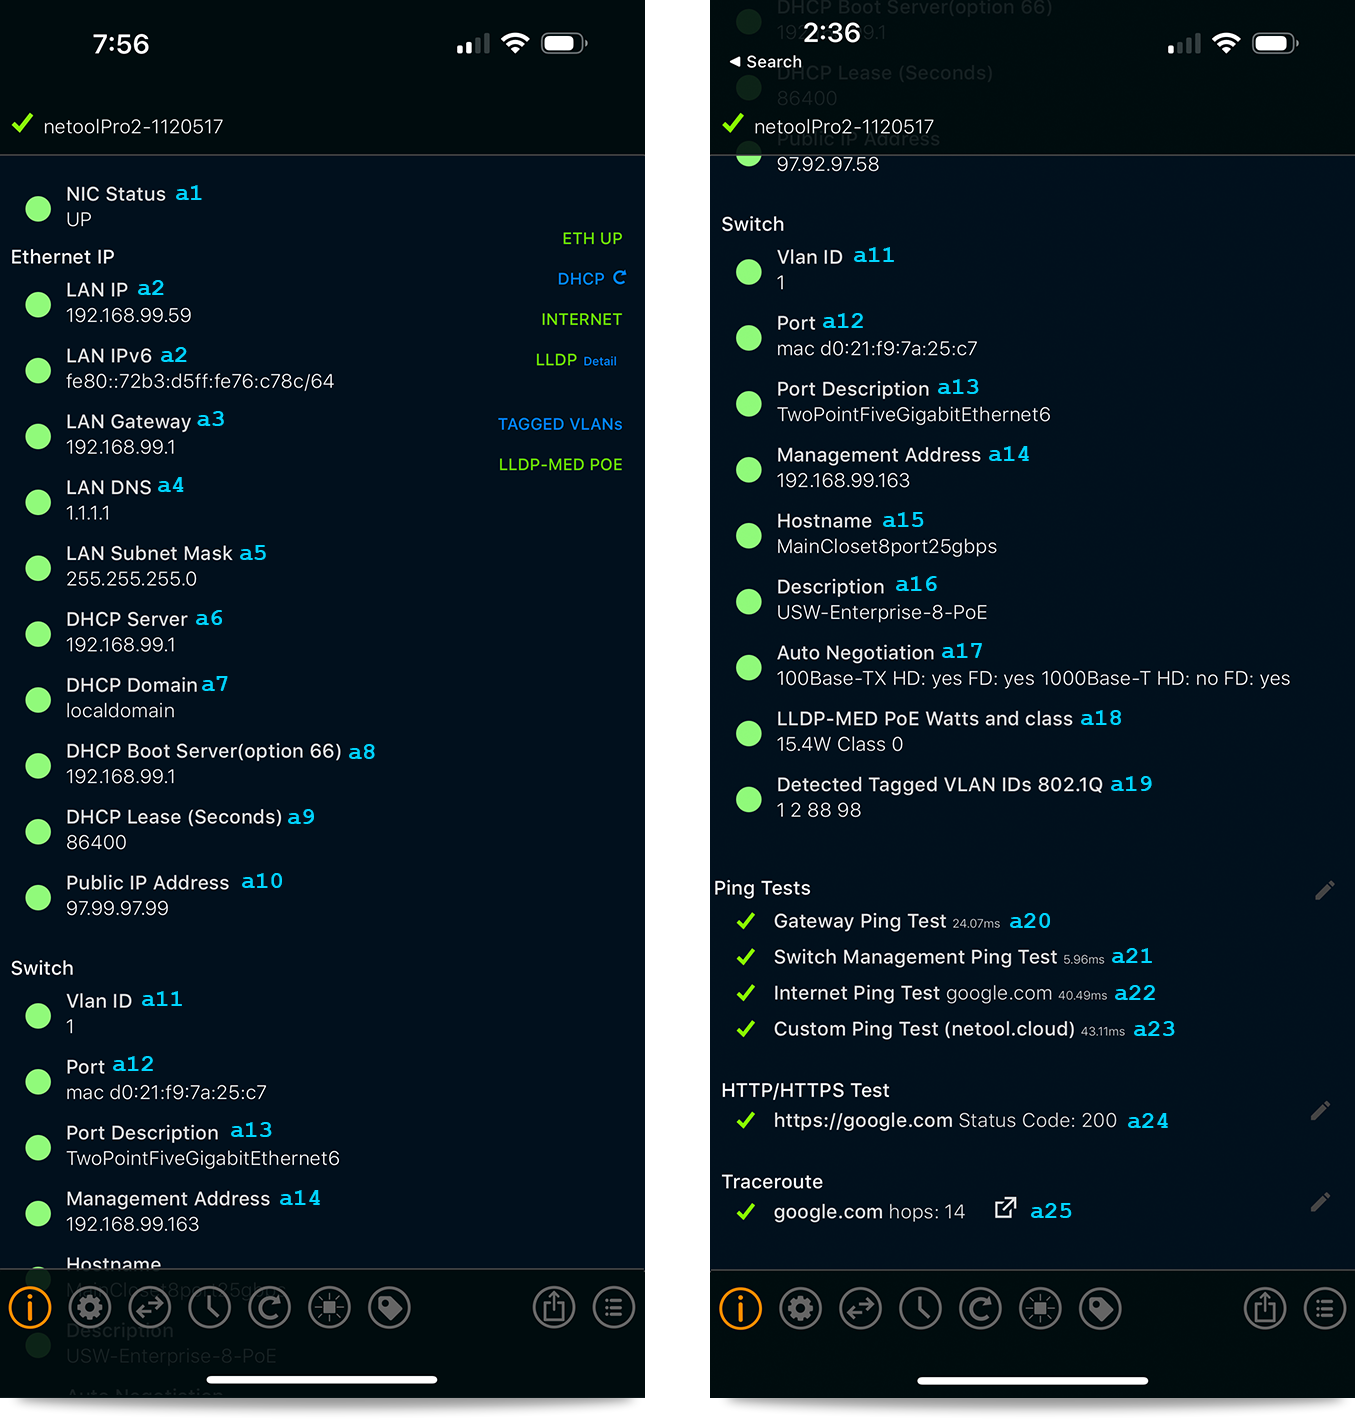
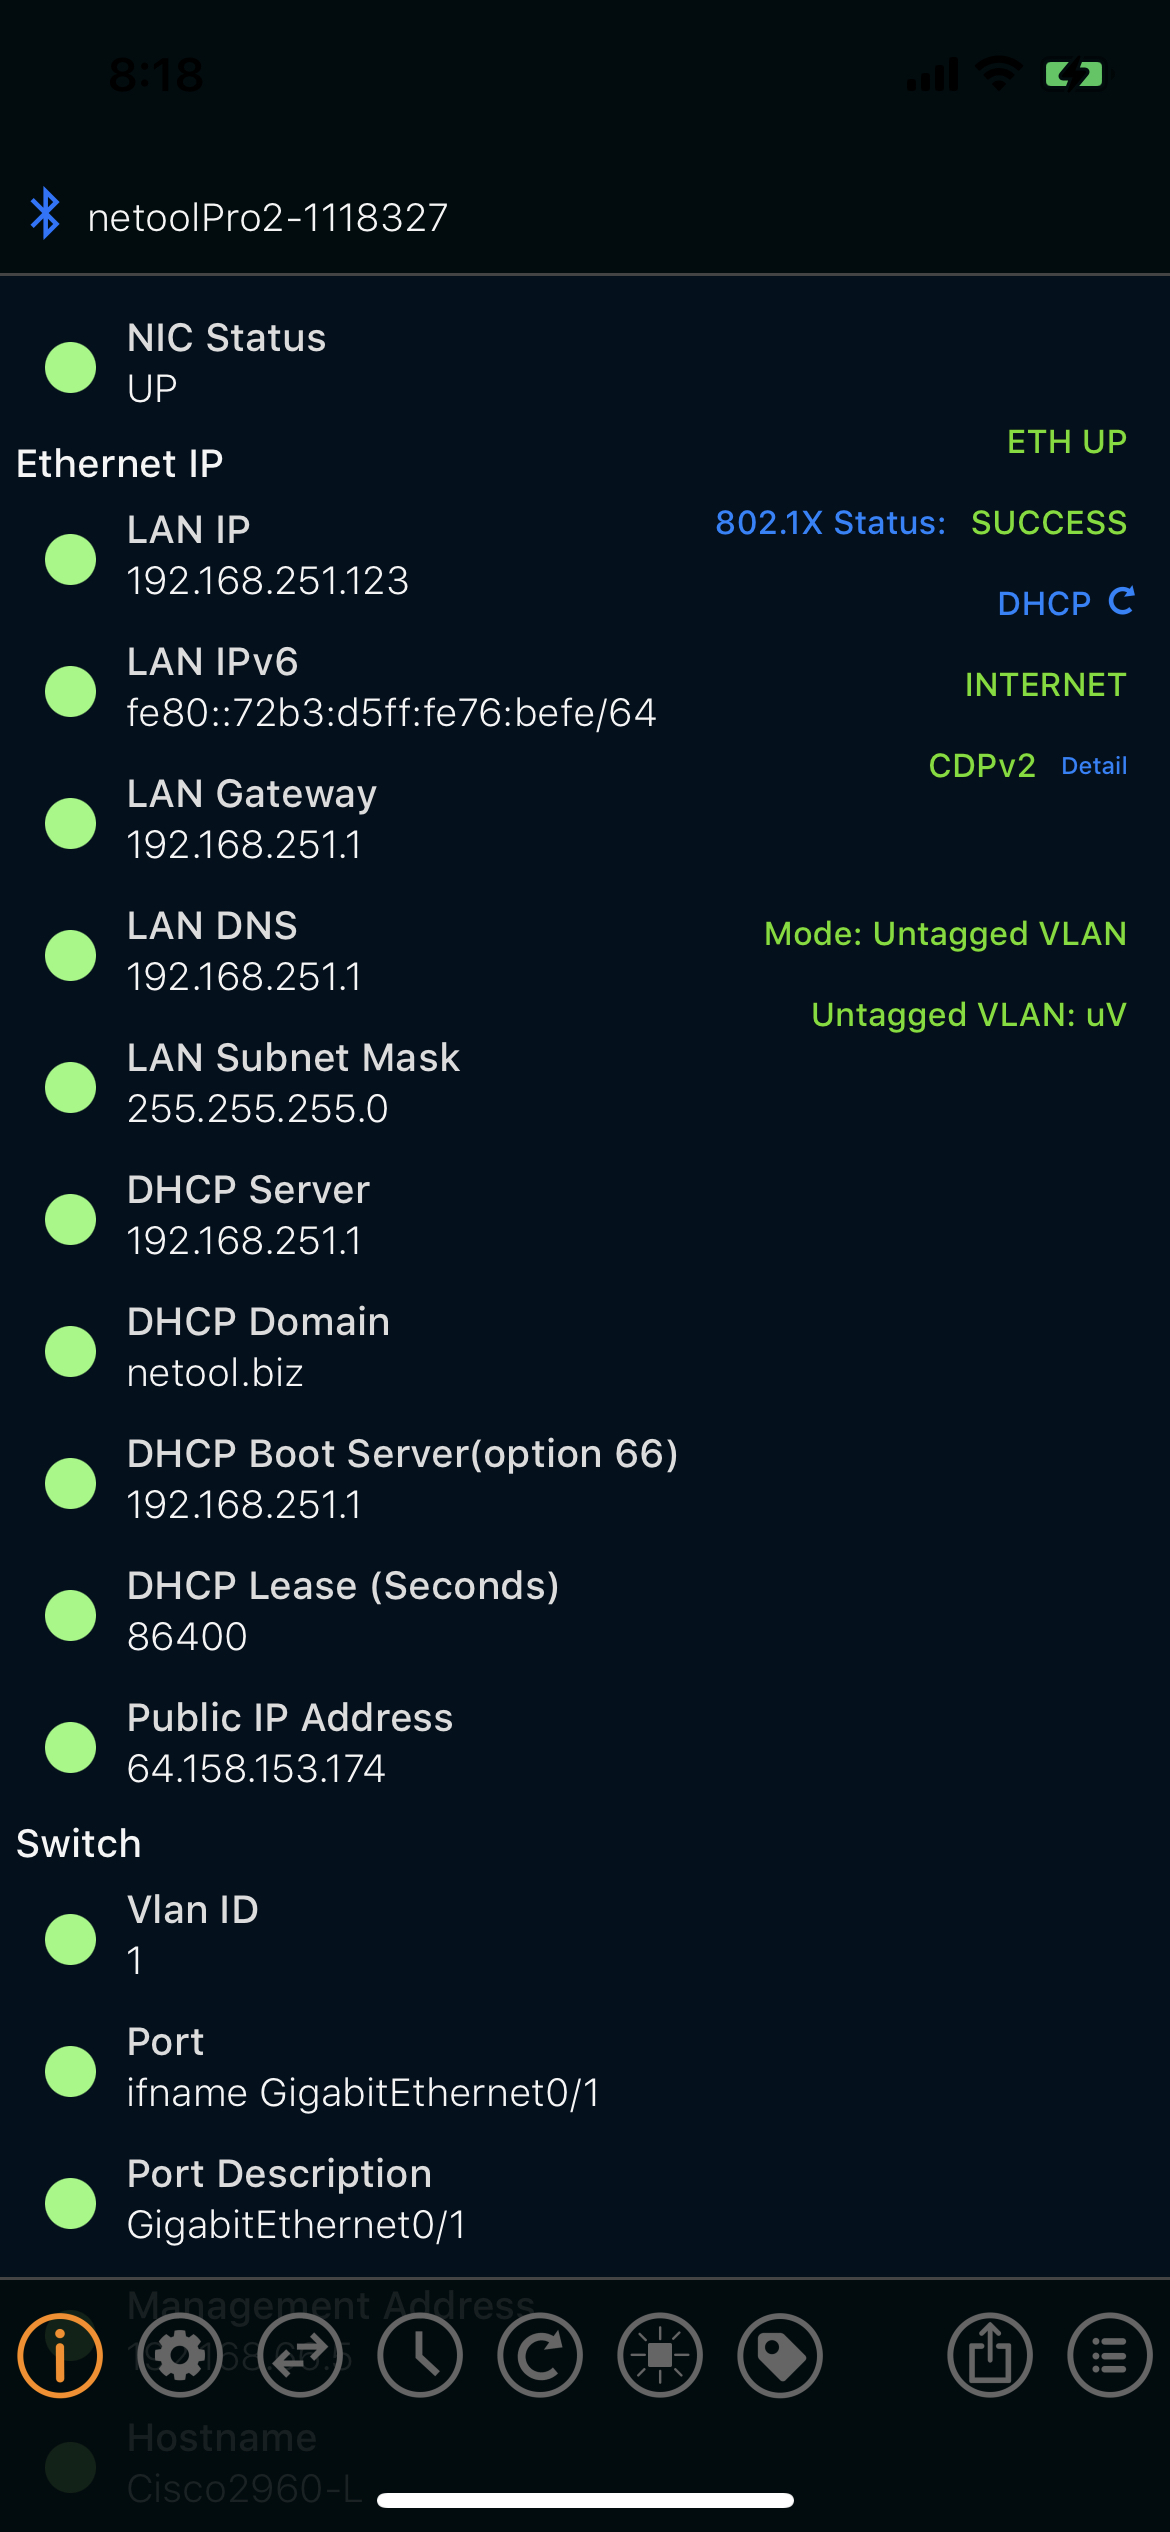
Ethernet IP
- Assigned LAN IPv4 and IPv6 Figure a2
- The LAN's Gateway Figure a3
- DNS server Figure a4
- LAN Subnet Mask Figure a5
- DHCP server Figure a6
- DHCP Domain Figure a7
- DHCP Option 66 - Boot Server Figure a8
- DHCP Lease time Figure a9
- Public IP address Figure a10
Switch
- VLAN id assigned to the port Figure a11
- Port number that netoolPro2 is plugged into Figure a12
- Port Description Figure a13
- Management address of the switch Figure a14
- Host-name assigned to the switch Figure a15
- Description of the switch Figure a16
- Auto negotiation available speeds Figure a17
- LLD-MED PoE Info Figure a18
- Tagged VLAN 802.1Q detection Figure a19
Ping Tests
- Gateway ping test Figure a20
- Switch Management ping test Figure a21
- Internet ping test Figure a22
- Custom Ping test Figure a23
- Enable in toggle settings menu.
- Edit HTTP/HTTPS address by tapping the edit icon to the right (pencil icon).
- HTTP/HTTPS test Figure a24
- Edit HTTP/HTTPS address by tapping the edit icon to the right (pencil icon).
- Trace-Route Figure a25
- Auto runs when plugged into an Ethernet port and the netool.io Lite has internet access.
- Edit Trace-Route address by tapping the edit icon to the right (pencil icon).
¶ Tags
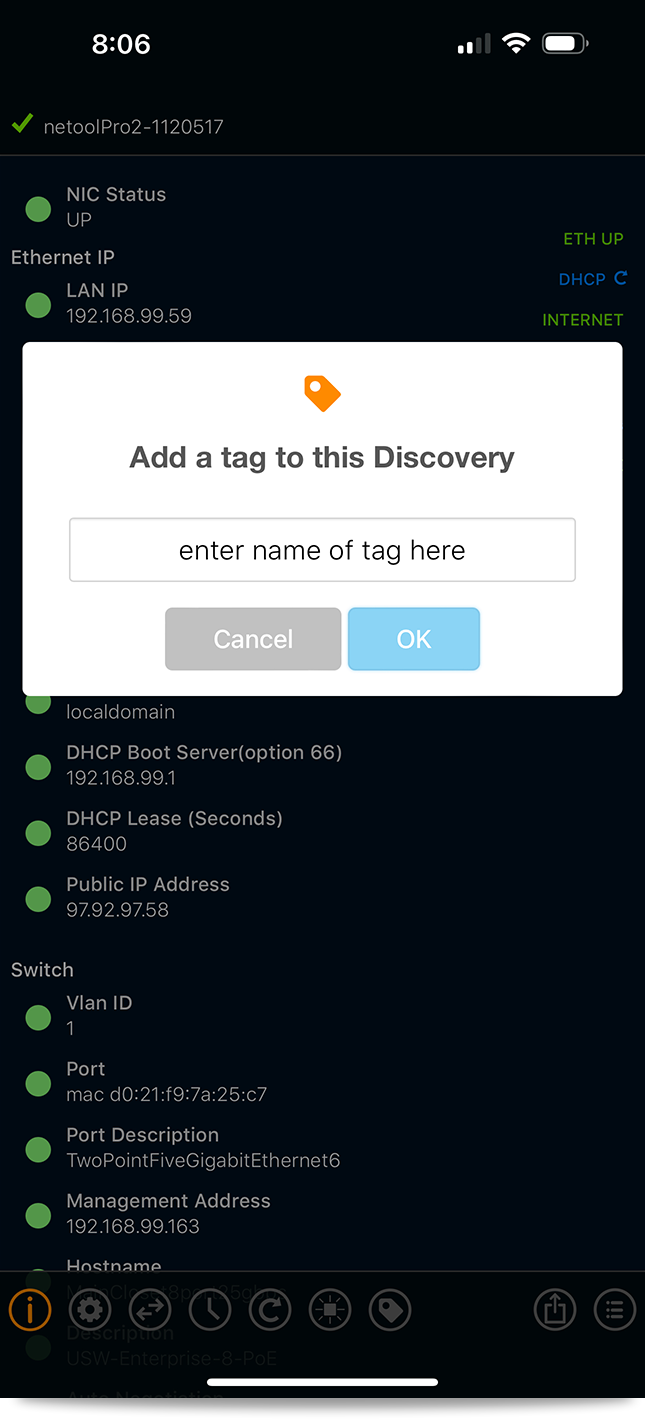
¶ Add a TAG
- Save the current port's information by simply tapping the TAG icon and naming it.
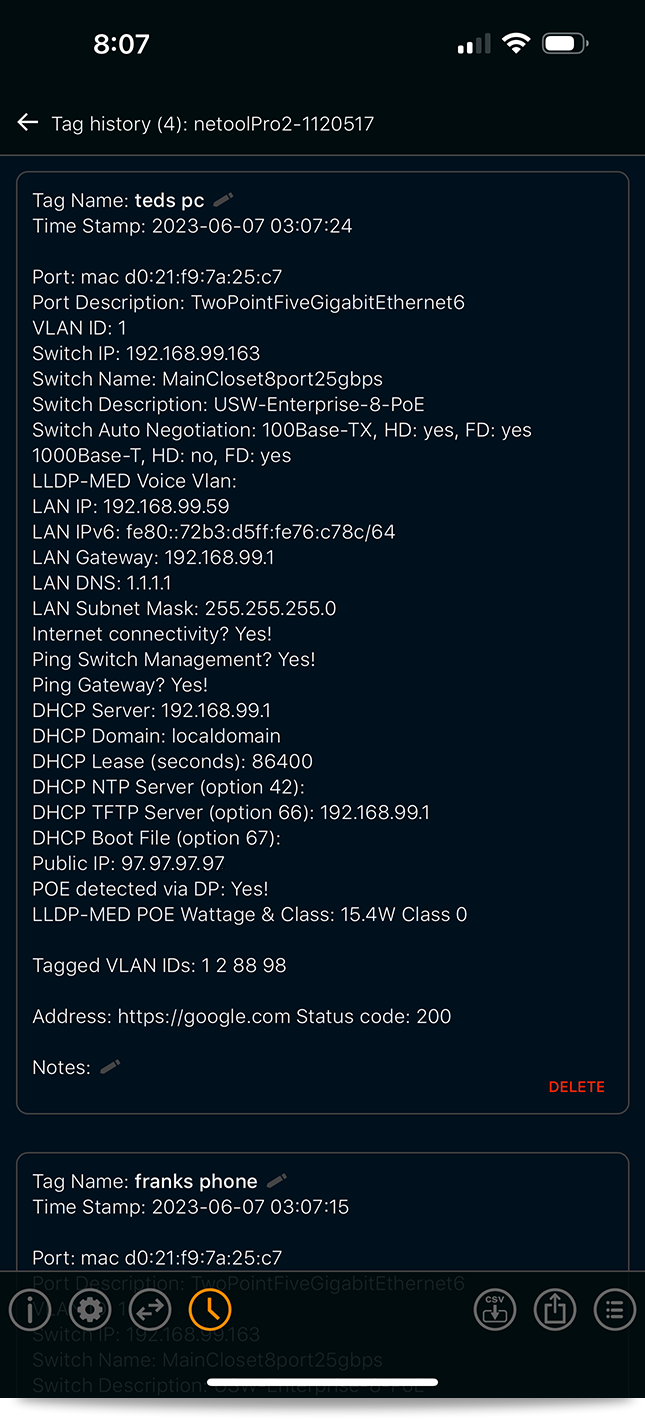
¶ Review TAG Entries
- To review the saved TAGs on the netoolPro2, tap the history icon.
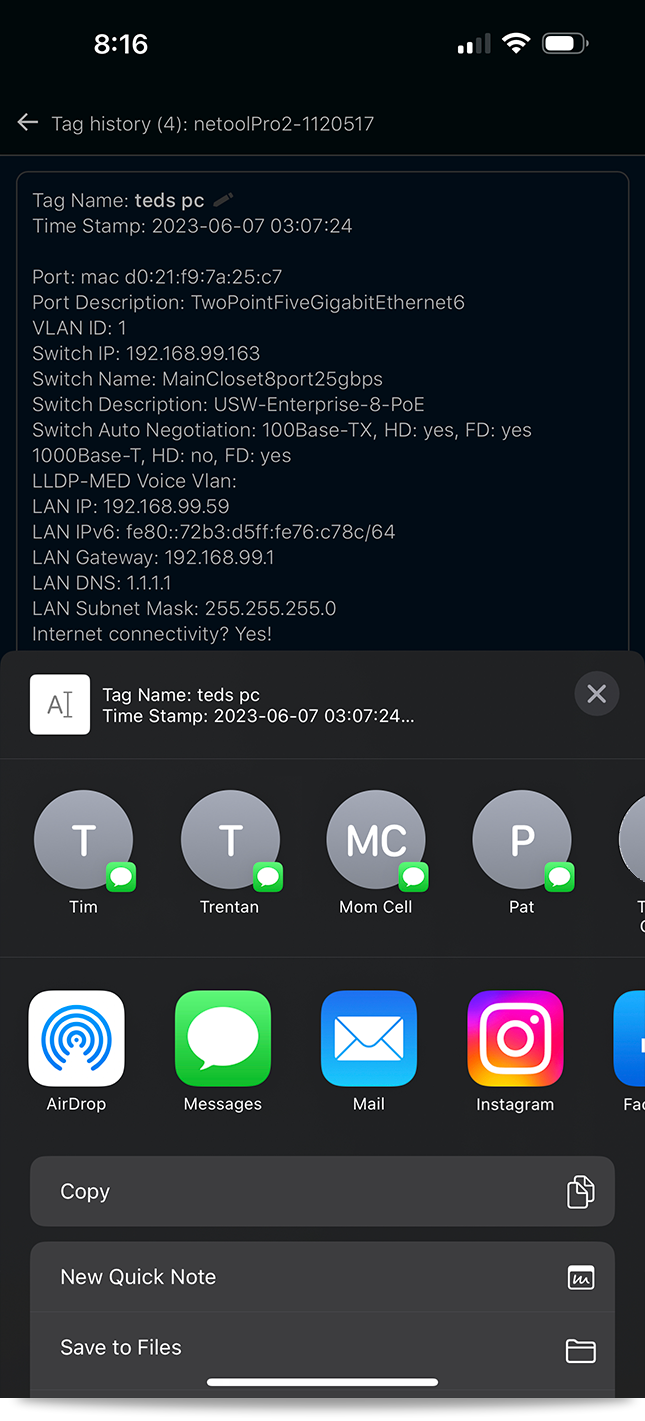
¶ Share TAGs
- TAGs can also be shared through different services or uploaded to netool.cloud
¶ Settings
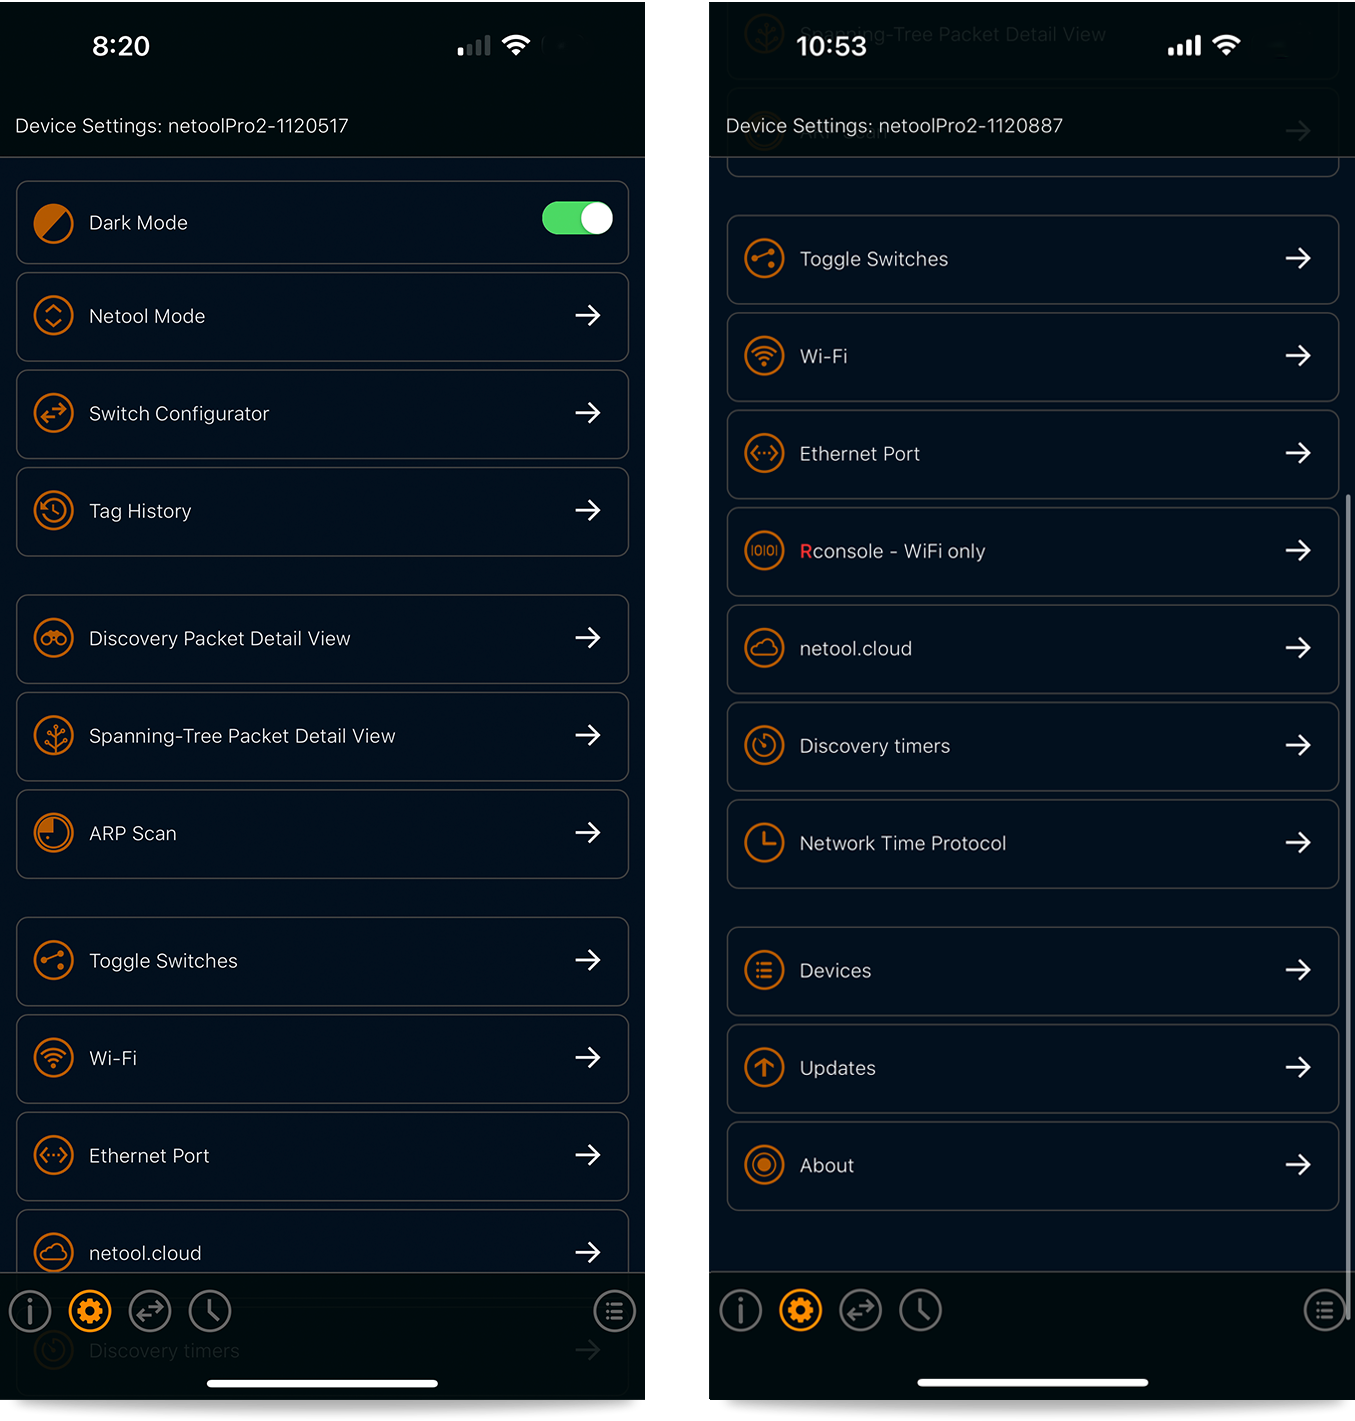
Dark Mode
- This will allow to switch from light to dark modes
Mode
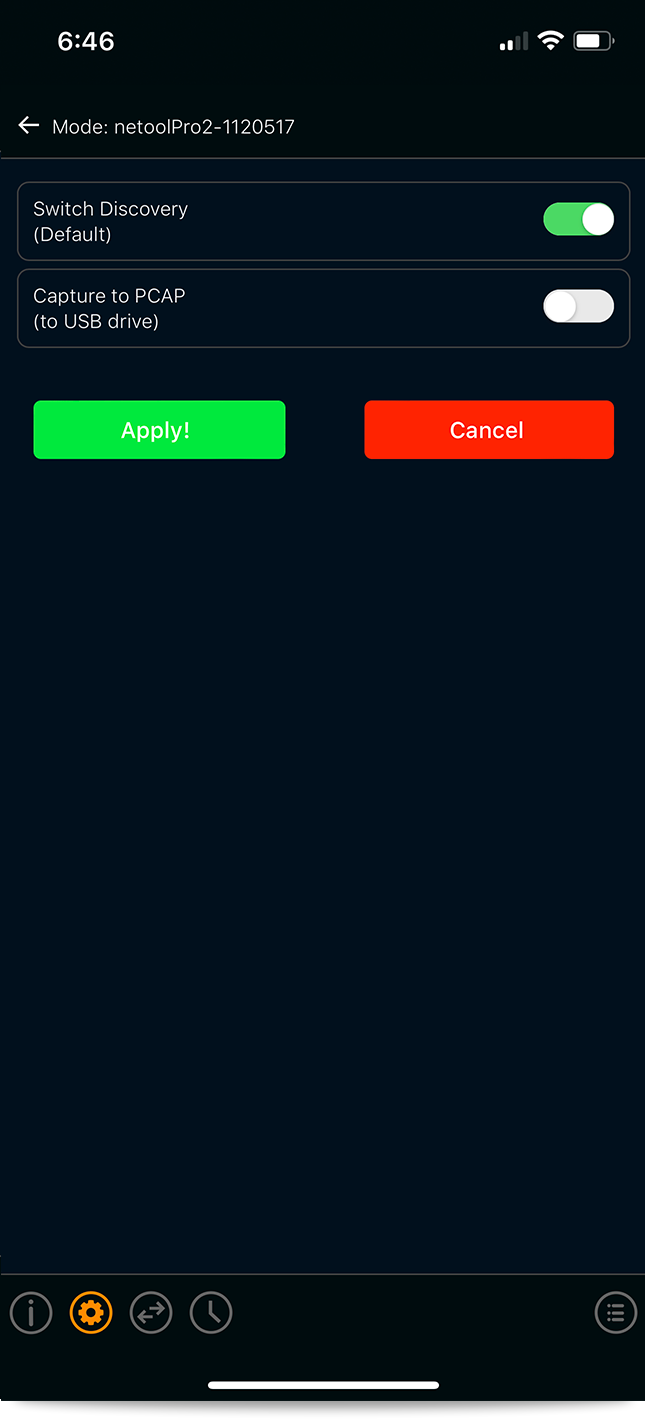
- This is where Capture to PCAP mode is activated
Switch Configurator
- This is where switch credentials and configuration are assigned
Tag History
- all of the saved tags are available here
Discovery Packet Detail View
- This will give a more detail description of the received packet.
Spanning-Tree Packet Detail View
- This will show a detail view of the incoming spanning-tree packet.
ARP Scan
- All of the ARP entries can be viewed here.
Toggle Switches
- Here is where the netoolPro2 is set up to detect a variety of Discovery Protocols and growing, along with Spanning-tree detection, Tagged VLAN discovery, LACP discovery, and ARP Scan activation are all set in here.
Wi-Fi
- The SSID and password can be changed in this menu.
Ethernet Port
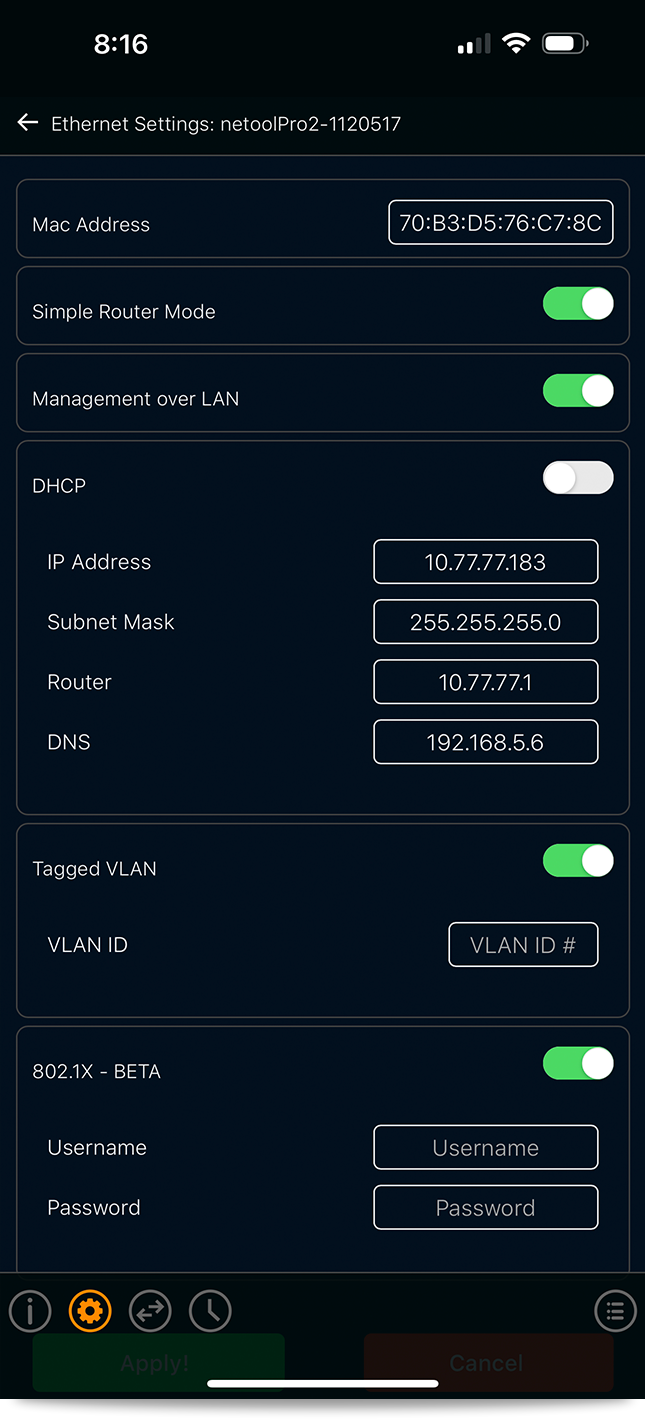
- In this tab, a netool's Mac Address and IP can be set and Tagged VLAN can be applied. Also, Simple Router mode and Management over LAN can be turned OFF. Here is also where the netool sets its 802.1X credentials.
Rconsole - WiFi only
- This feature enables a RS32 console connection from a switch to the netool, so that it can be configured by phone or PC from the netool APP.
netool.cloud
- Here the netoolPro2 can upload all of the saved tags to be reviewed later on netoolcloud.io
Discovery Timers
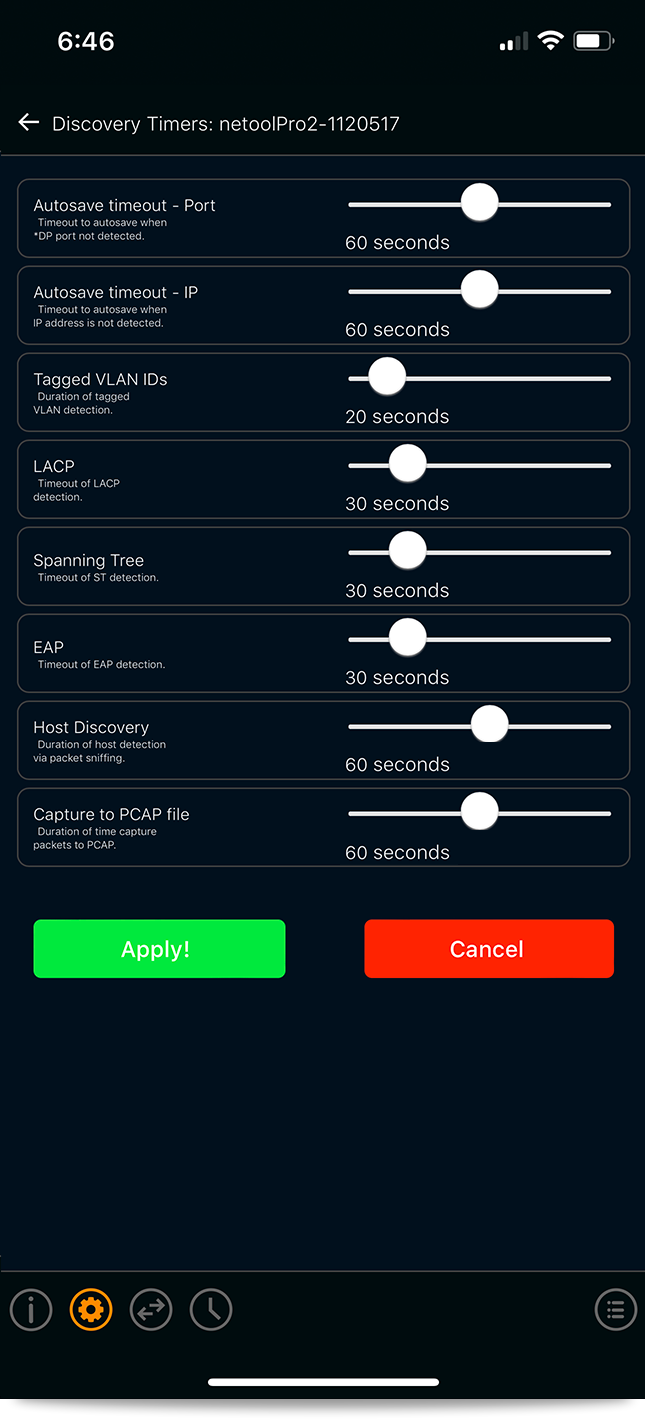
- This is where all the settings for the Autosave timeout of Port and IP, Tagged VLAN IDs, LACP, Spanning-Tree, EAP, Host Discovery, and Capture to PCAP file will be found.
Network Time Protocol
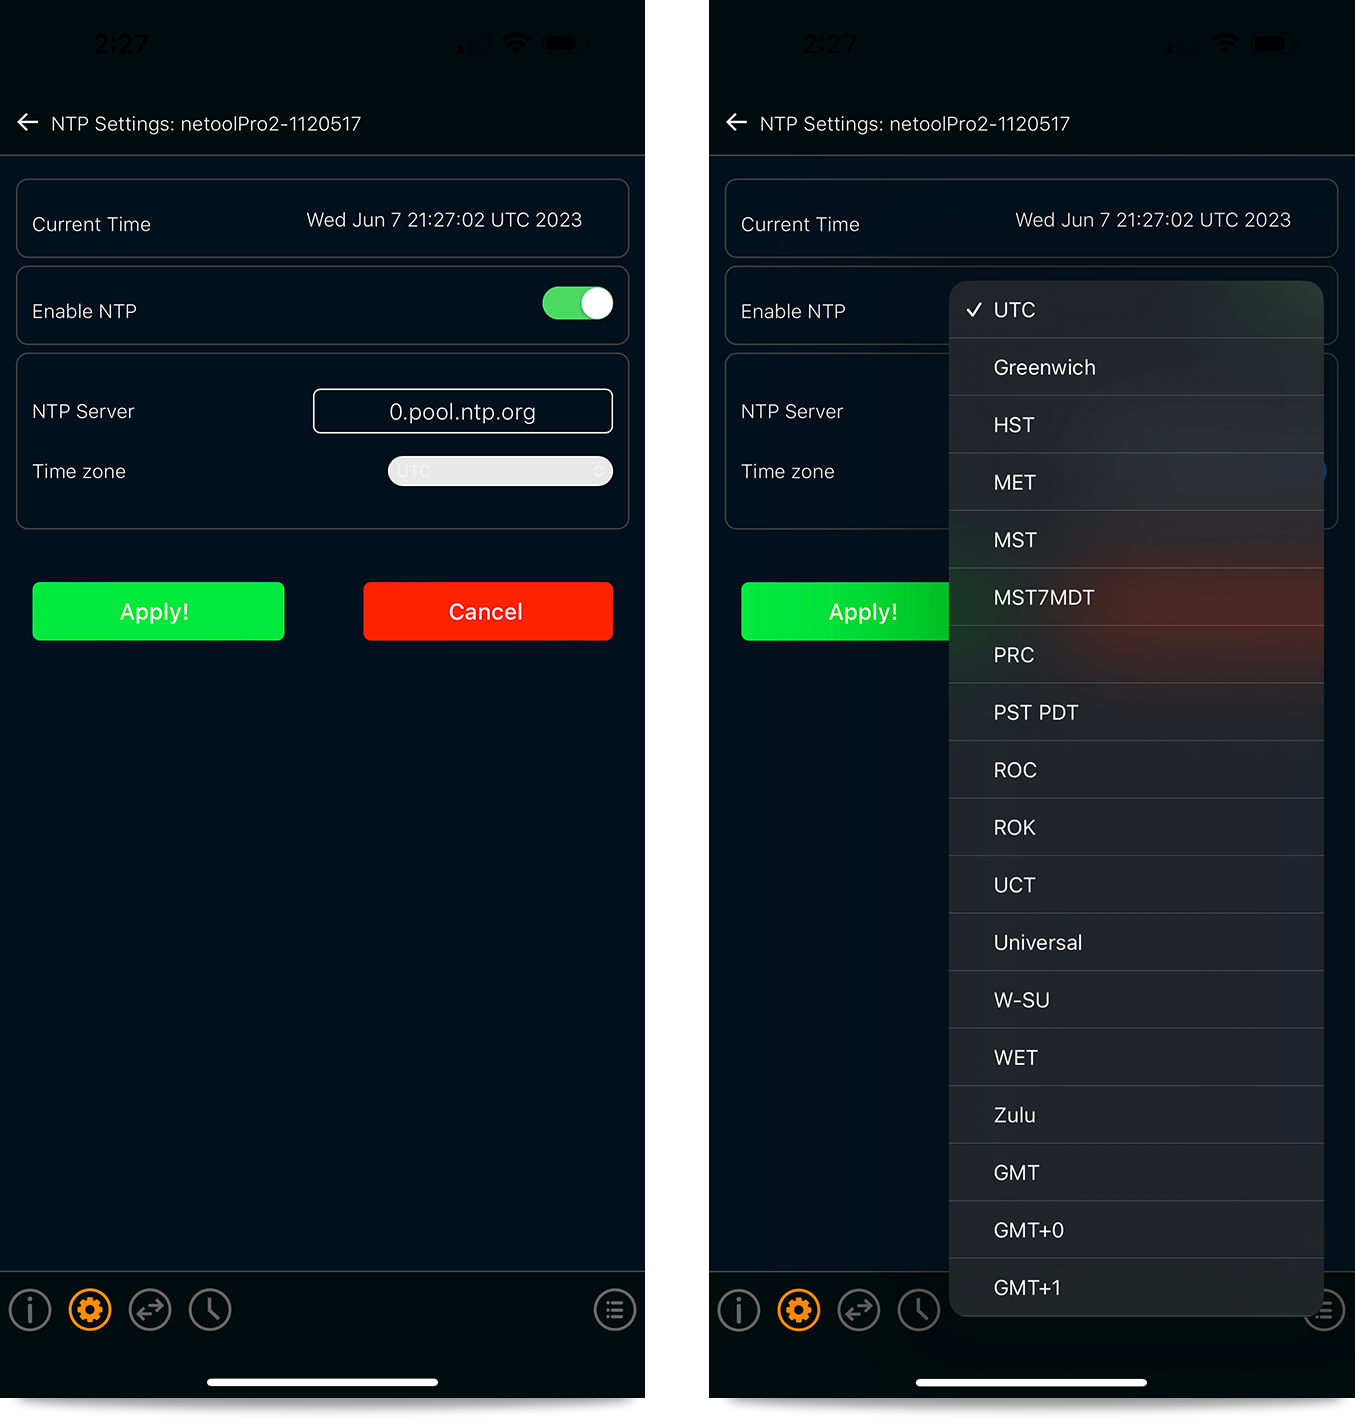
- Here the netoolPro2's NTP server can be set along with its time configuration.
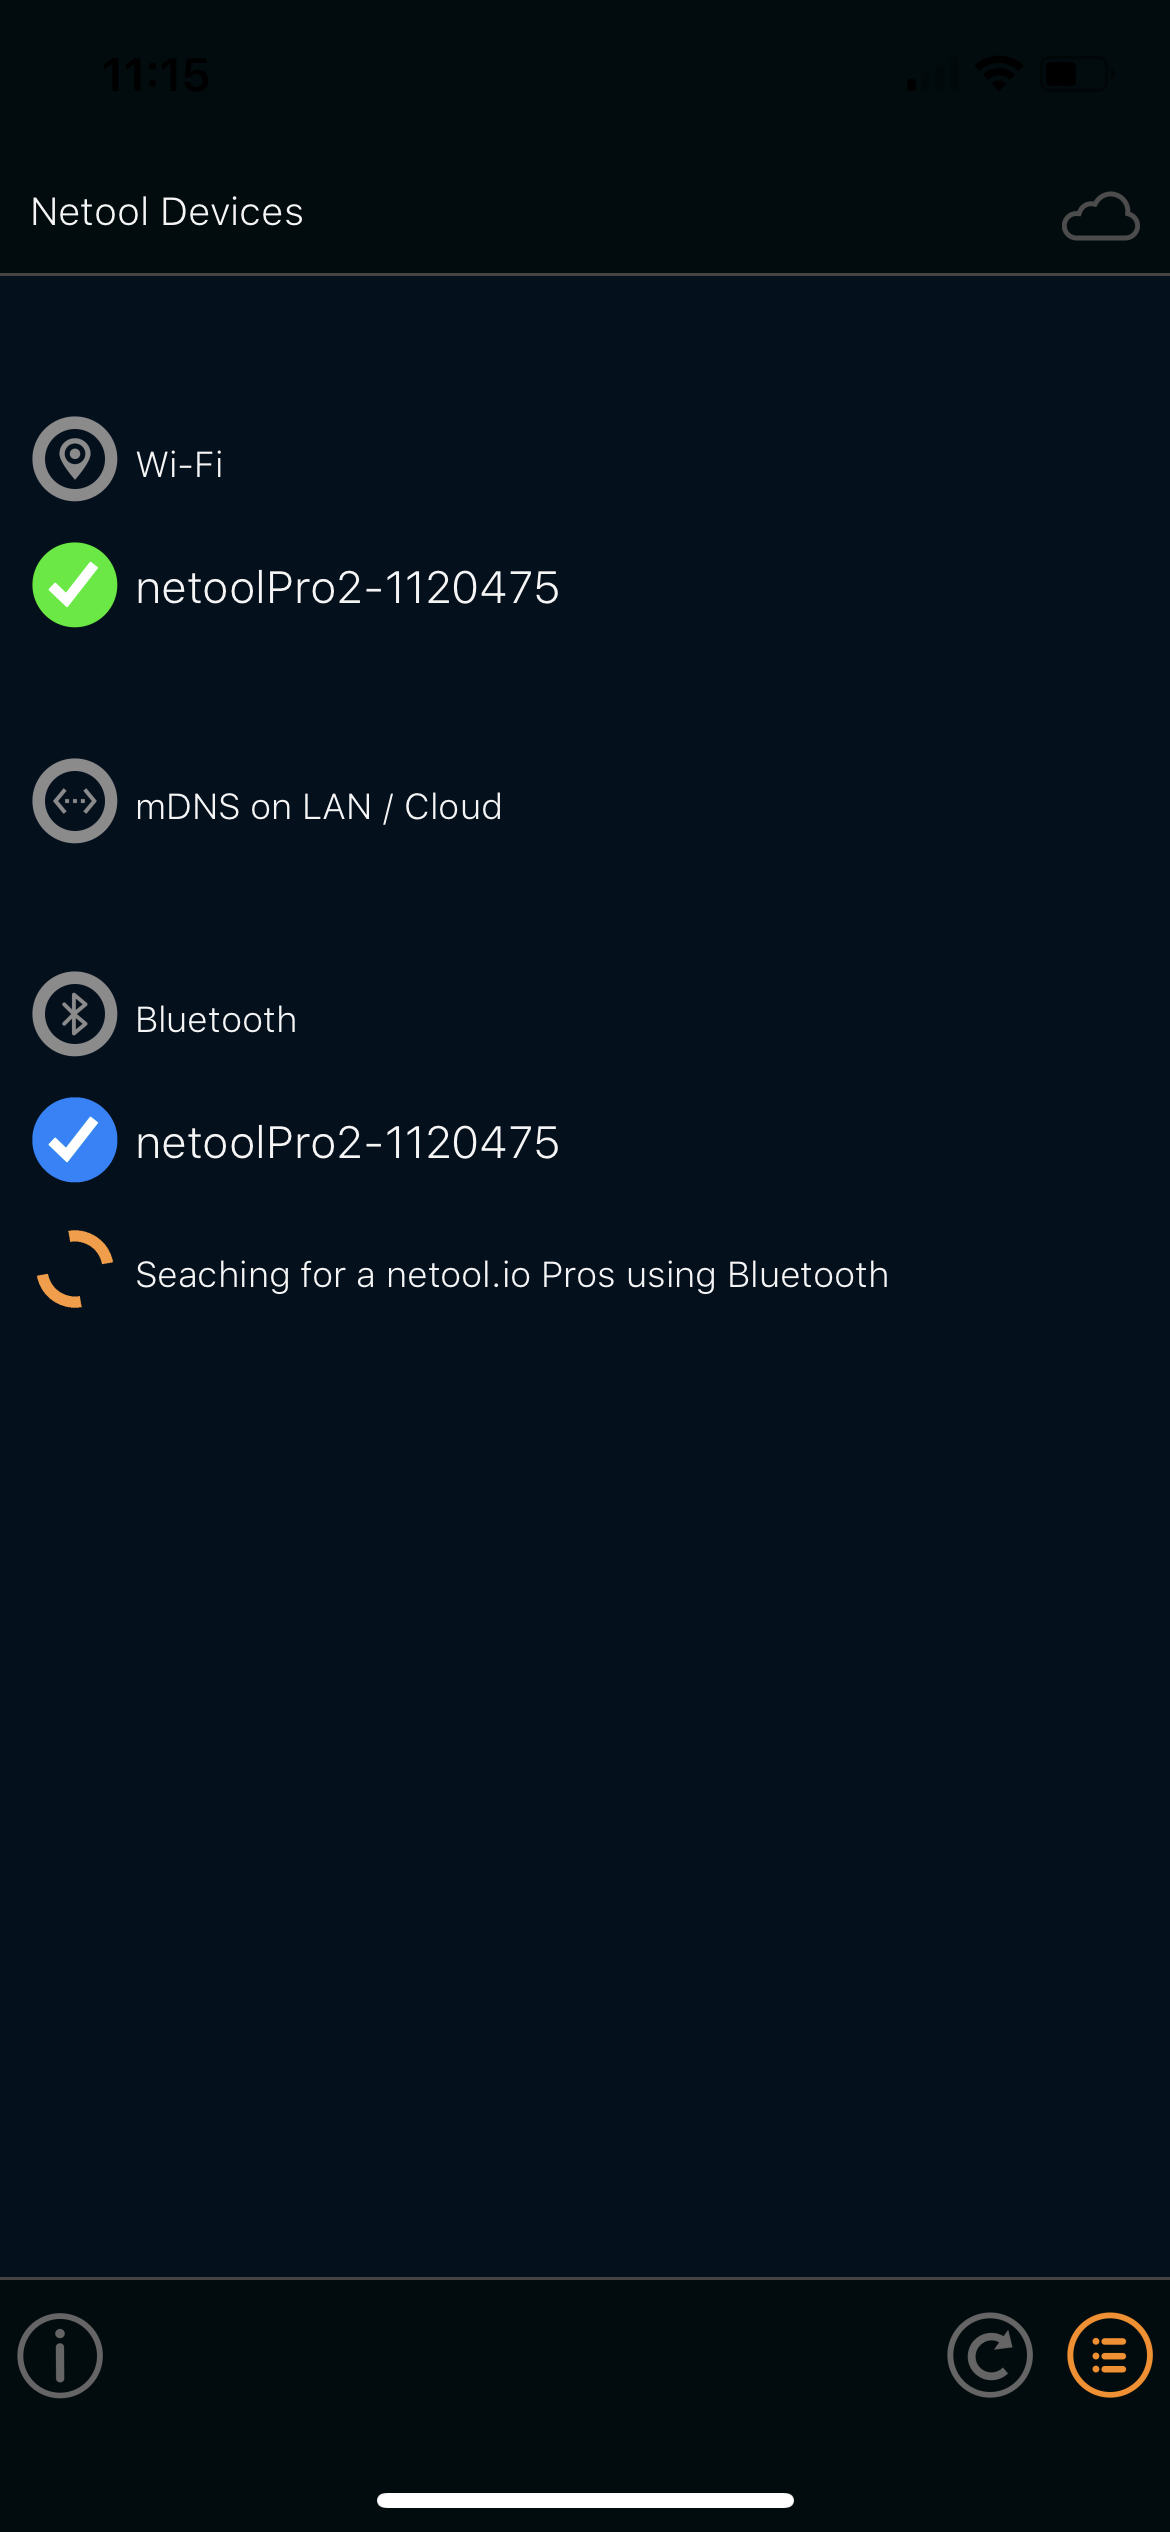
Devices
- This is where all the available netoolPro2s are available to connect to, either by Bluetooth or Wi-Fi.
Updates
Refer to the Firmware Update sections.
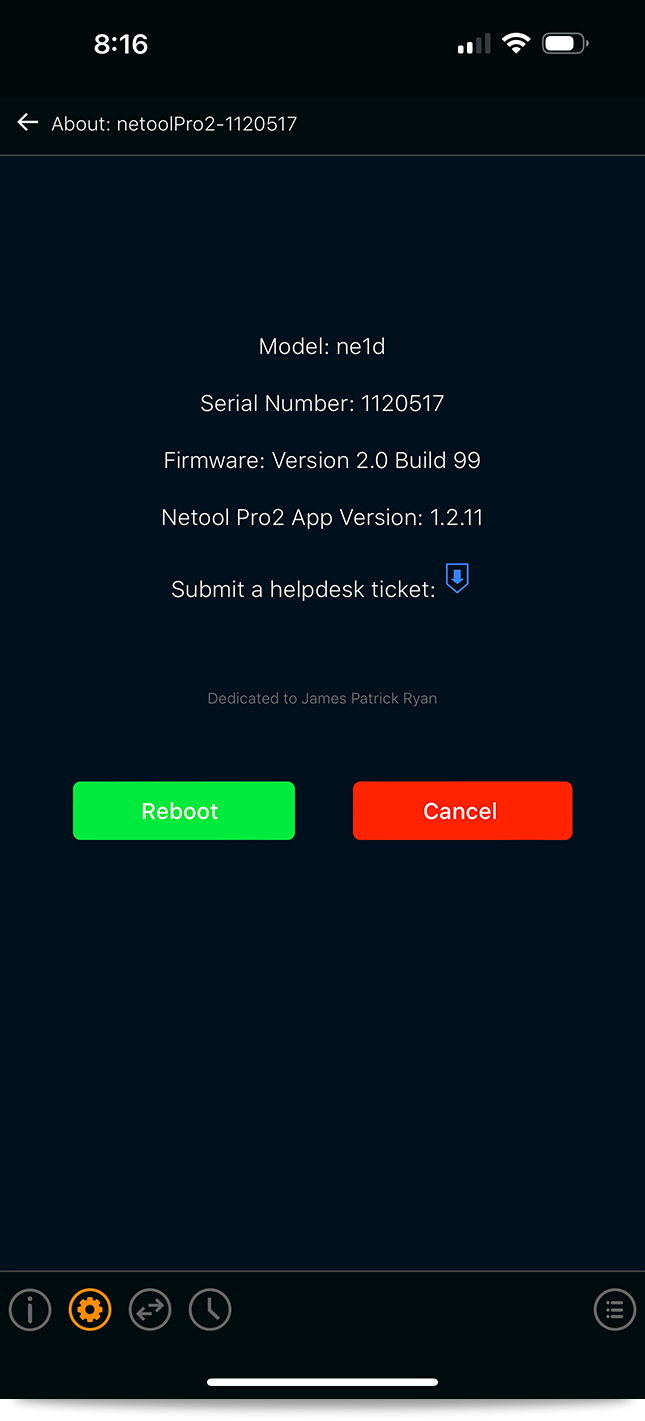
About
- This is where all of the netoolPro2 information will be displayed.
¶ Toggle Switches
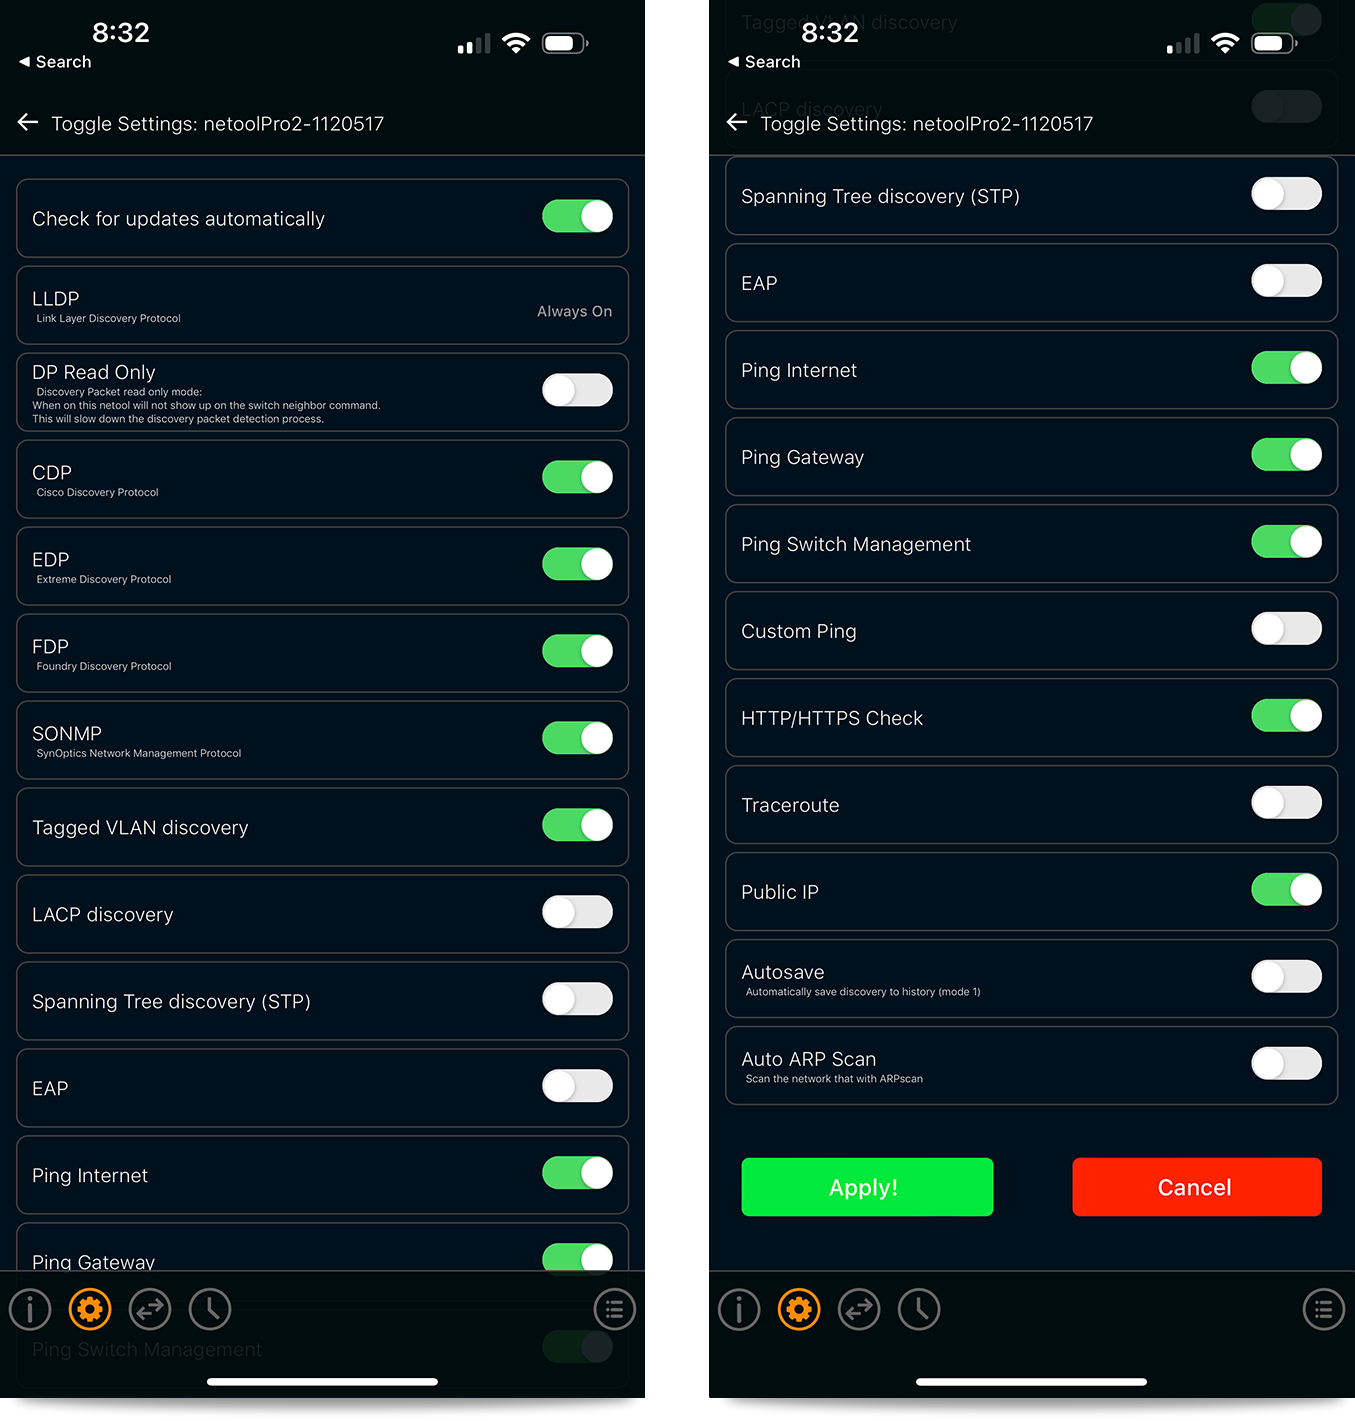
- Here are all the netoolPro2 settings for packet detection.
¶ Discovery Protocols
- There are different discovery protocols to choose from like LLDP, CDP, EDP, FDP, and SONMP. Depending on what protocol the switch in which the netoolPro2 is being used on.
- LLDP: By default this protocol is always being captured.
- DP Read Only: This enables the discovery of packets without broadcasting LLDP.
- CDP: This will enable Cisco discovery protocol detection.
- EDP: This will enable Extreme discovery protocol detection.
- FDP: This will enable Foundry discovery protocol detection.
- SONMP: This will enable SynOptics Network Management protocol detection.
¶ Protocol Discovery
- Different discoveries can be set here like Tagged VLAN discovery, LACP discovery, Spanning Tree discovery, ARP Scan, and EAP.
- Tagged VLAN discovery: This will enable the discovery of Tagged VLANs. This is done by packet sniffing the LAN interface of the netool.io Lite for 802.1Q traffic. If 802.1Q traffic is not detected from a given VLAN then the VLAN id will not be shown.
- LACP discovery: This will enable the discovery of Link Aggregation Control Protocol.
- Spanning Tree discovery (STP): This will enable the discovery of Spanning Tree packets. This is done by packeting sniffing for STP packets on the LAN interface of your netool.io Pro2. If a STP packet is found then the netool.io Pro2 will decode the packet and show that it has been found on the main menu of the netool.io Pro2 app. You can also tap ether on the STP icon on the front menu or tap on the STP details menu in the settings menu to get the decoded detail output from this packet.
¶ Ping and ARP Discovery
- All of the Ping and trace-route options can be set here along with ARP discovery.
- EAP: This enables the discovery of Extensible Authentication Protocol
- Ping Internet: This will enable an active ping to google.com
- Ping Gateway: This will enable an active ping to the Gateway IP.
- Ping Switch Management: This will enable an active ping to the Management IP of the switch.
- Custom Ping: This will enable to ping any IP address .
- HTTP/HTTPS Check: This will enable an active check of HTTP/HTTPS
- Trace-route: This will enable a custom trace-route.
- Public IP: This enable the netoolPro2 to discover the Public IP address.
- Auto Save: This will enable the auto save in the form of TAGs every time the netoolPro2 get used.
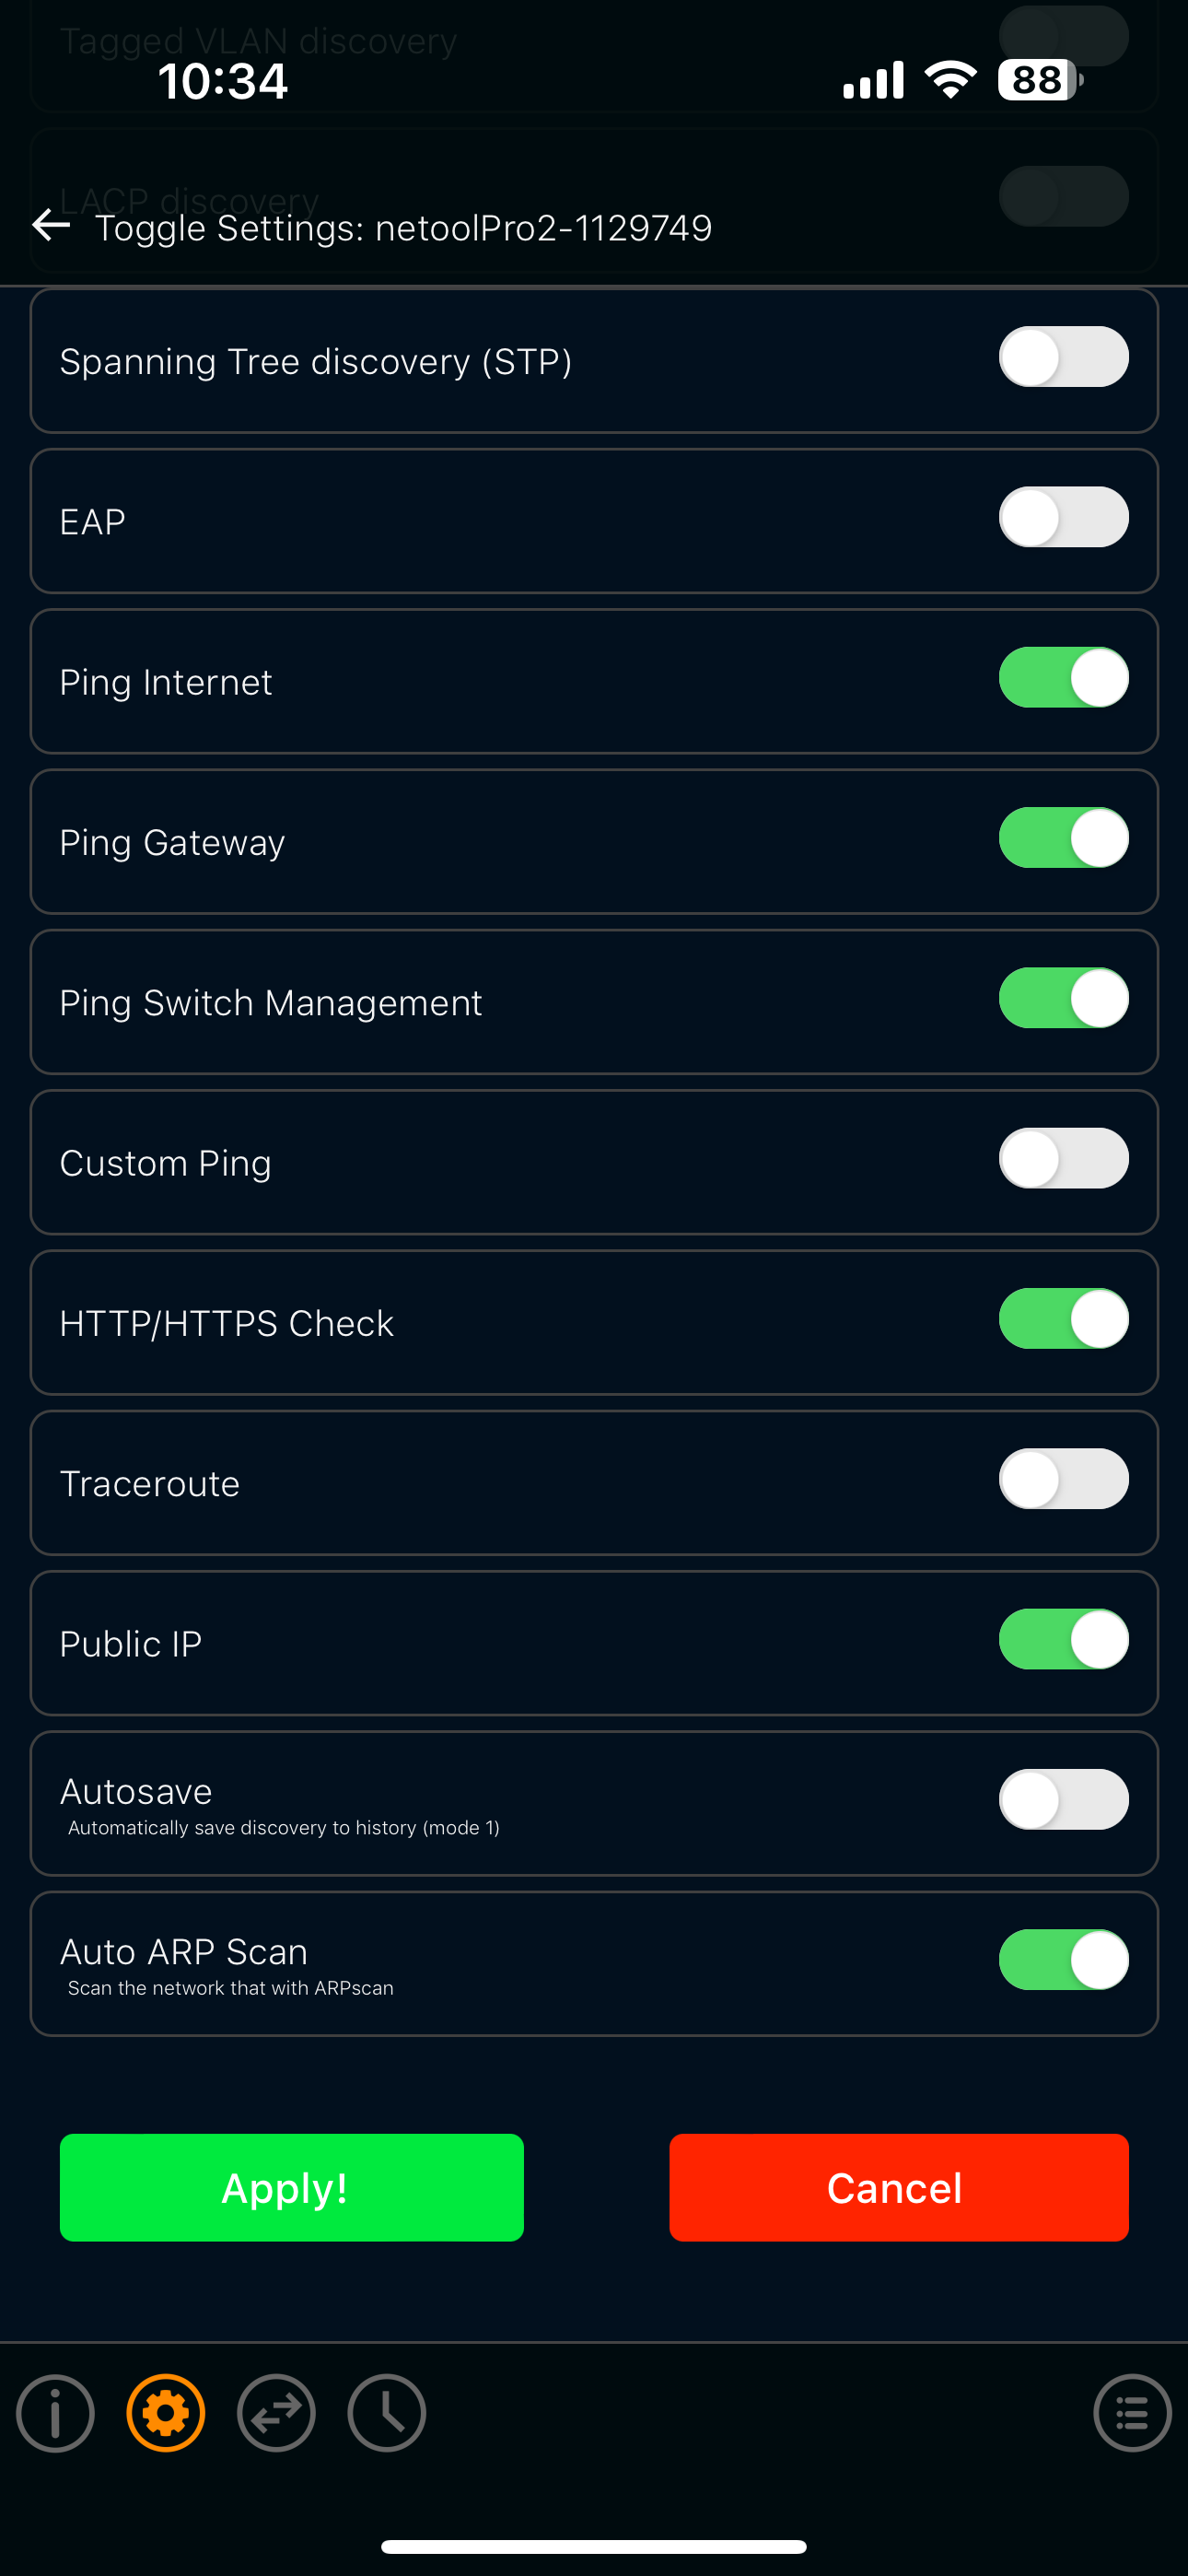
- Auto ARP Scan: This enable the scanning of ARP packet coming through the port.
¶ Wi-Fi
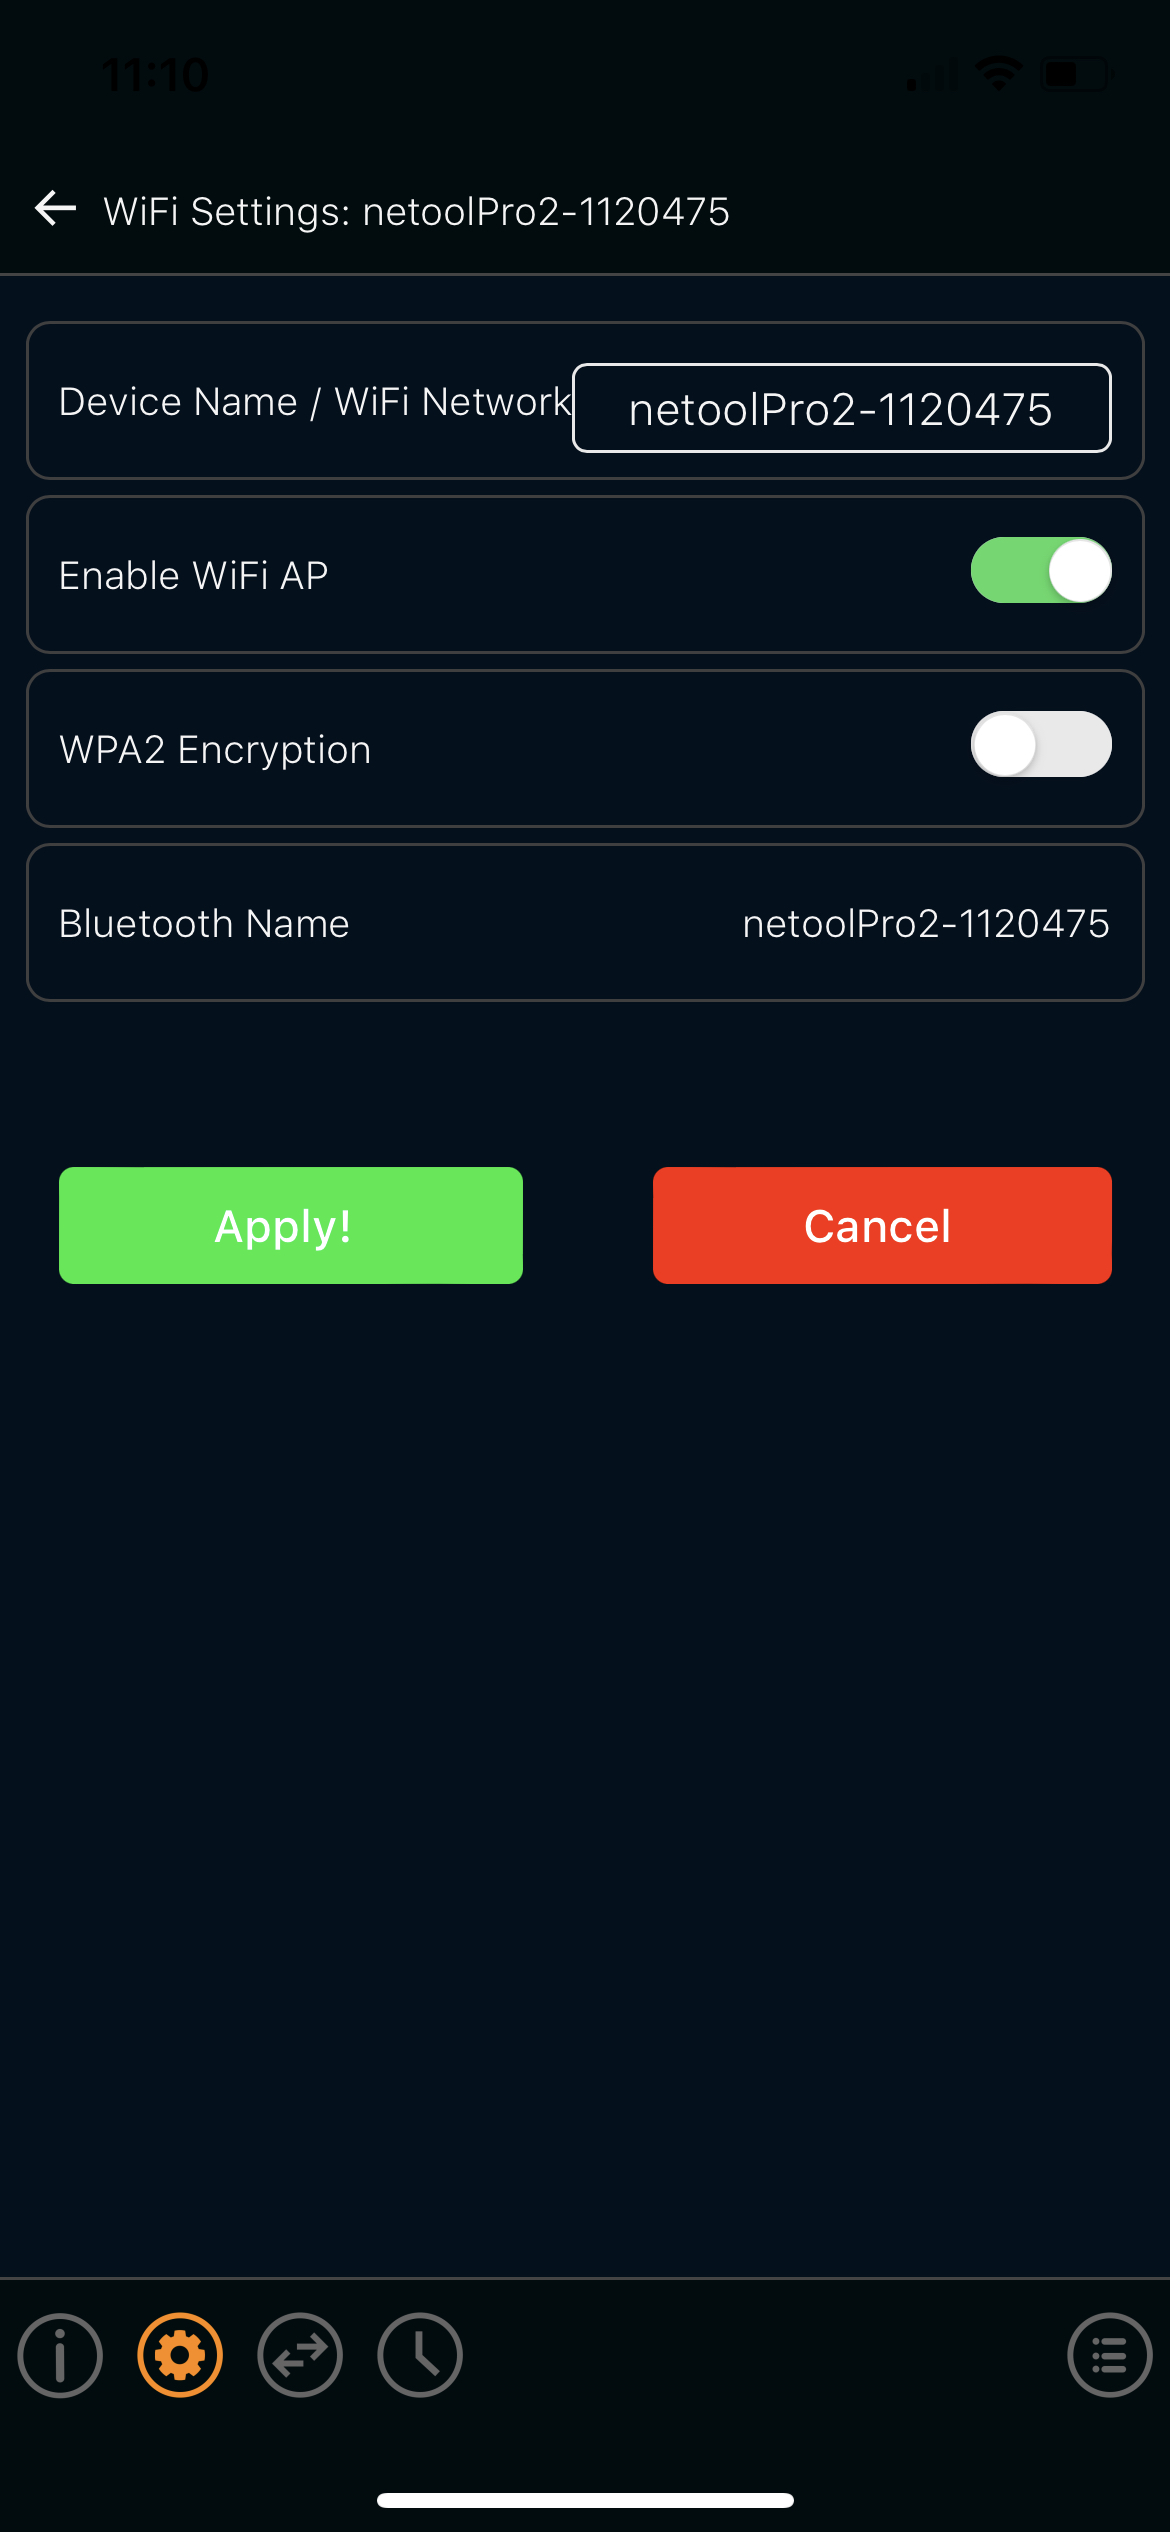
- Device Name / Wifi Network: Here you can set the netoolPro2 SSID or device name
- Enable Wifi AP: This is where WiFI AP can be disabled or enabled
- WPA2 Encryption: This tap enables encrypted password to be setup.
- Bluetooth Name: This is where the Bluetooth name being shown, can be changed.
¶ Ethernet Port
- Mac Address: The MAC address can be changed here
- Simple Router mode: This is on by default and it allows to access the internet through the netoolPro2 if it is connect to a port with access to the web.
- Management over LAN: Enable the ability to control the netoolPro2 over the same network.
- DHCP: A static IP address can be assigned and DHCP can be disabled.
- Tagged VLAN: If a VLAN is needed to be Tagged on this port it can be configured here.
¶ Rconsole - WiFi only
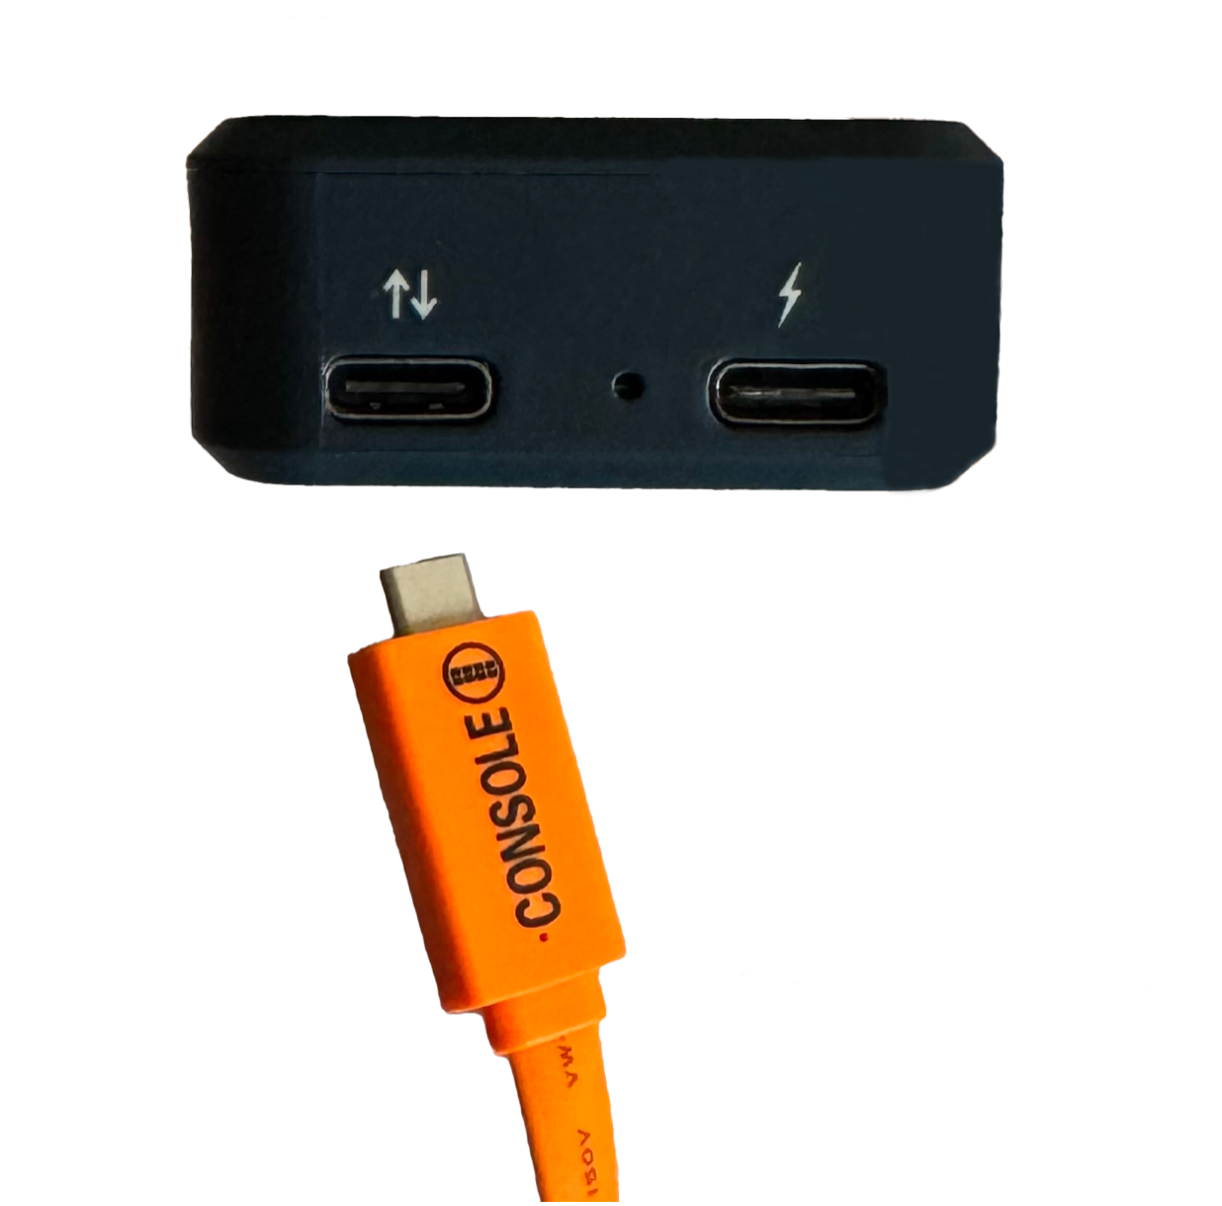
- Plug in Console cable into data USB-c port, that is located at the bottom of the netool.
- This will make the icon “ CONSOLE CABLE “ appear on the right side of the info screen.
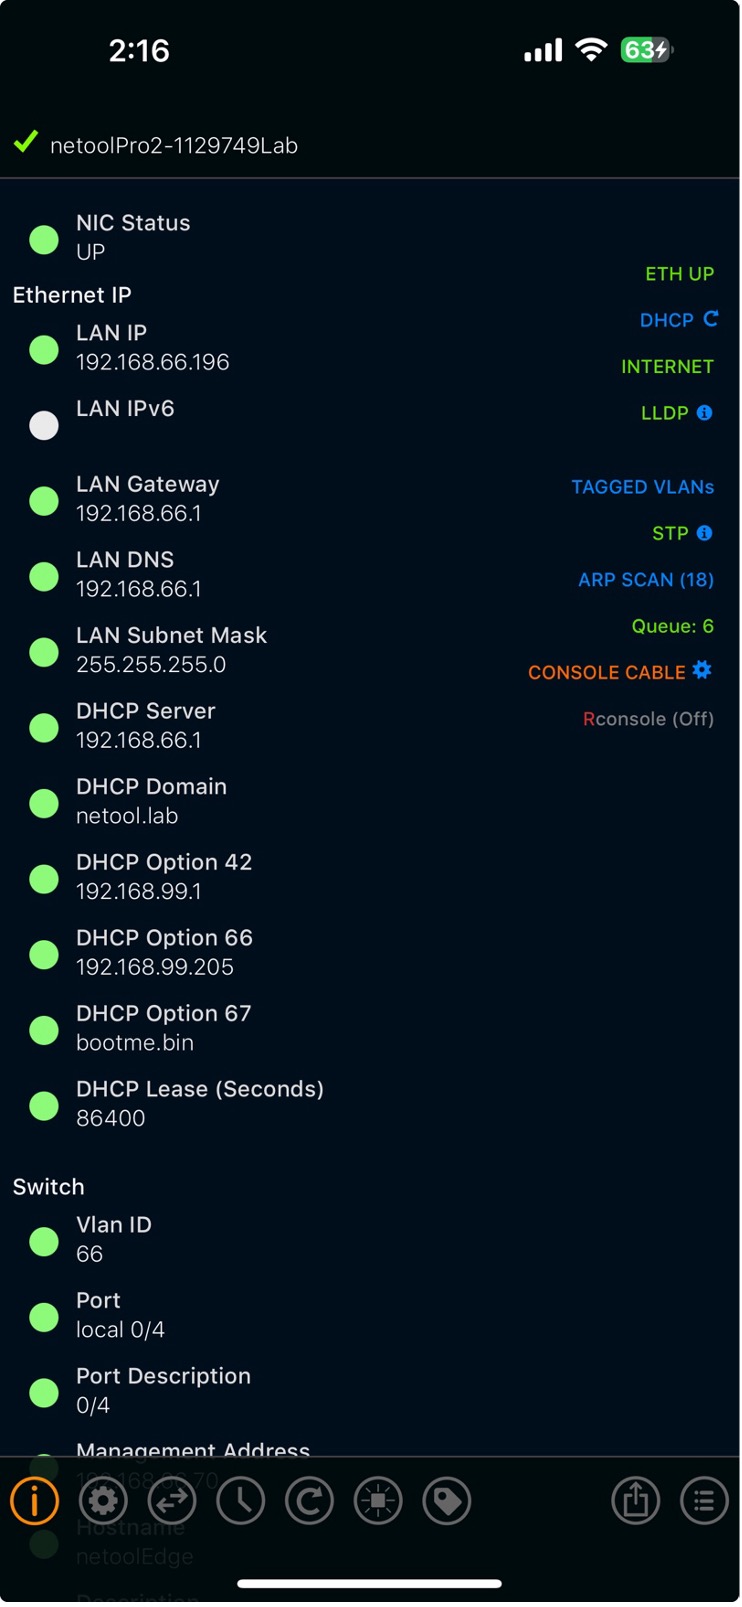
- By tapping the “CONSOLE CABLE” icon it will take you to the Rconsole settings.
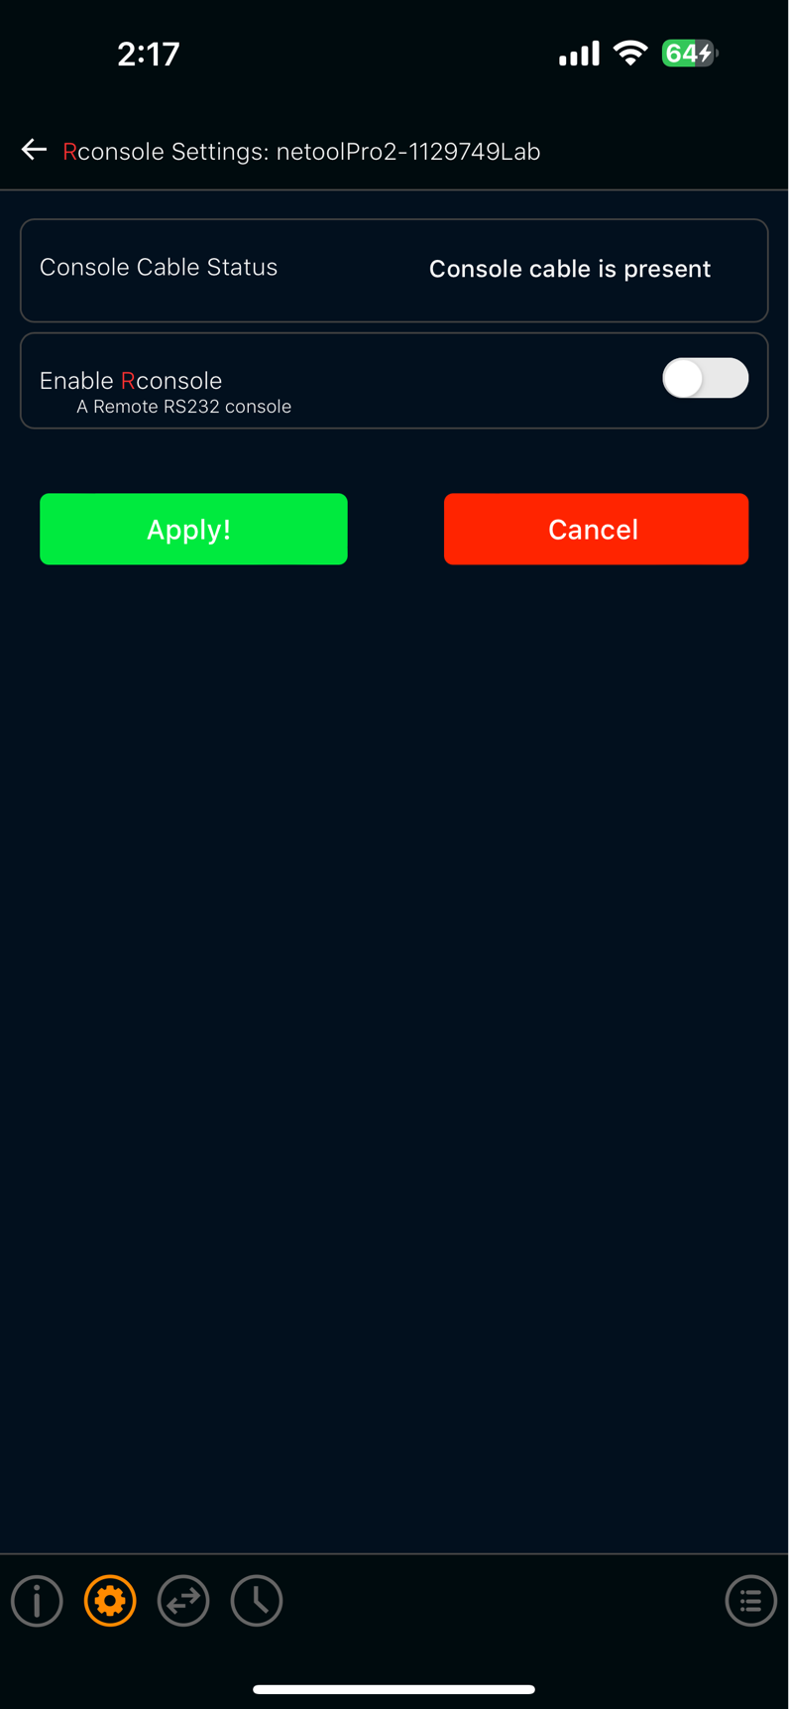
- Once in the Rconsole settings, tap on “Enable Rconsole”, set the settings for the switch connection, and tap "Apply!".
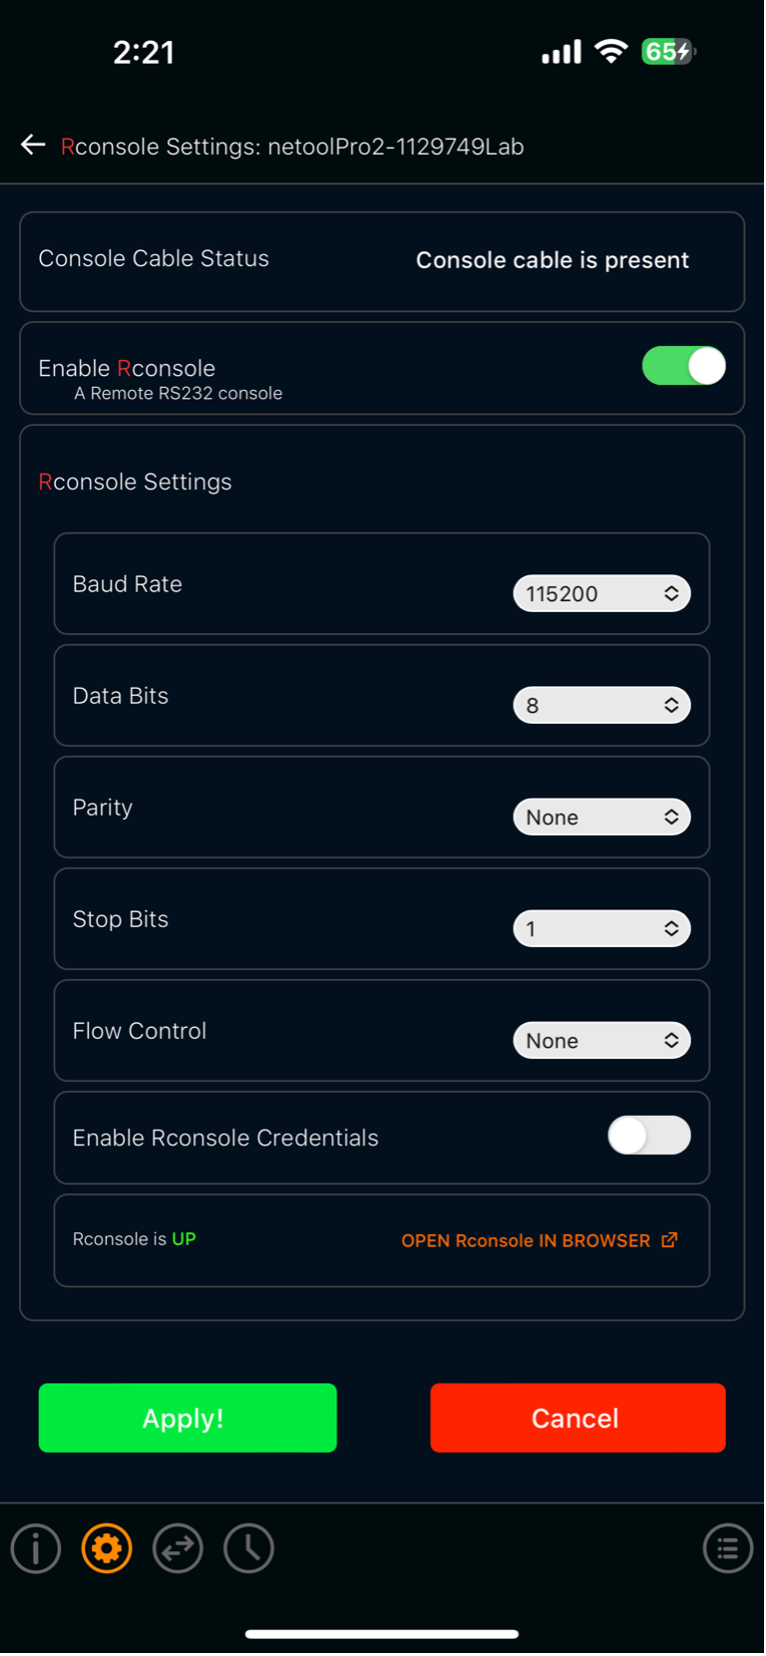
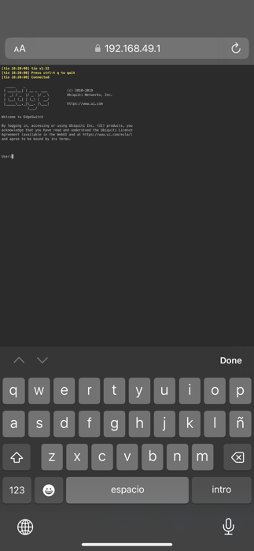
- Once the settings are set and applied, tap the “OPEN CONSOLE IN BROWSER” icon.
- This will open the default browser with a connection to the switch.
¶ 802.1X - BETA
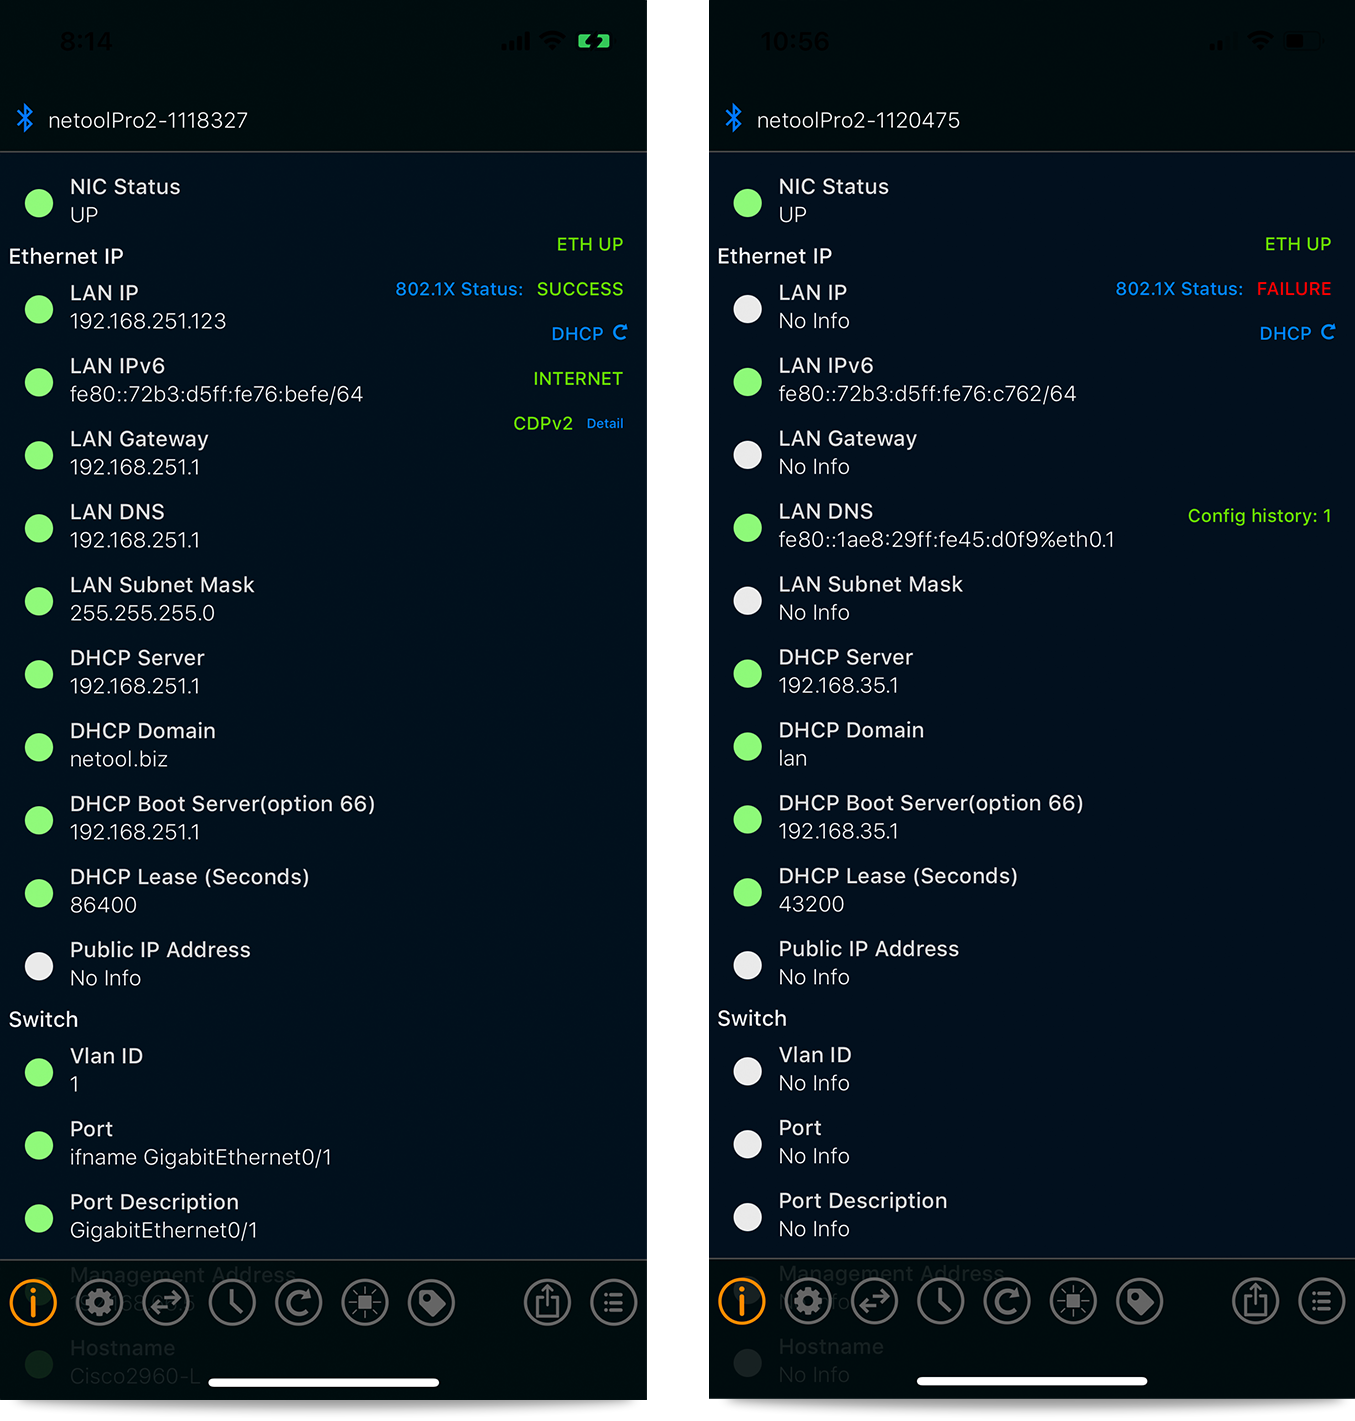
- Test if 802.1X is configured correctly
- Simply enable the tab and fill in the Username and Password and a 802.1X icon will appear on the home screen.
¶ netool.cloud
- Video example on enabling 2fa Youtube
- Once in netool.cloud tab, turn on the netool cloud and the Tag history SYNC and then hit apply.
- Then there will be a unique netool cloud-ID generated.
- This cloud-ID can be shared by tapping the share icon next to it.
- Once you have netool cloud-ID go to netool.cloud and register.
- Then click + Add Cloud ID and apply the netool cloud-ID.
- Now all of the tagged entries in the netool will appear.
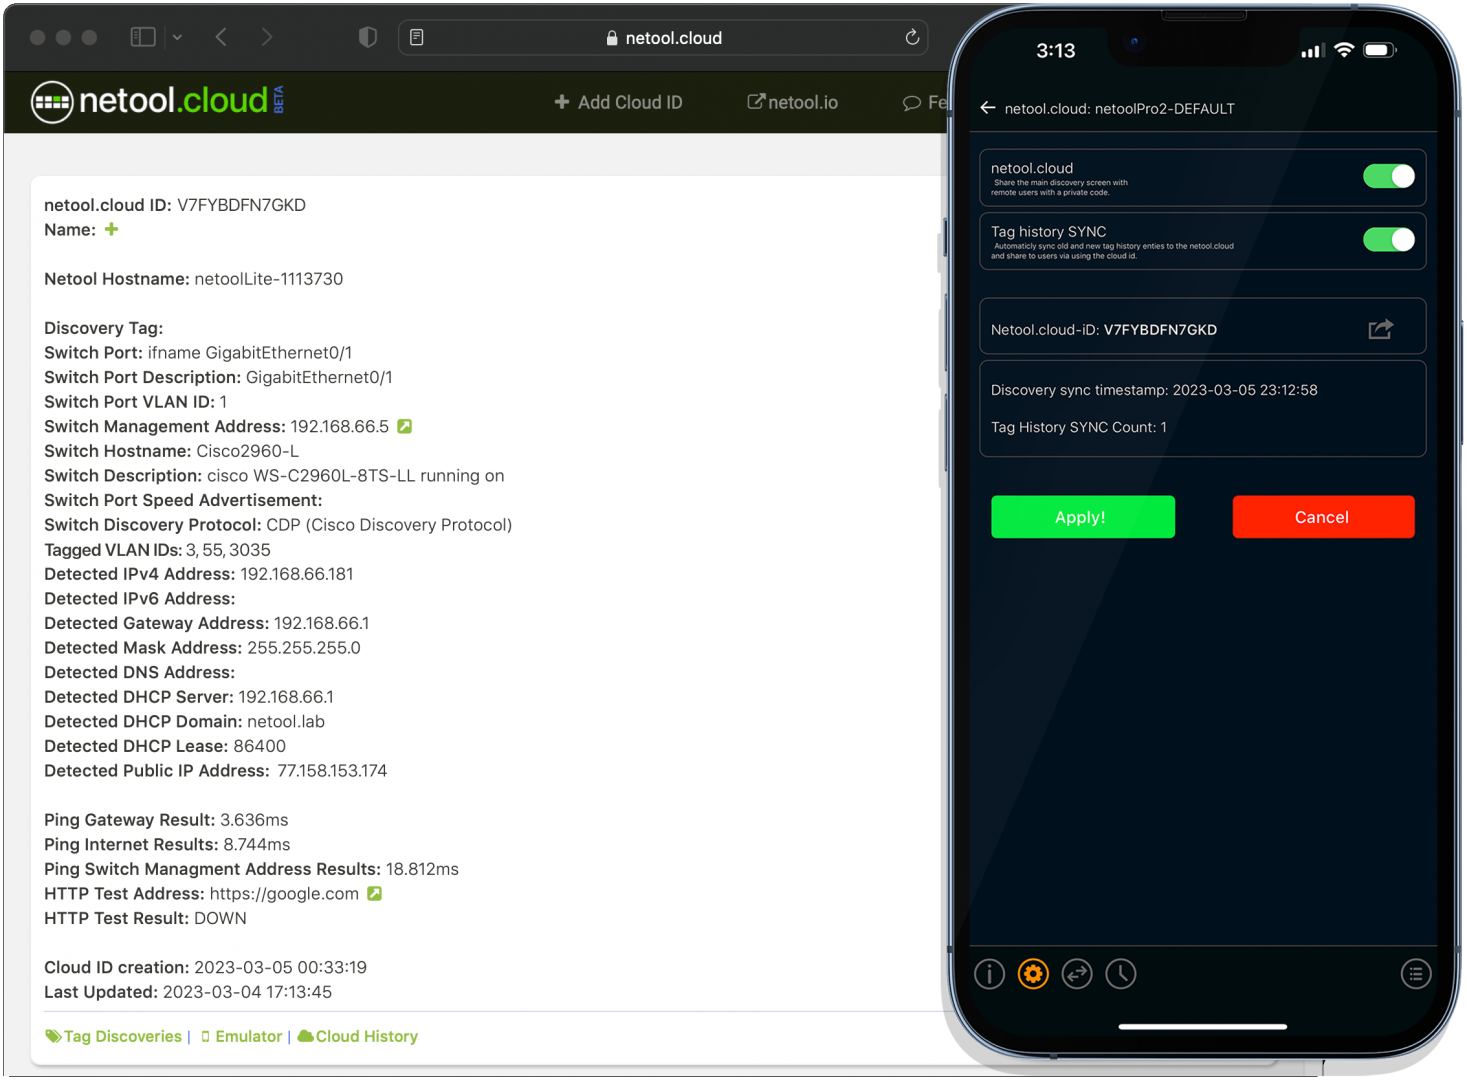
- This enables the sharing of Tags in a secure platform.
- Upload all of the netoolPro2 Tags to the cloud to be reviewed securely.
- Access is controlled and easily granted if needed.
¶ Discovery timers
- Here is where all the timers for the netoolPro2 can be changed
¶ Network Time Protocol
- Here the netoolPro2 time can be configured
- NTP can be Disabled or enabled
- NTP Server can be configured here and Time Zone.
¶ netool.io Pro2 Features
¶ netool mode: PCAP
- To set netool.io Pro2 into Capture to PCAP, just go into settings and into netool mode and activate Capture to PCAP. The netool.io Pro2 will then restart and it is ready to go.
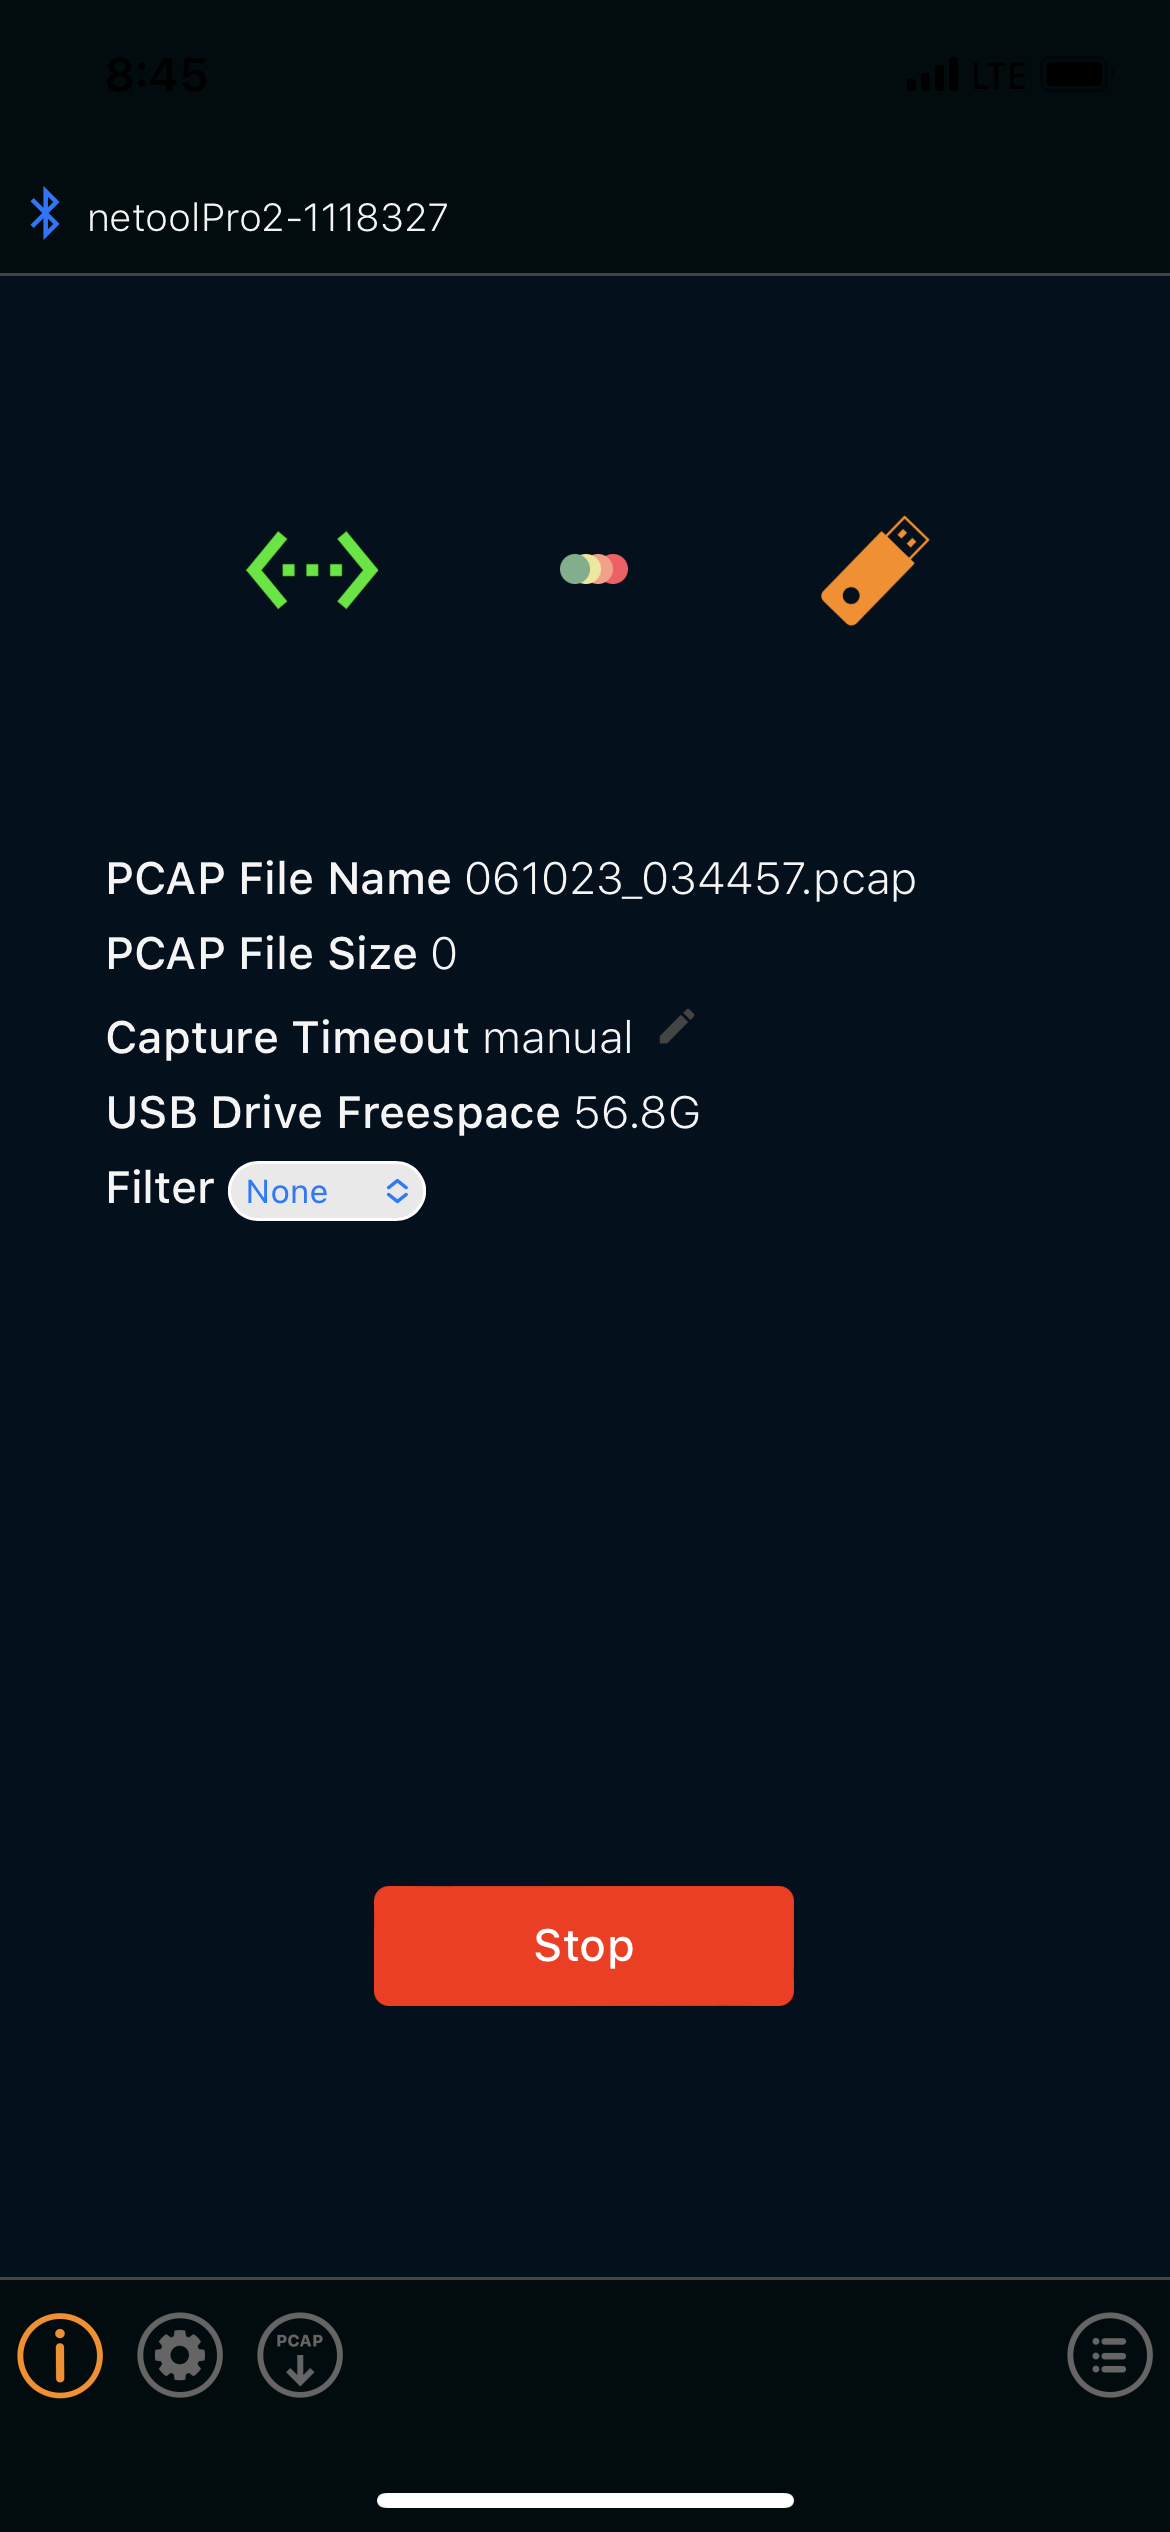
- Once the netoolpro2 has been plugged into the network and the storage device into the USB-C port that is for data transfer, simply tap the icon and it will start capturing all of the traffic.The device will then start saving files and show how much storage is been used.
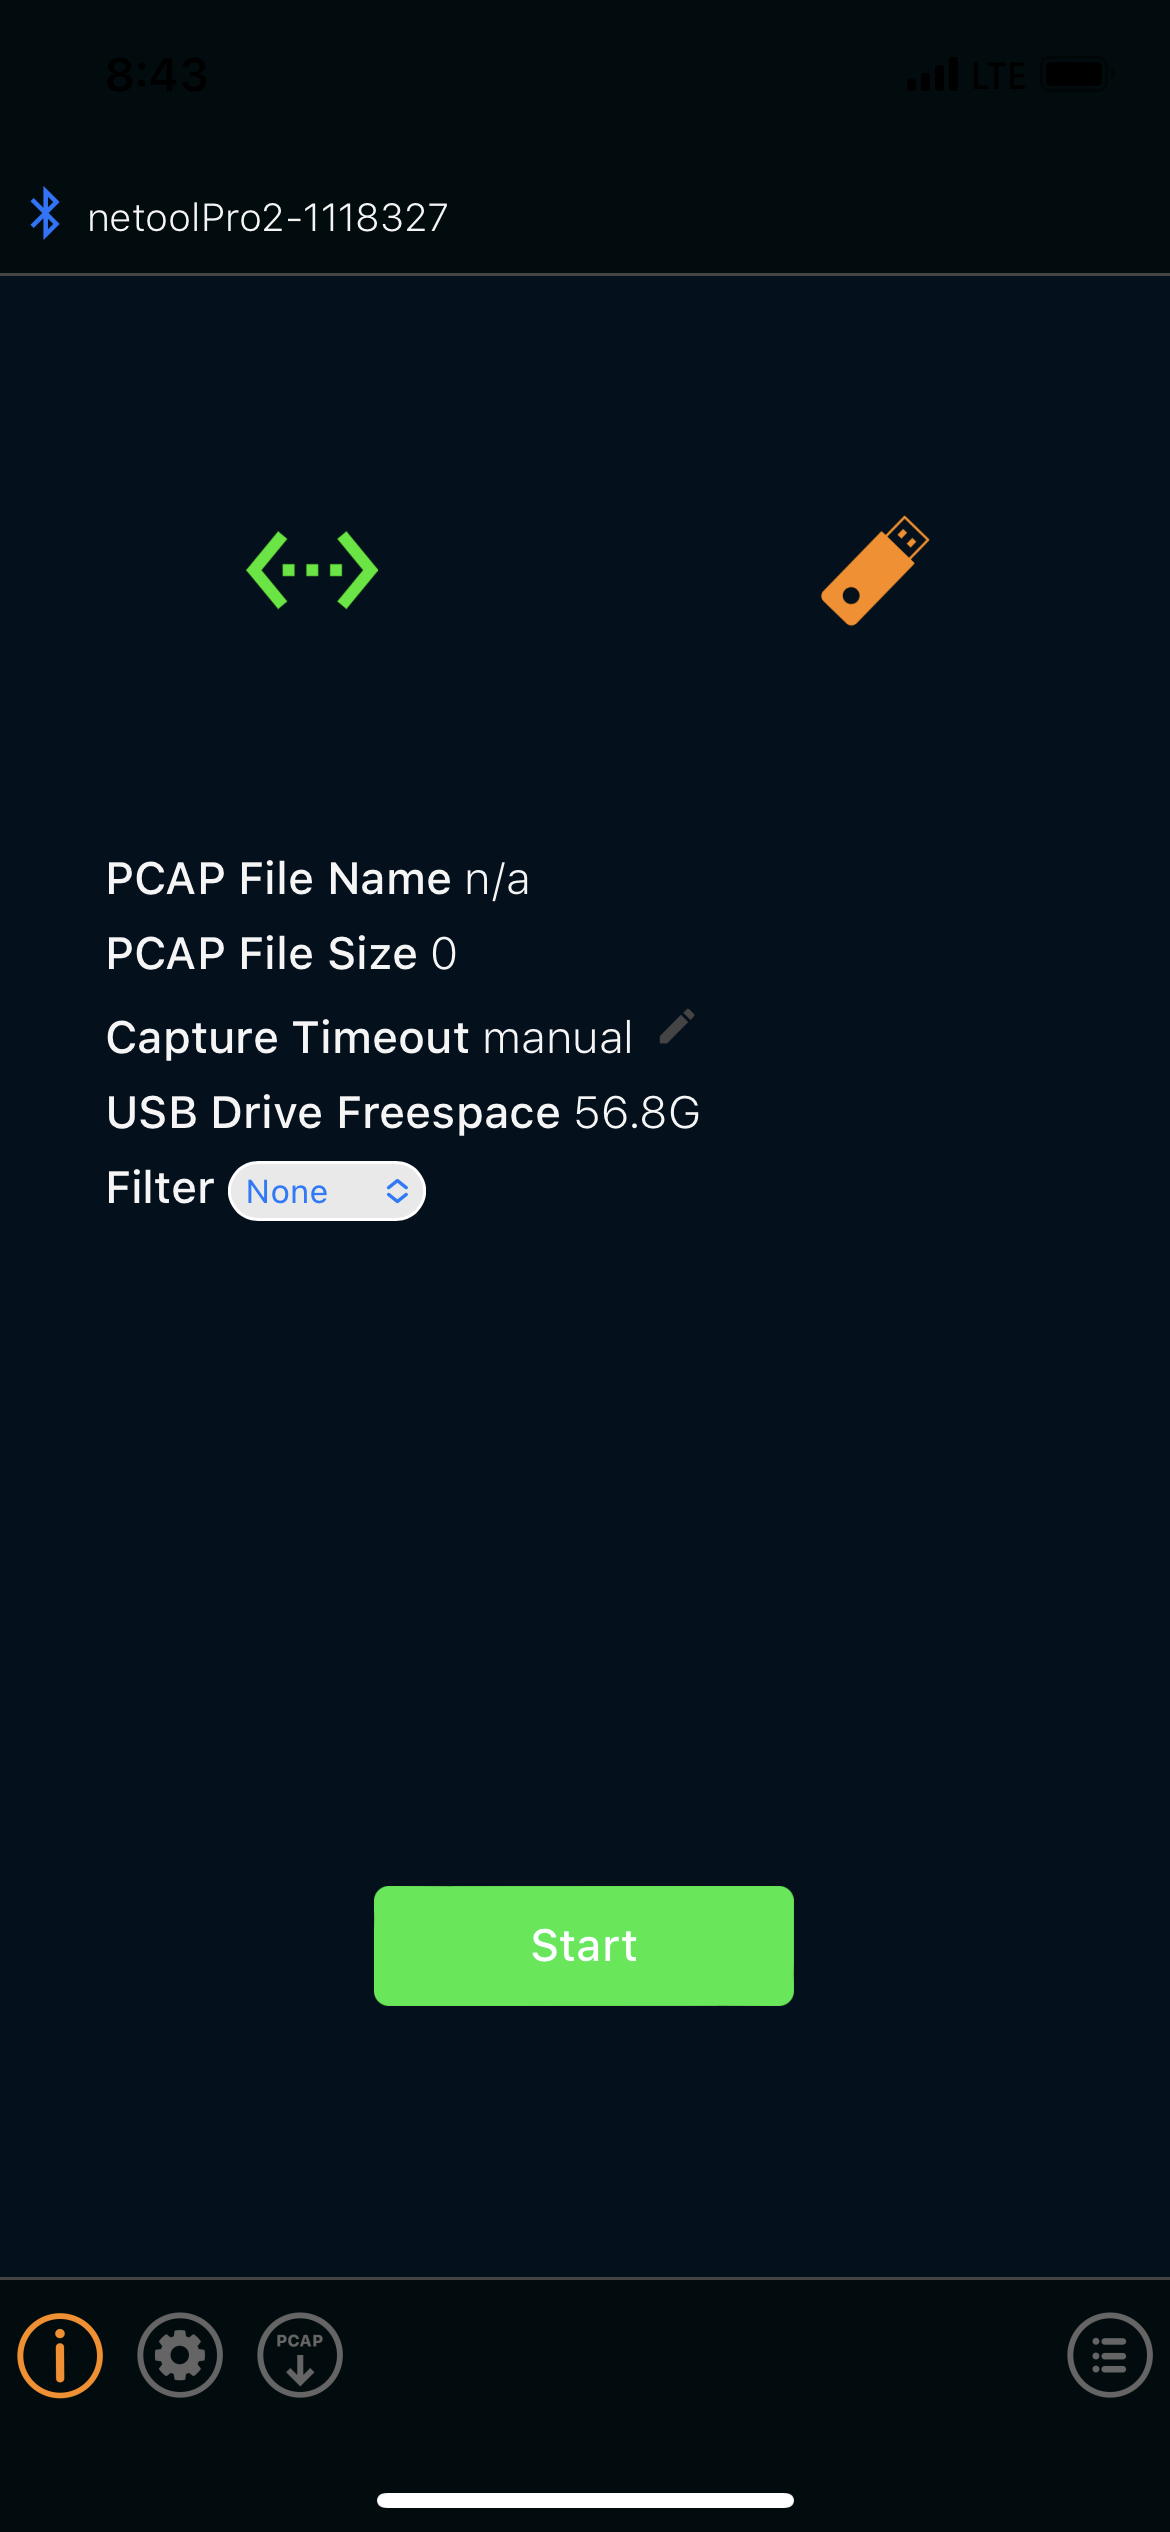
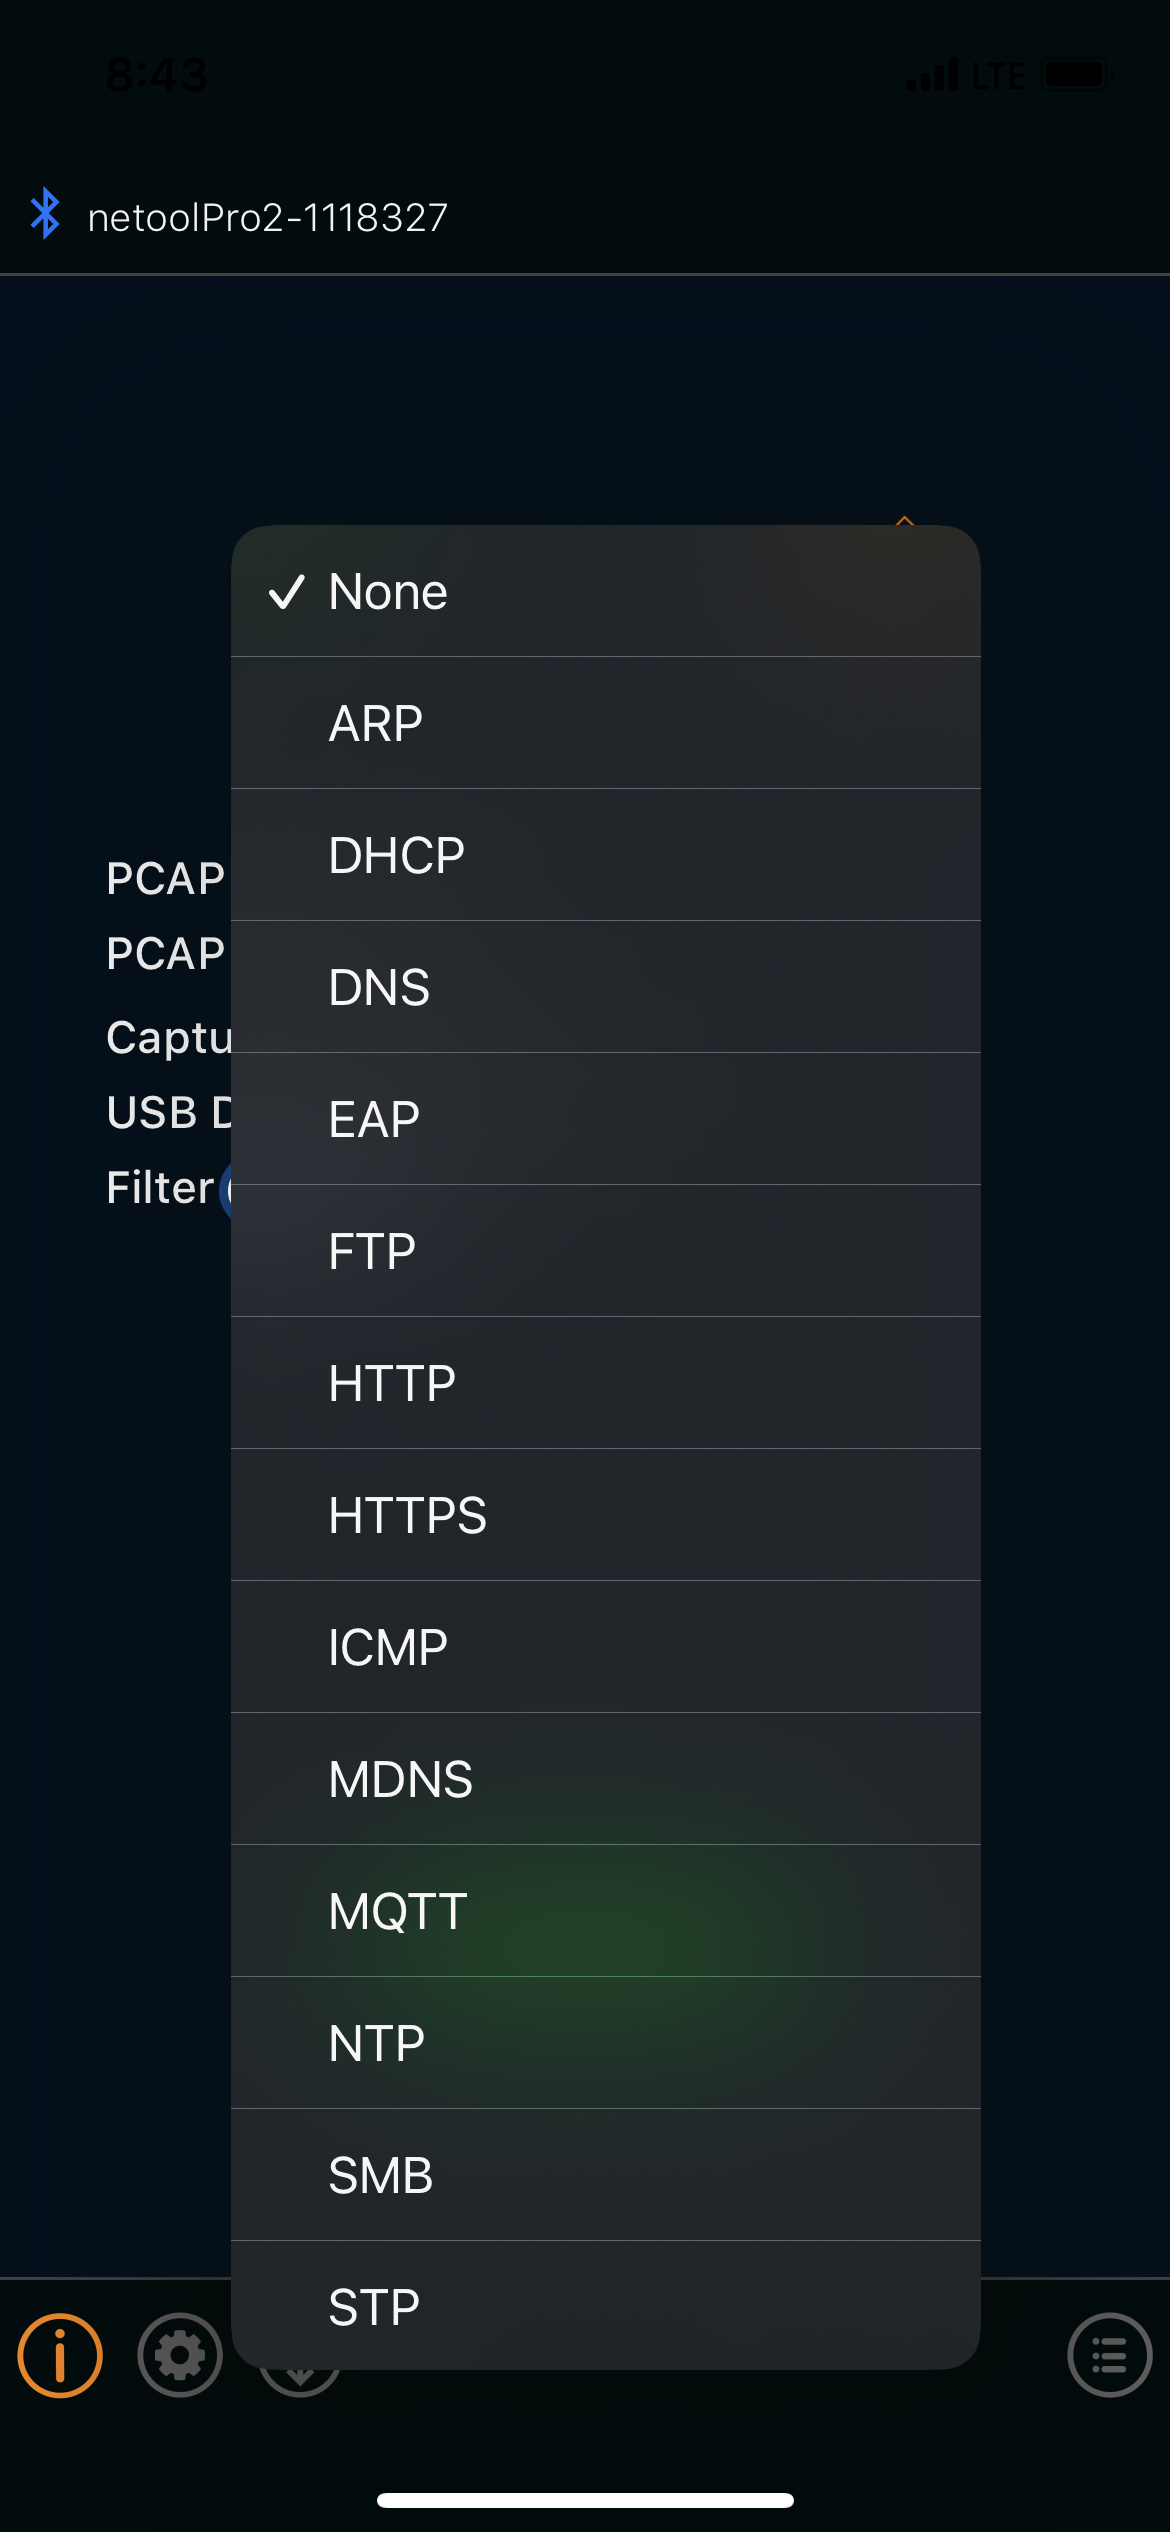
- Filters can also be places, so not all protocols are captured.
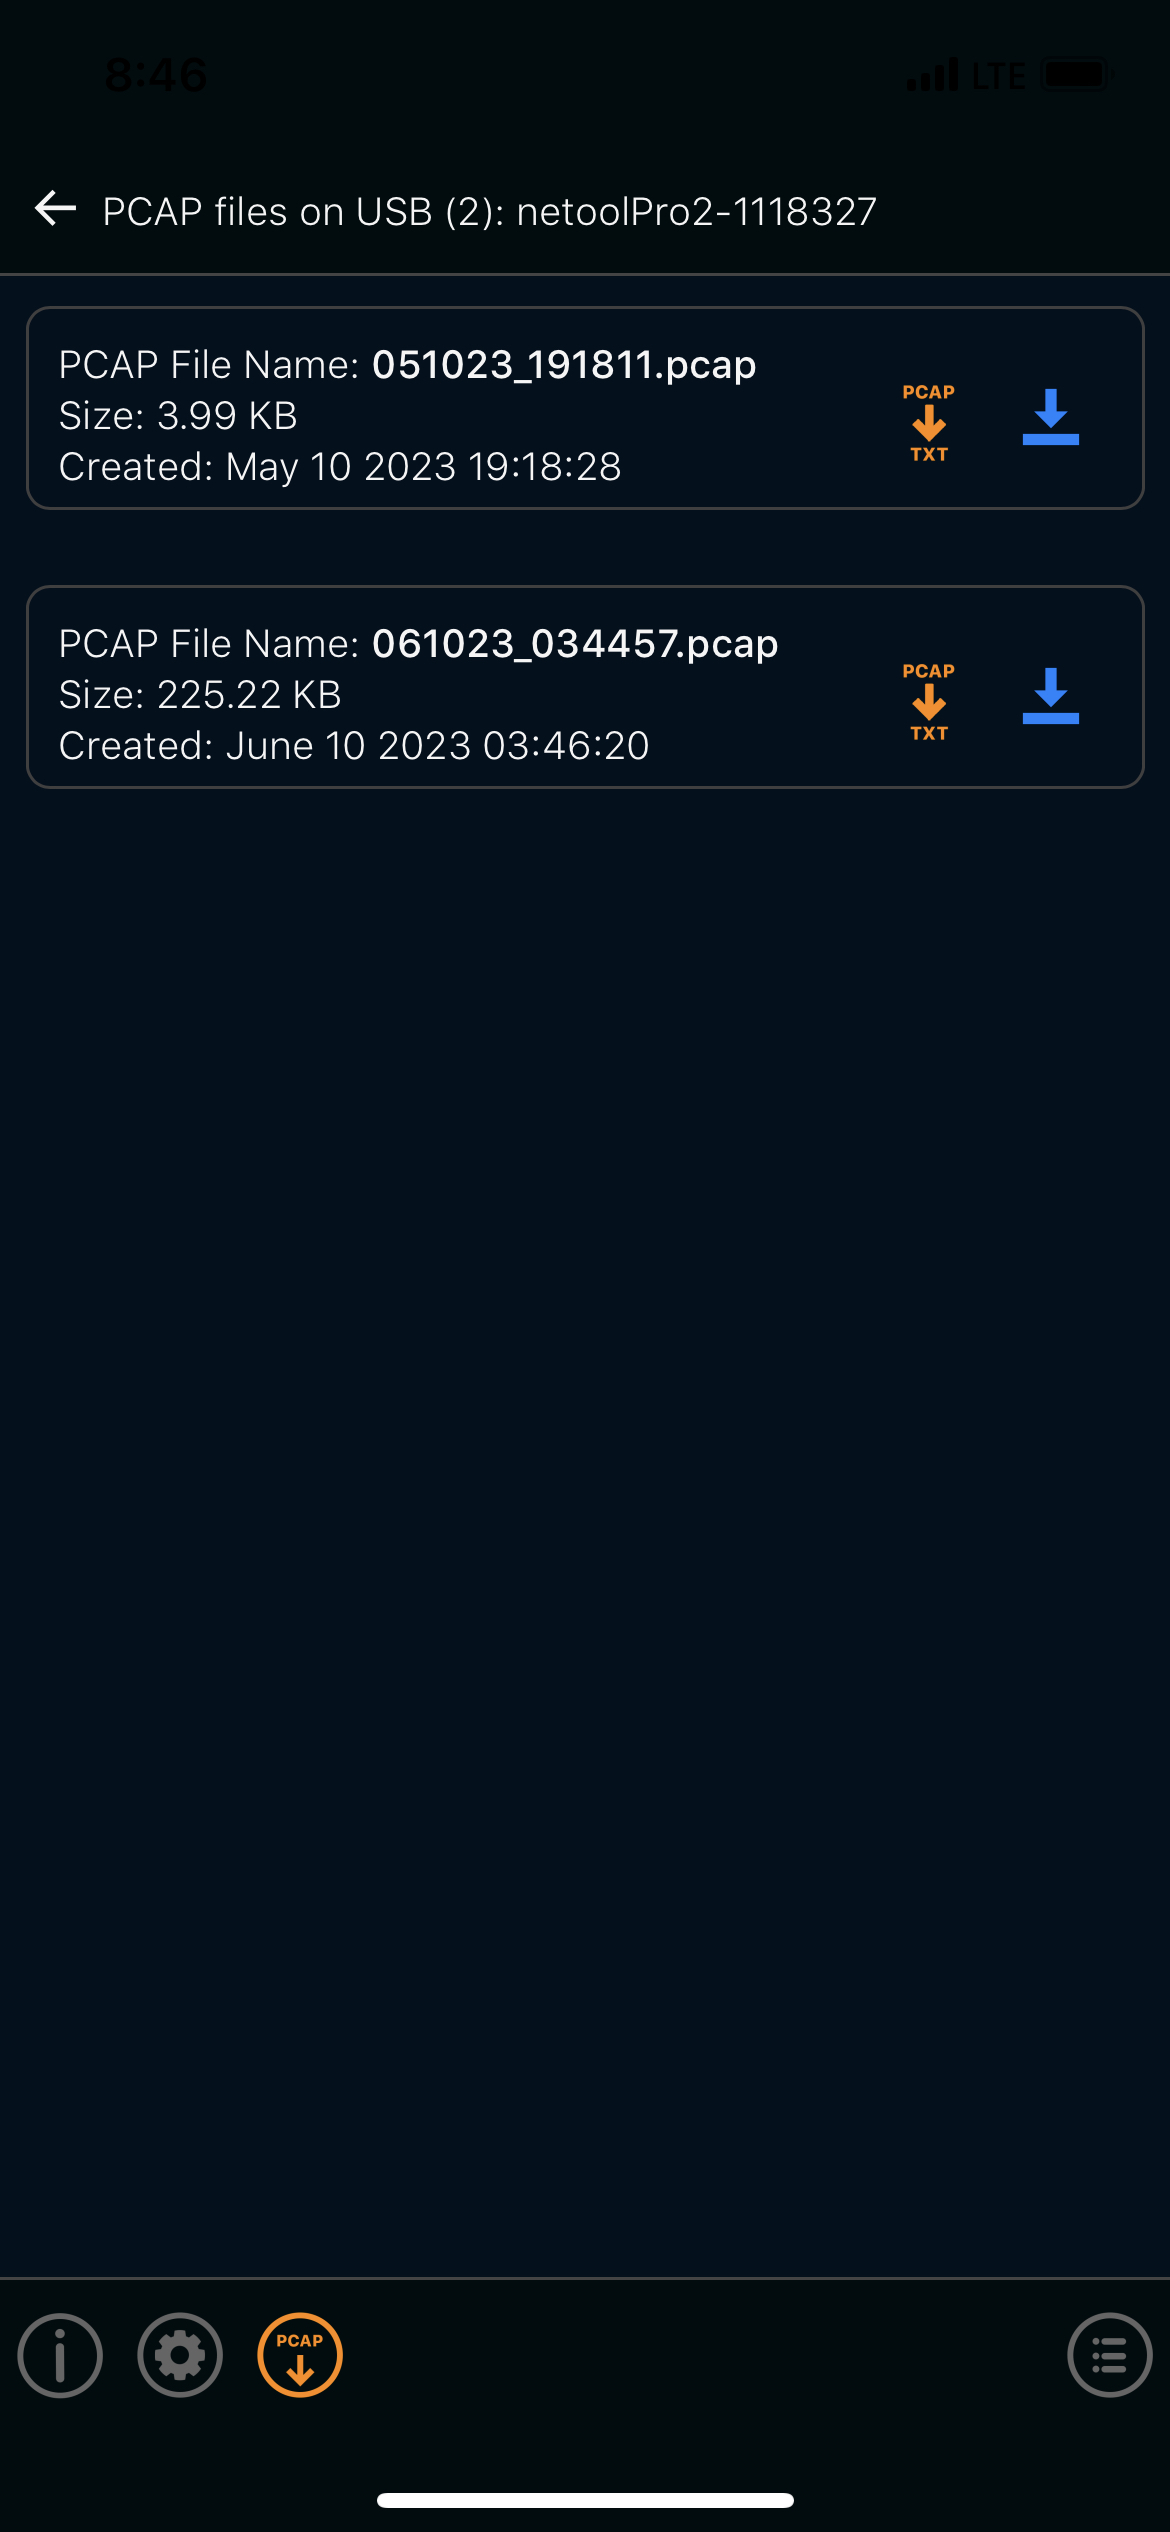
- Once PCAP file has been made, it will be presented in a list of all the PCAP files that have been saved on the portable storage device.
¶ Switch Configurator
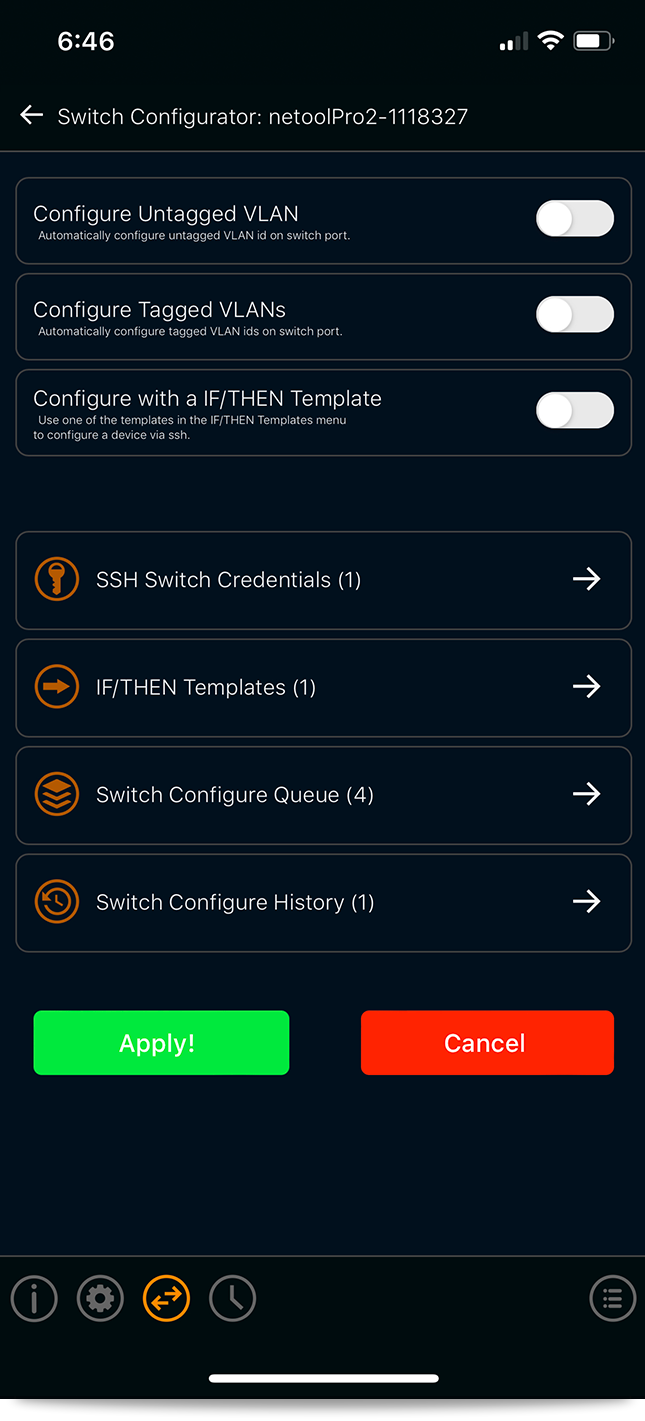
- This allow for the configuration of a switch through a SSH connection.
- To use the switch configurator, you must set SSH credential that will be used to configure Tagged or Untagged VLANs , also for If/Then templates.
- Here is a video on how to get started
¶ SSH Switch Credentials
- Credentials will need to be added depending on what switch and what type of changes will be allowed by each credentials.
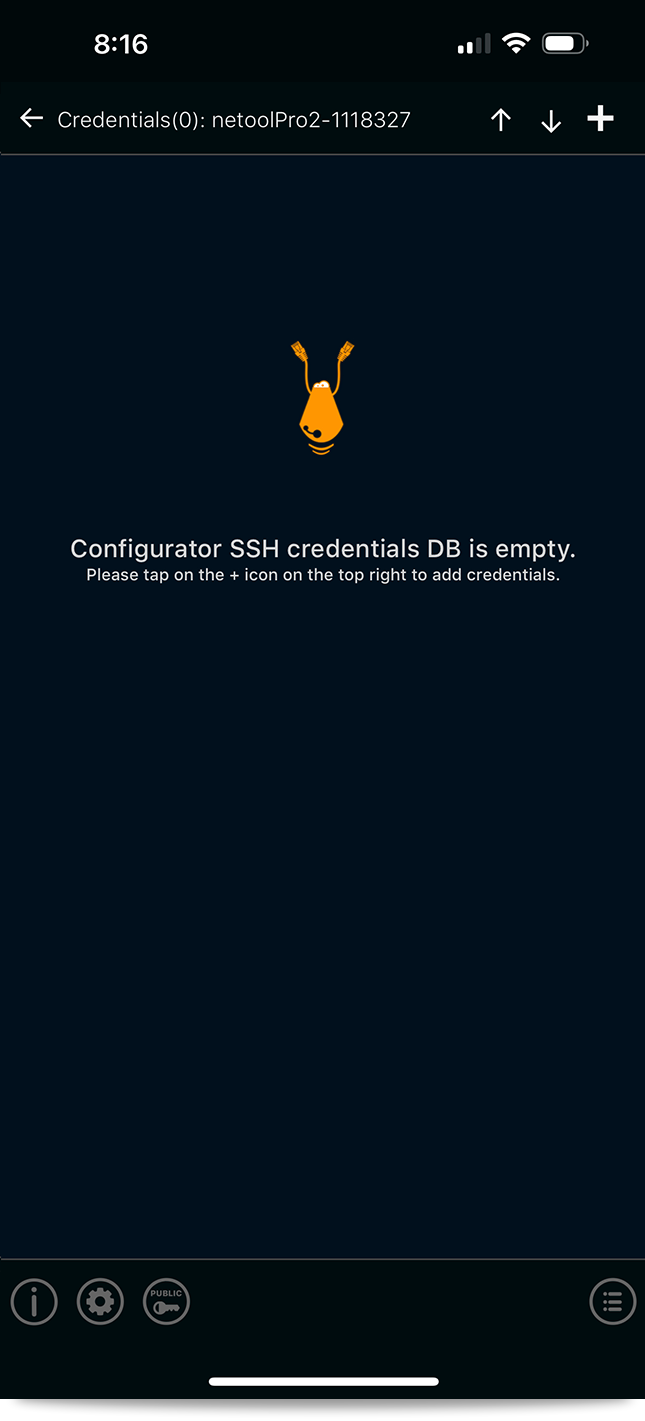
- To do this, just tap the settings tab, then Switch Configurator, and finally, SSH switch credentials tab. Once in this screen, tap the plus symbol on the upper right-hand corner.
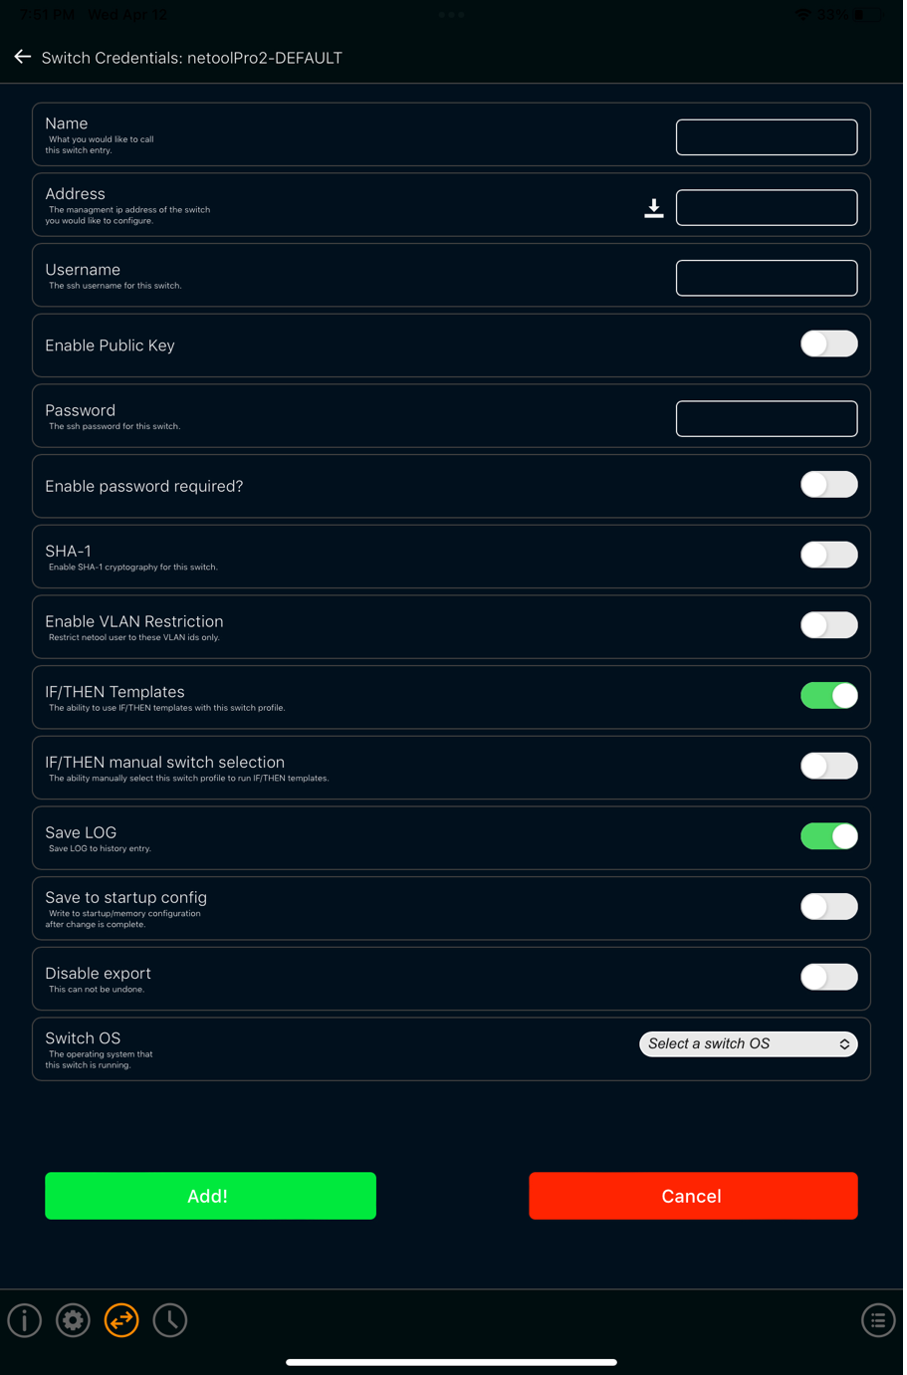
- In this screen, the SSH credentials can be customized to allow only certain configurations.
- Name: Here the credentials can be named
- Address: The IP address of the switch being configured is added here
- Username: Place the SSH username assigned to the switch being configured
- Enable Public Key: Here a public key can be added
- Password: Place the SSH password for the Switch being configured
- Enable Password required?: If the switch being configured has a password set on enable, it is placed here
- SHA-1: this enables SHA-1 cryptography
- Enable VLAN Restrictions: It is possible to only let these credentials assign only a certain VLAN
- IF/THEN Templates: This will allow these credentials to use IF/THEN templates.
- IF/THEN manual switch selection: This will allow for these credentials to manual select different profile to run IF/THEN templates
- Save LOG: This enable the saving of configurations done by these credentials.
- Save to Startup config: If this is enabled, all changes done by these credentials will save to the startup config.
- Disable export: If this is enabled, these credentials will not be allowed to export any templates. if this is enabled it can not be changed.
- Switch OS: Here the OS of the switch being configured can be chosen. With new choices coming soon.
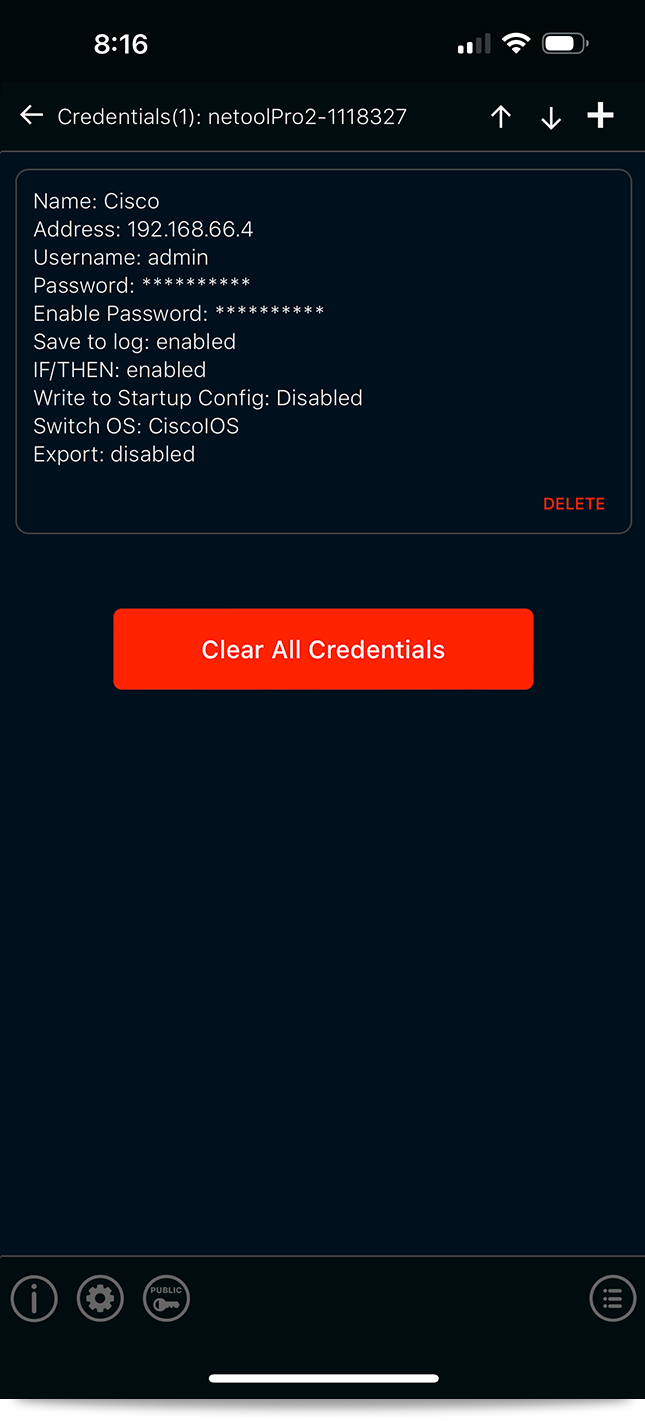
Once credentials have been made, there will be a list of all available credentials that have been created.
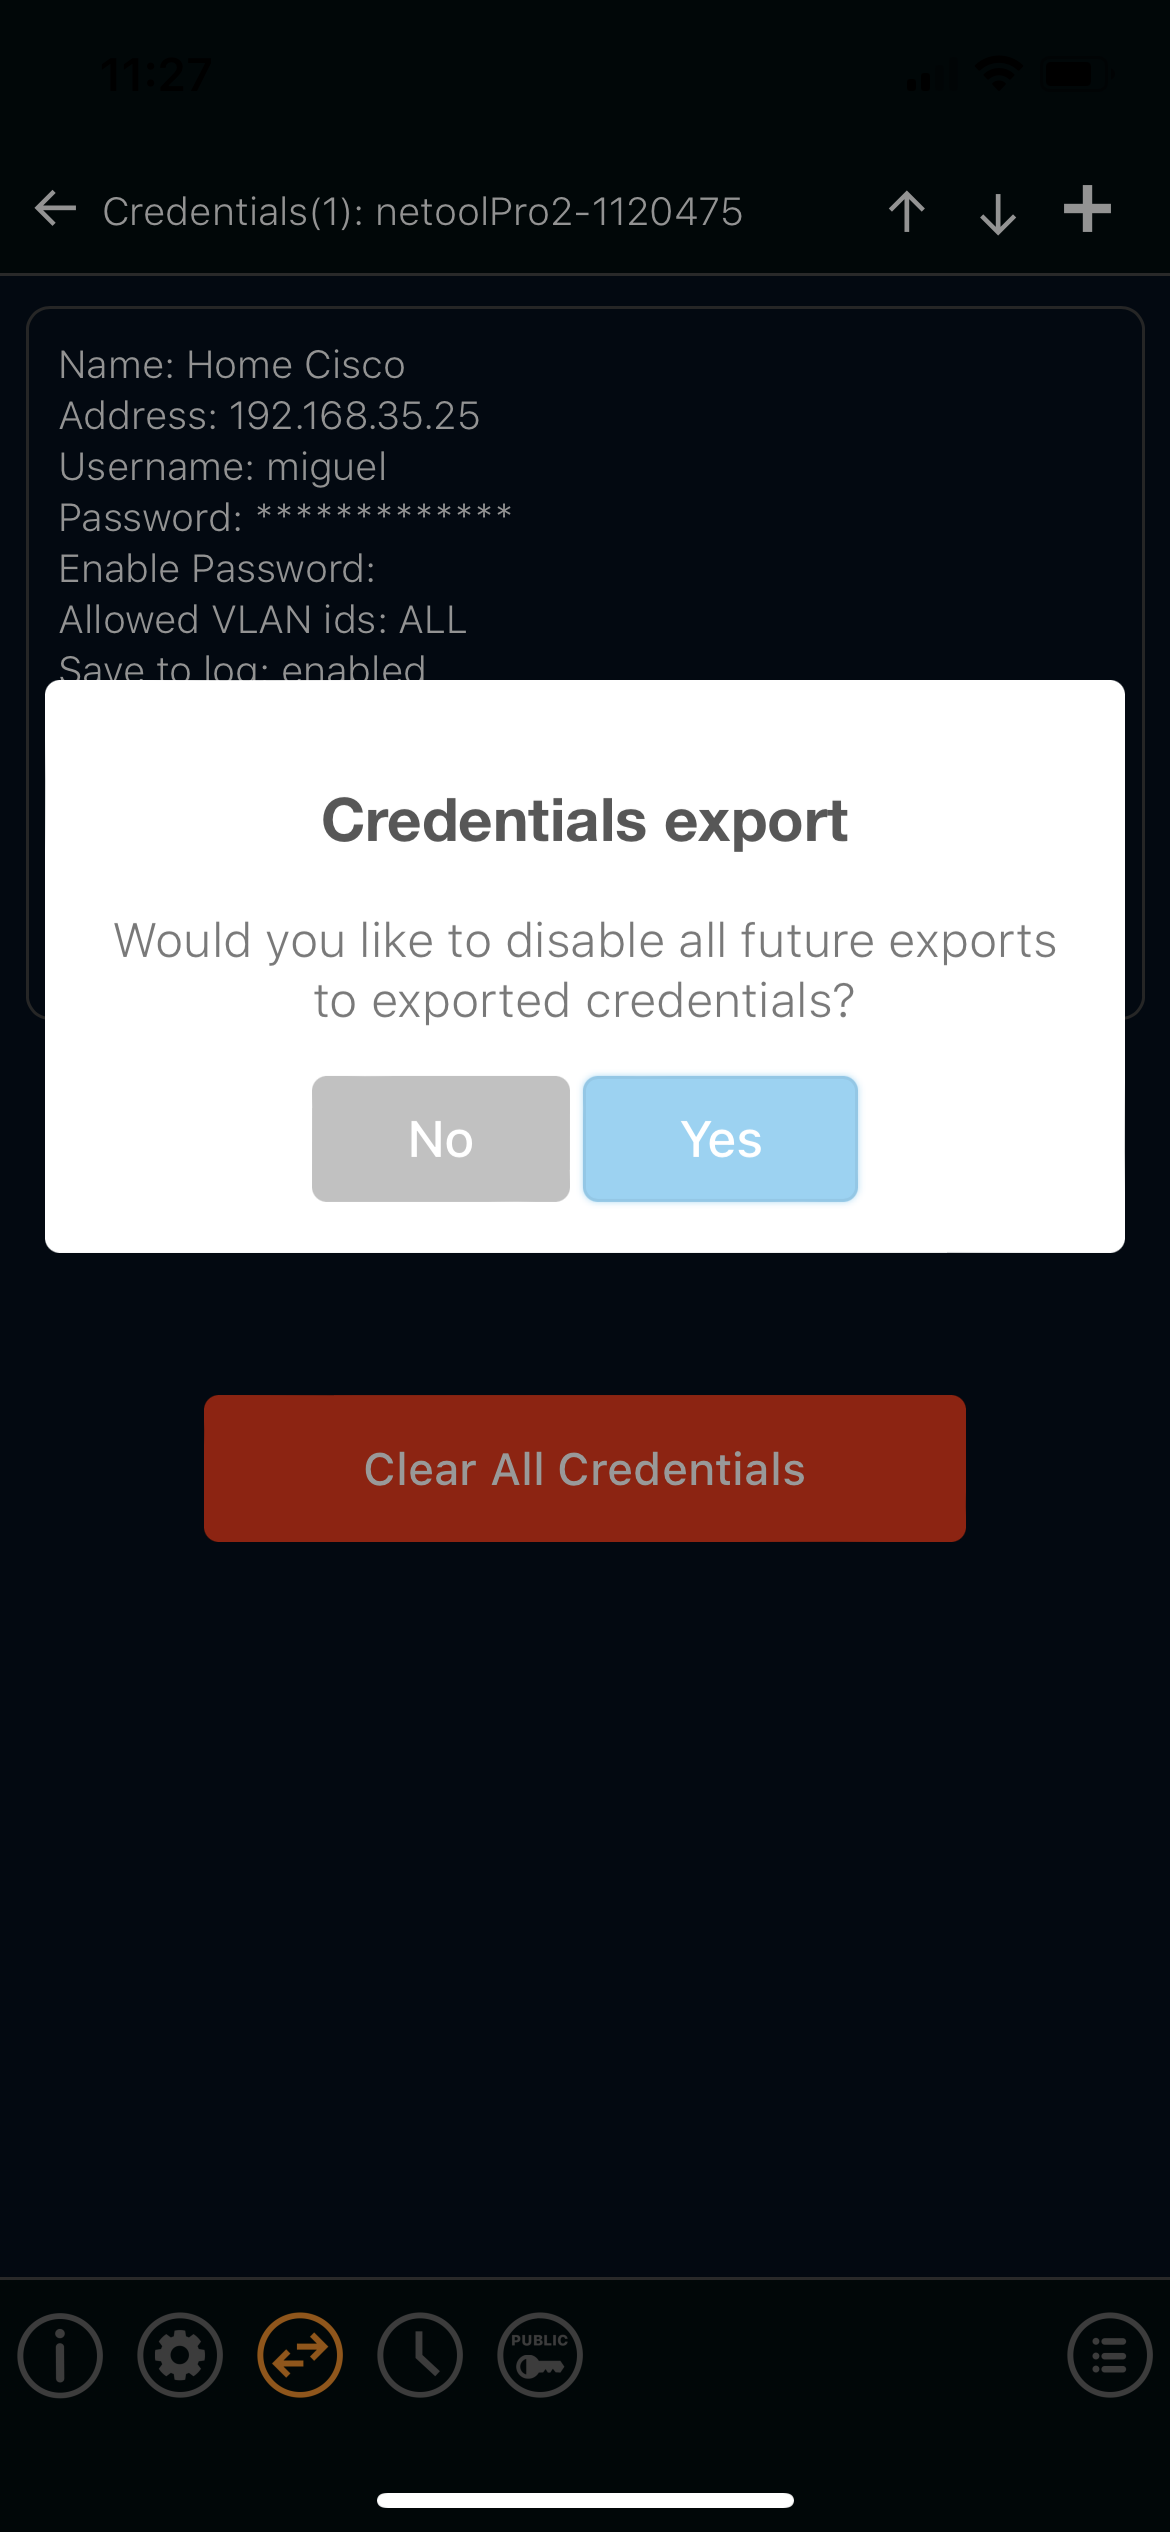
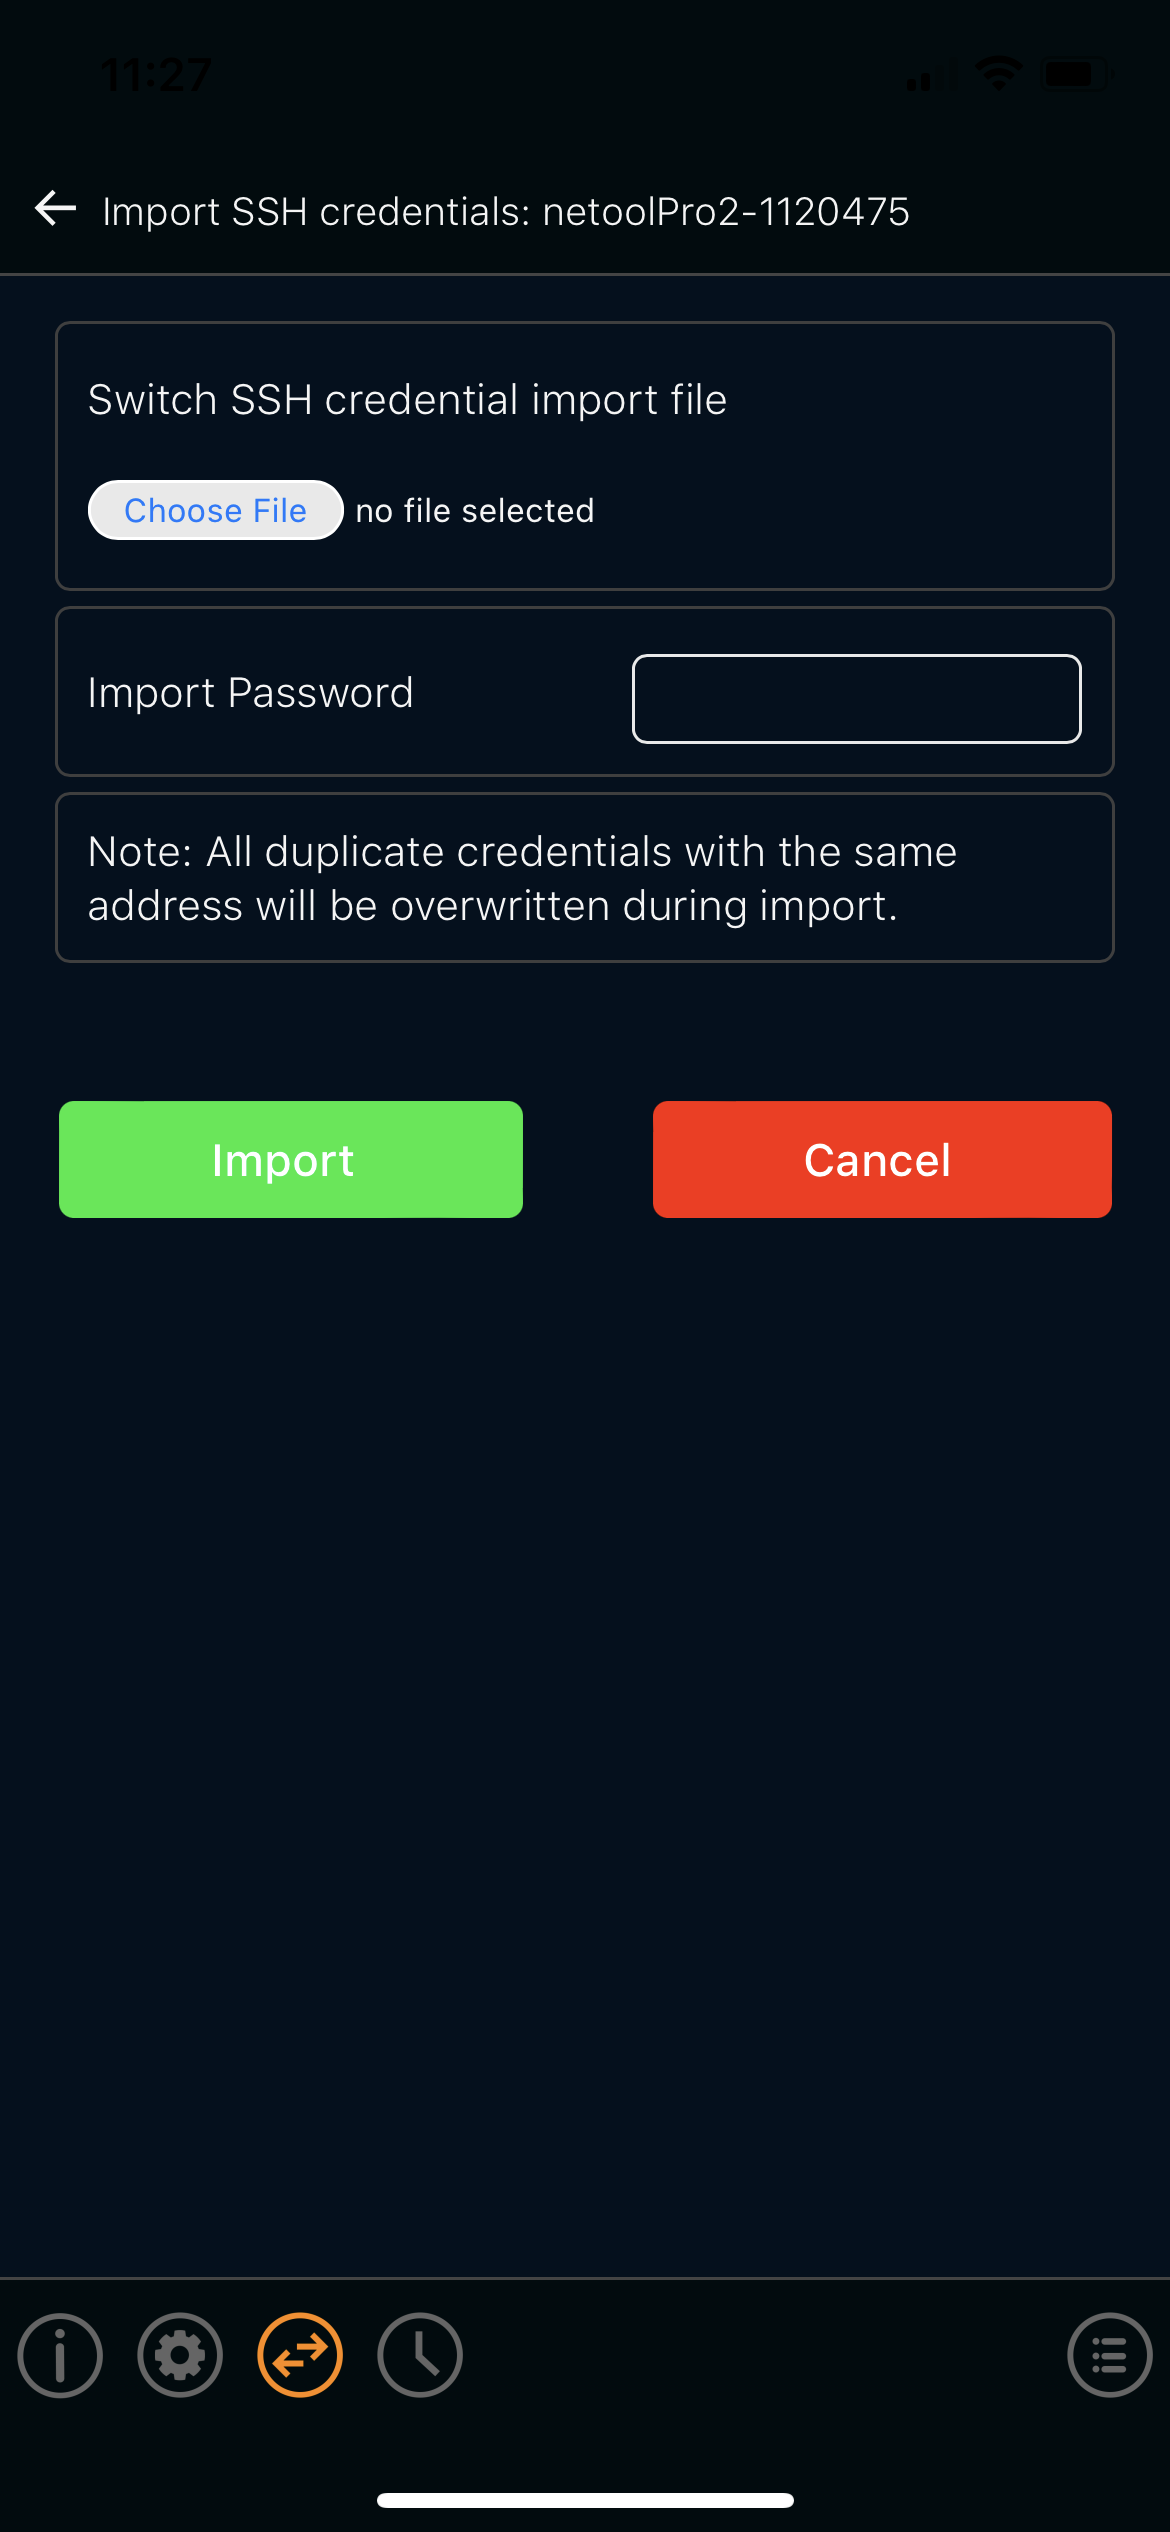
- Once the credentials are made, they can be imported or exported.
- Simply tap on the up point arrow to export and the down pointing arrow to import.
¶ Configure Untagged VLAN
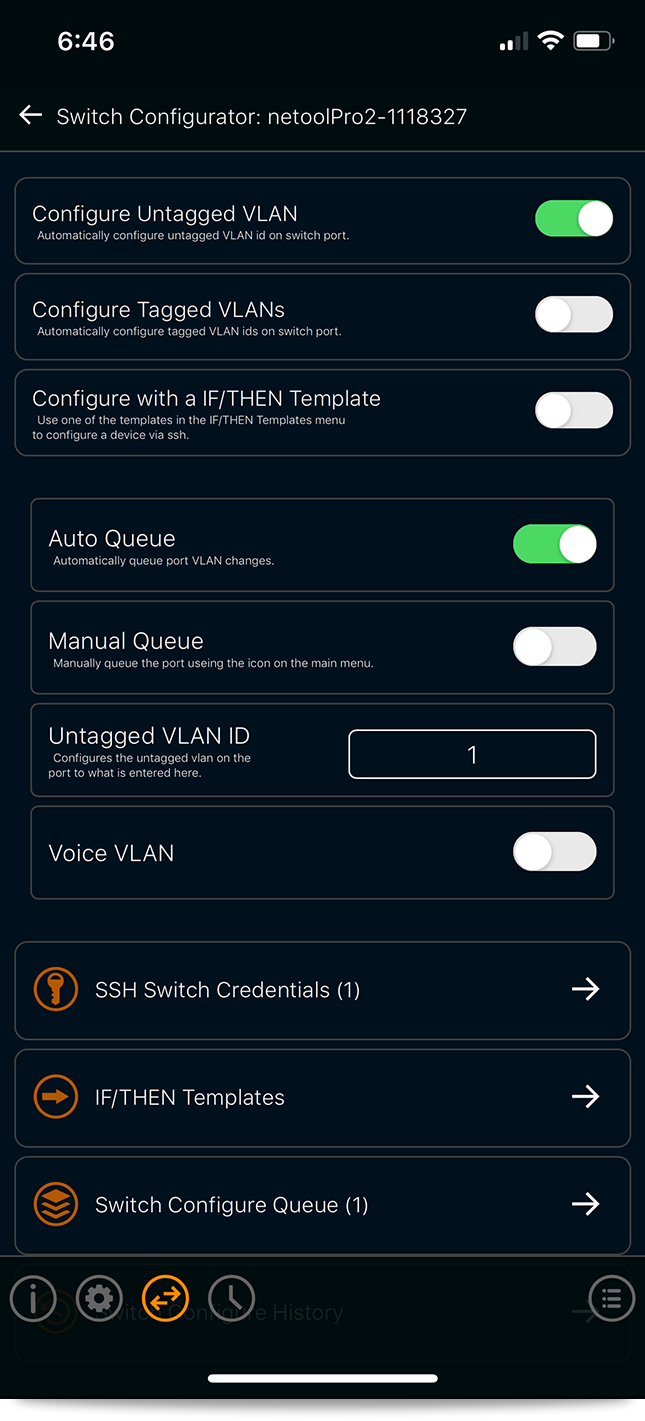
- configure untagged VLANs by Auto Queue or Manual Queue
- Auto Queue: This is used to queue up multiple configurations to run
- Manual Queue: This allows to run the queued configurations manually on the home screen
- Untagged VLAN ID: Type in the VLAN that needs to be untagged
- Voice VLAN: Here voice untagged VLANS can be assigned
¶ Configure Tagged VLANs
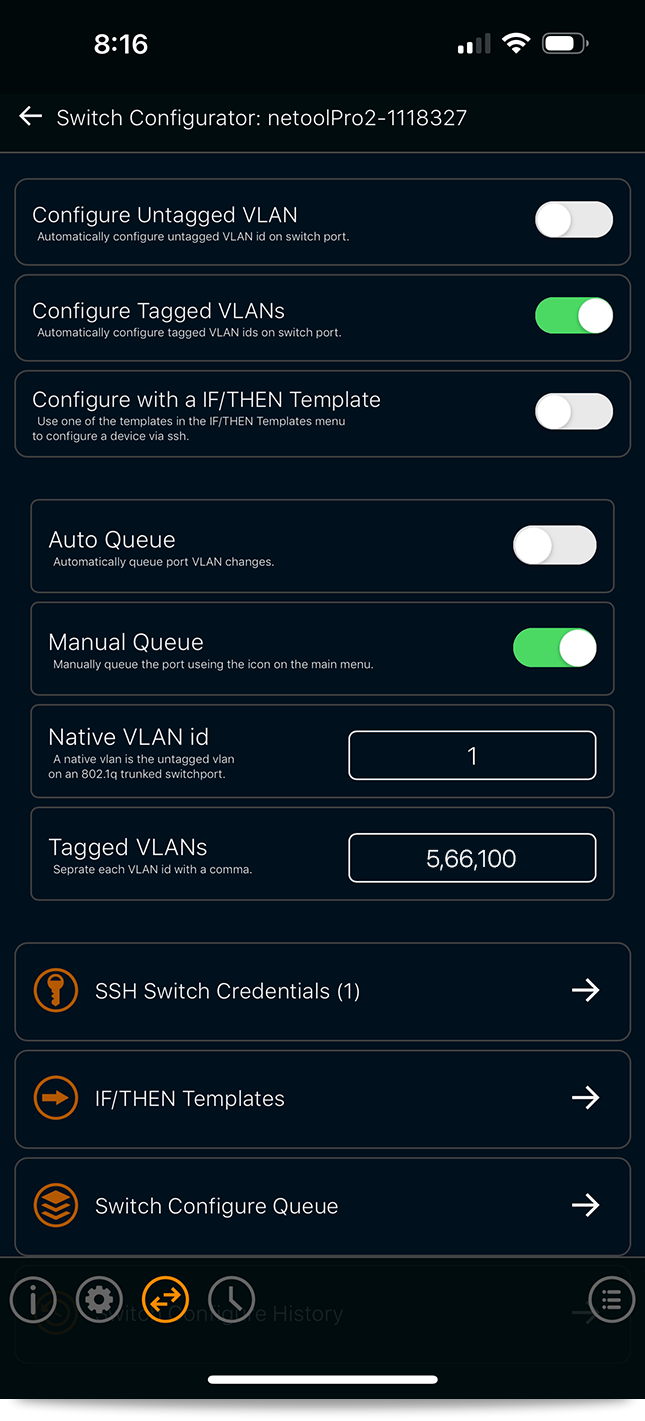
- Configure Tagged VLANs with auto queue and manual queue
- Auto Queue: This is used to queue up multiple configurations to run
- Manual Queue: This allows to run the queued configurations manually on the home screen
- Native VLAN ID: Type in the VLAN that needs to be Native
- Tagged VLANs: Type in the VLANs needed to be tagged, separated by a comma.
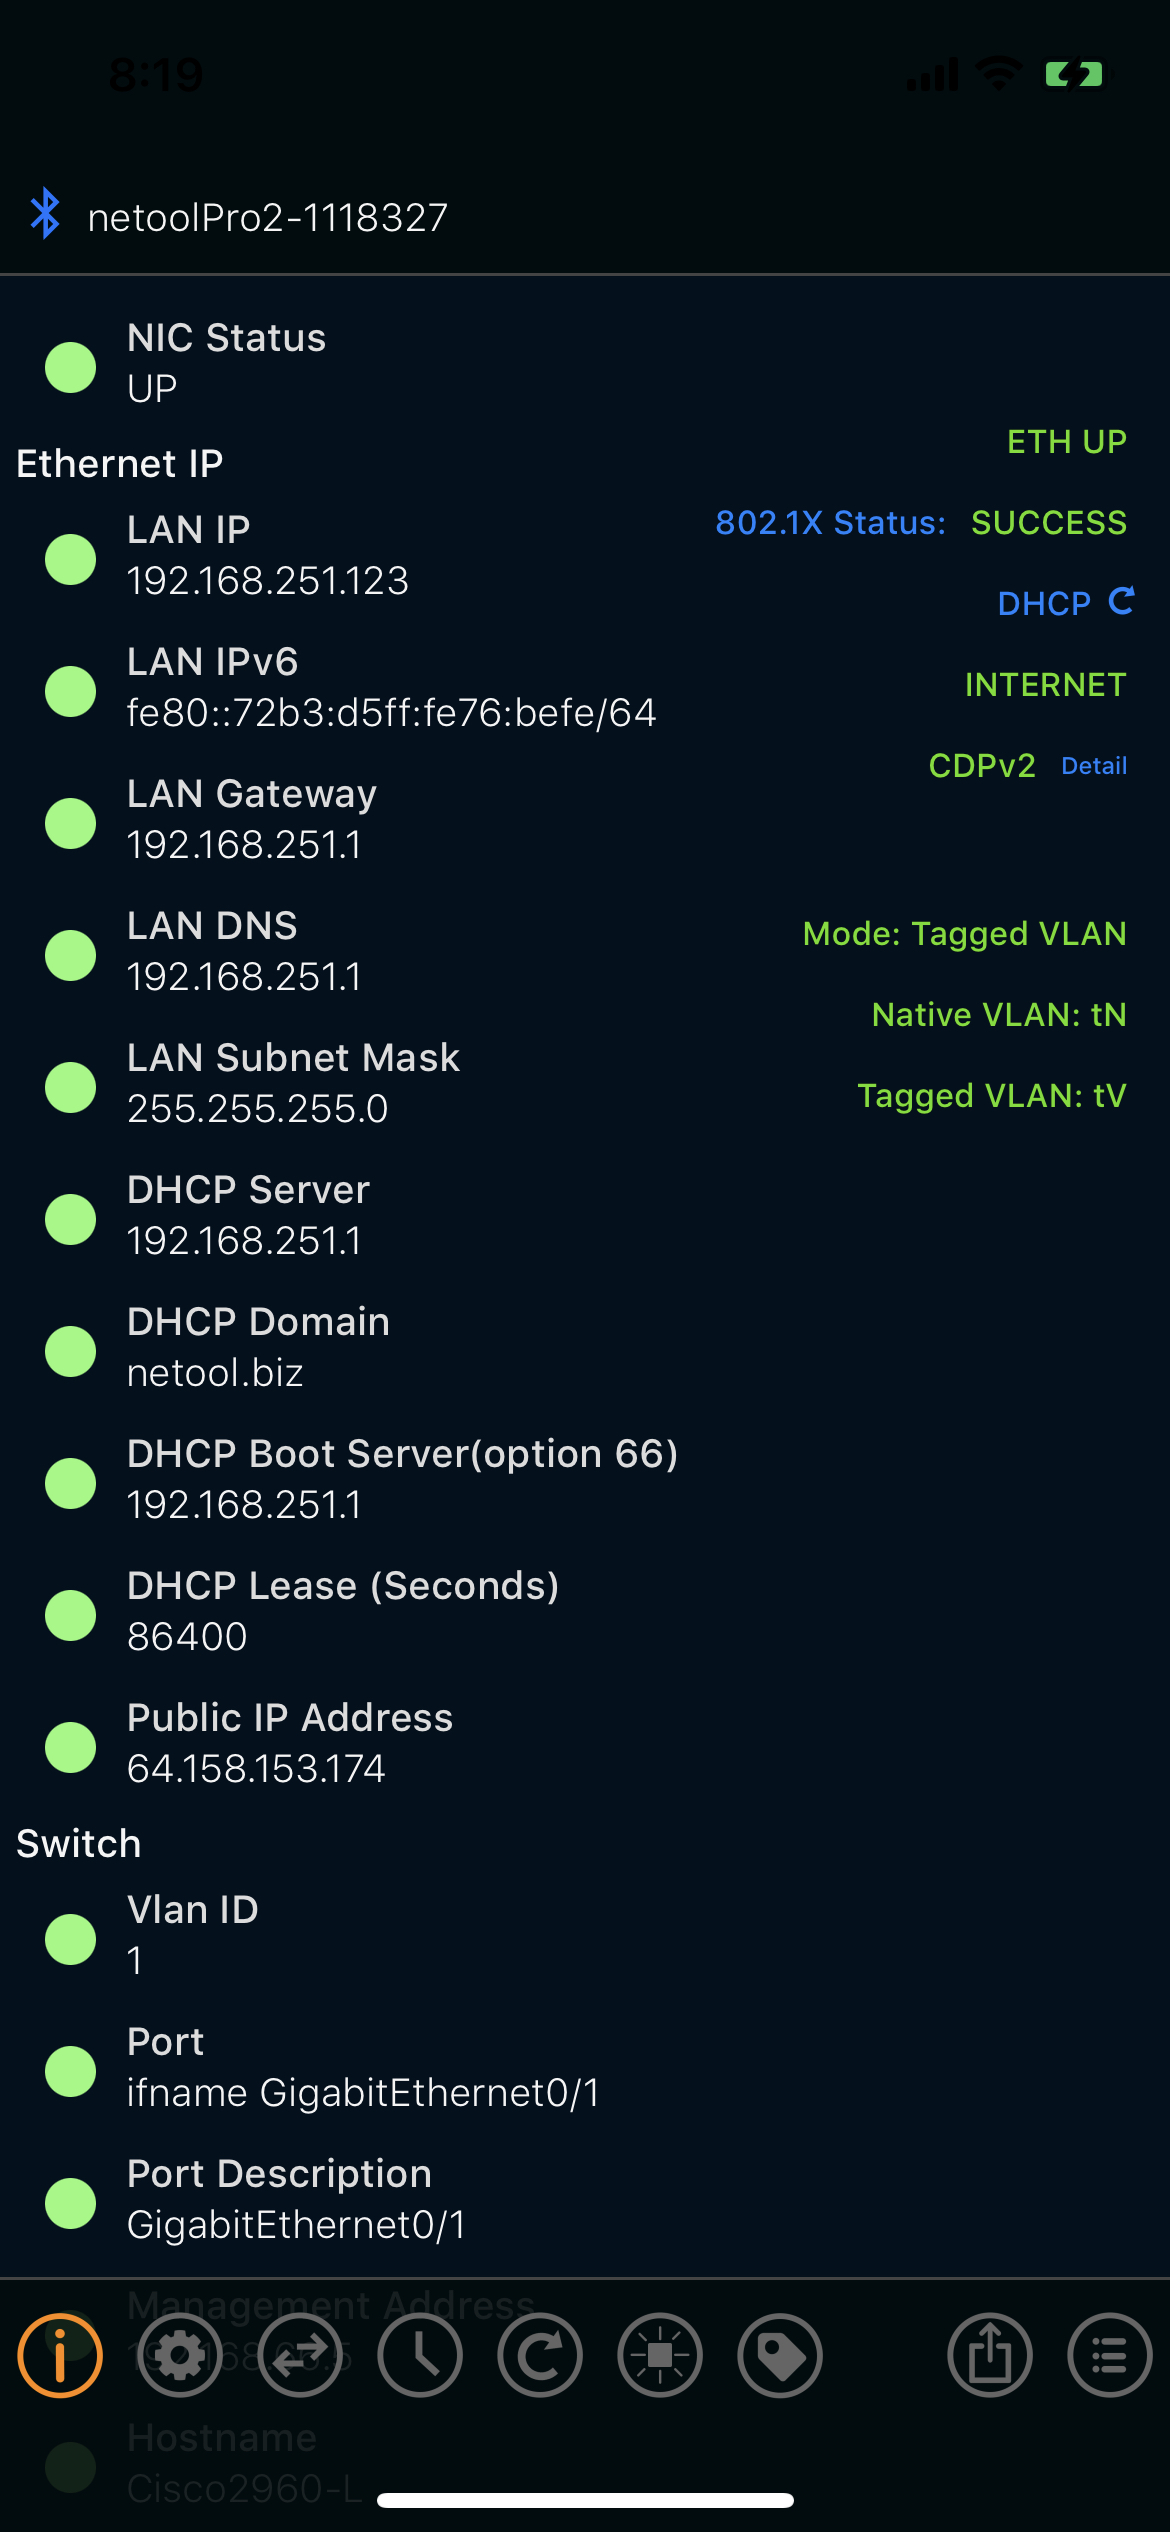
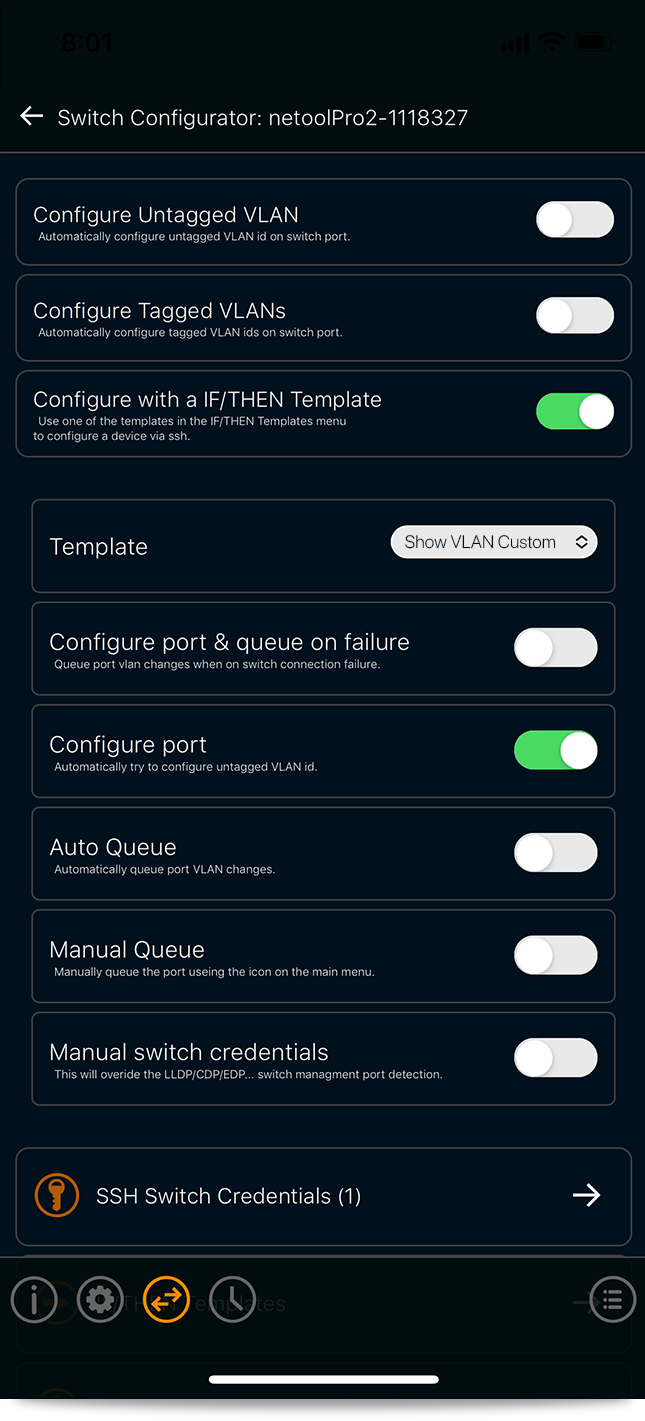
¶ Configure with a IF/THEN Template
- Configure a switch with IF/THEN templates that have been created.
- Template: Choose the template that wants to be used
- Configue port & queue on failure: If this is enabled and the configuration fails it will re queue.
- Configure port: Automatically configure untagged VLAN ID
- Auto Queue: This is used to queue up multiple configurations to run
- Manual Queue: This allows to run the queued configurations manually on the home screen
- Manual Switch Credentials: With this enabled, it will be possible to choose the credentials used, not the one used by the management IP.
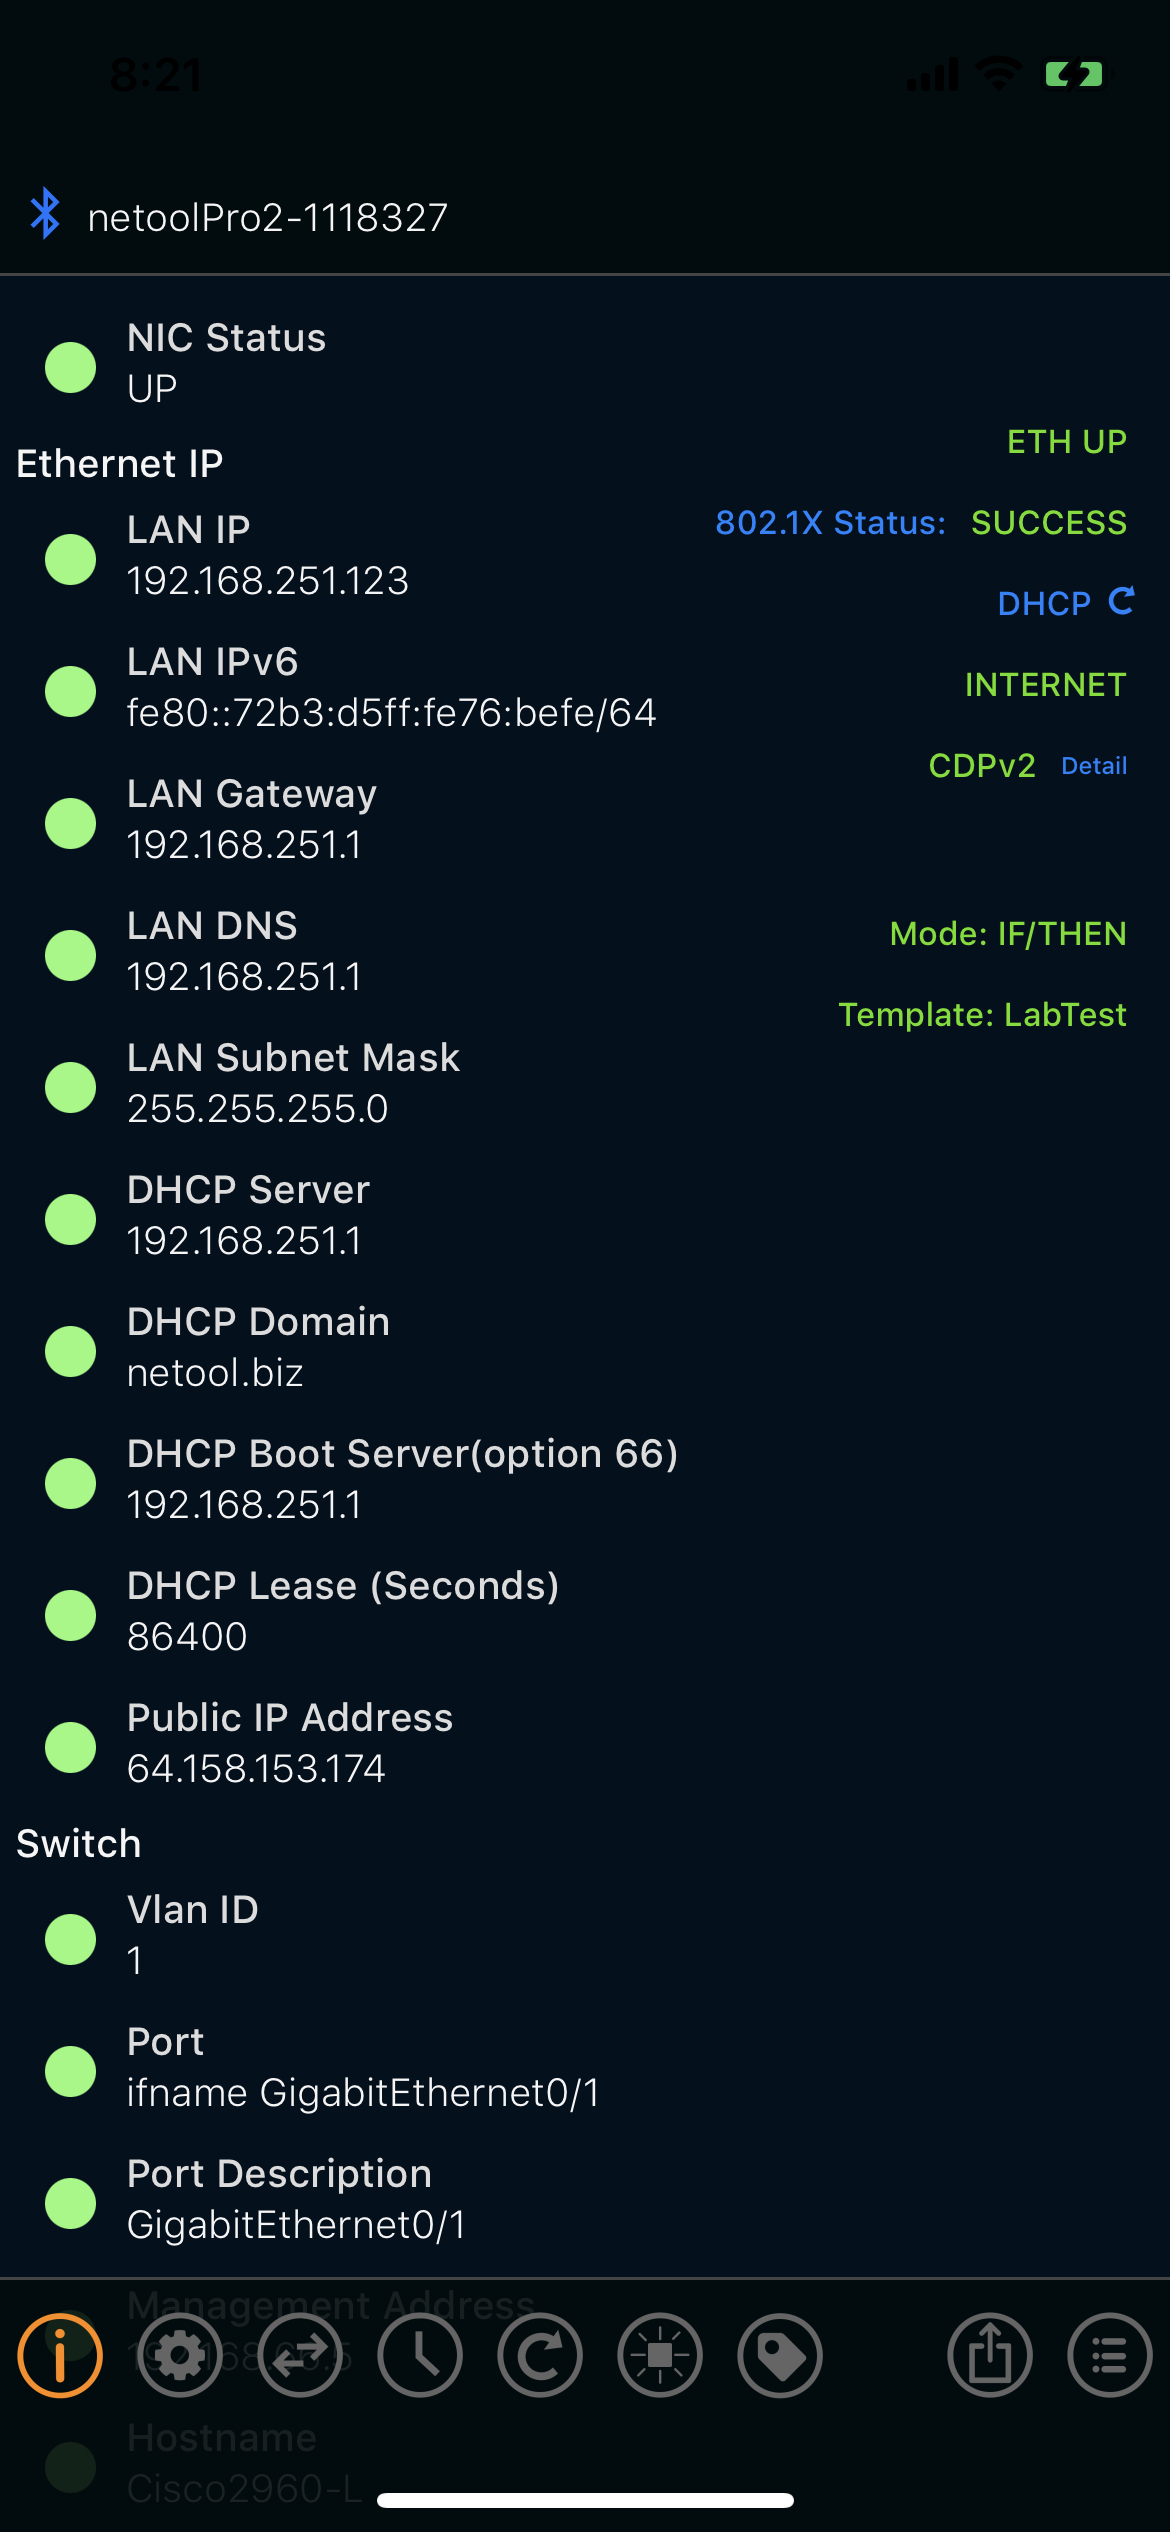
¶ IF/THEN Templates
- IF/THEN Templates can be made to configure a switch
- Add a template by tapping the plus icon on the upper right hand and naming it.
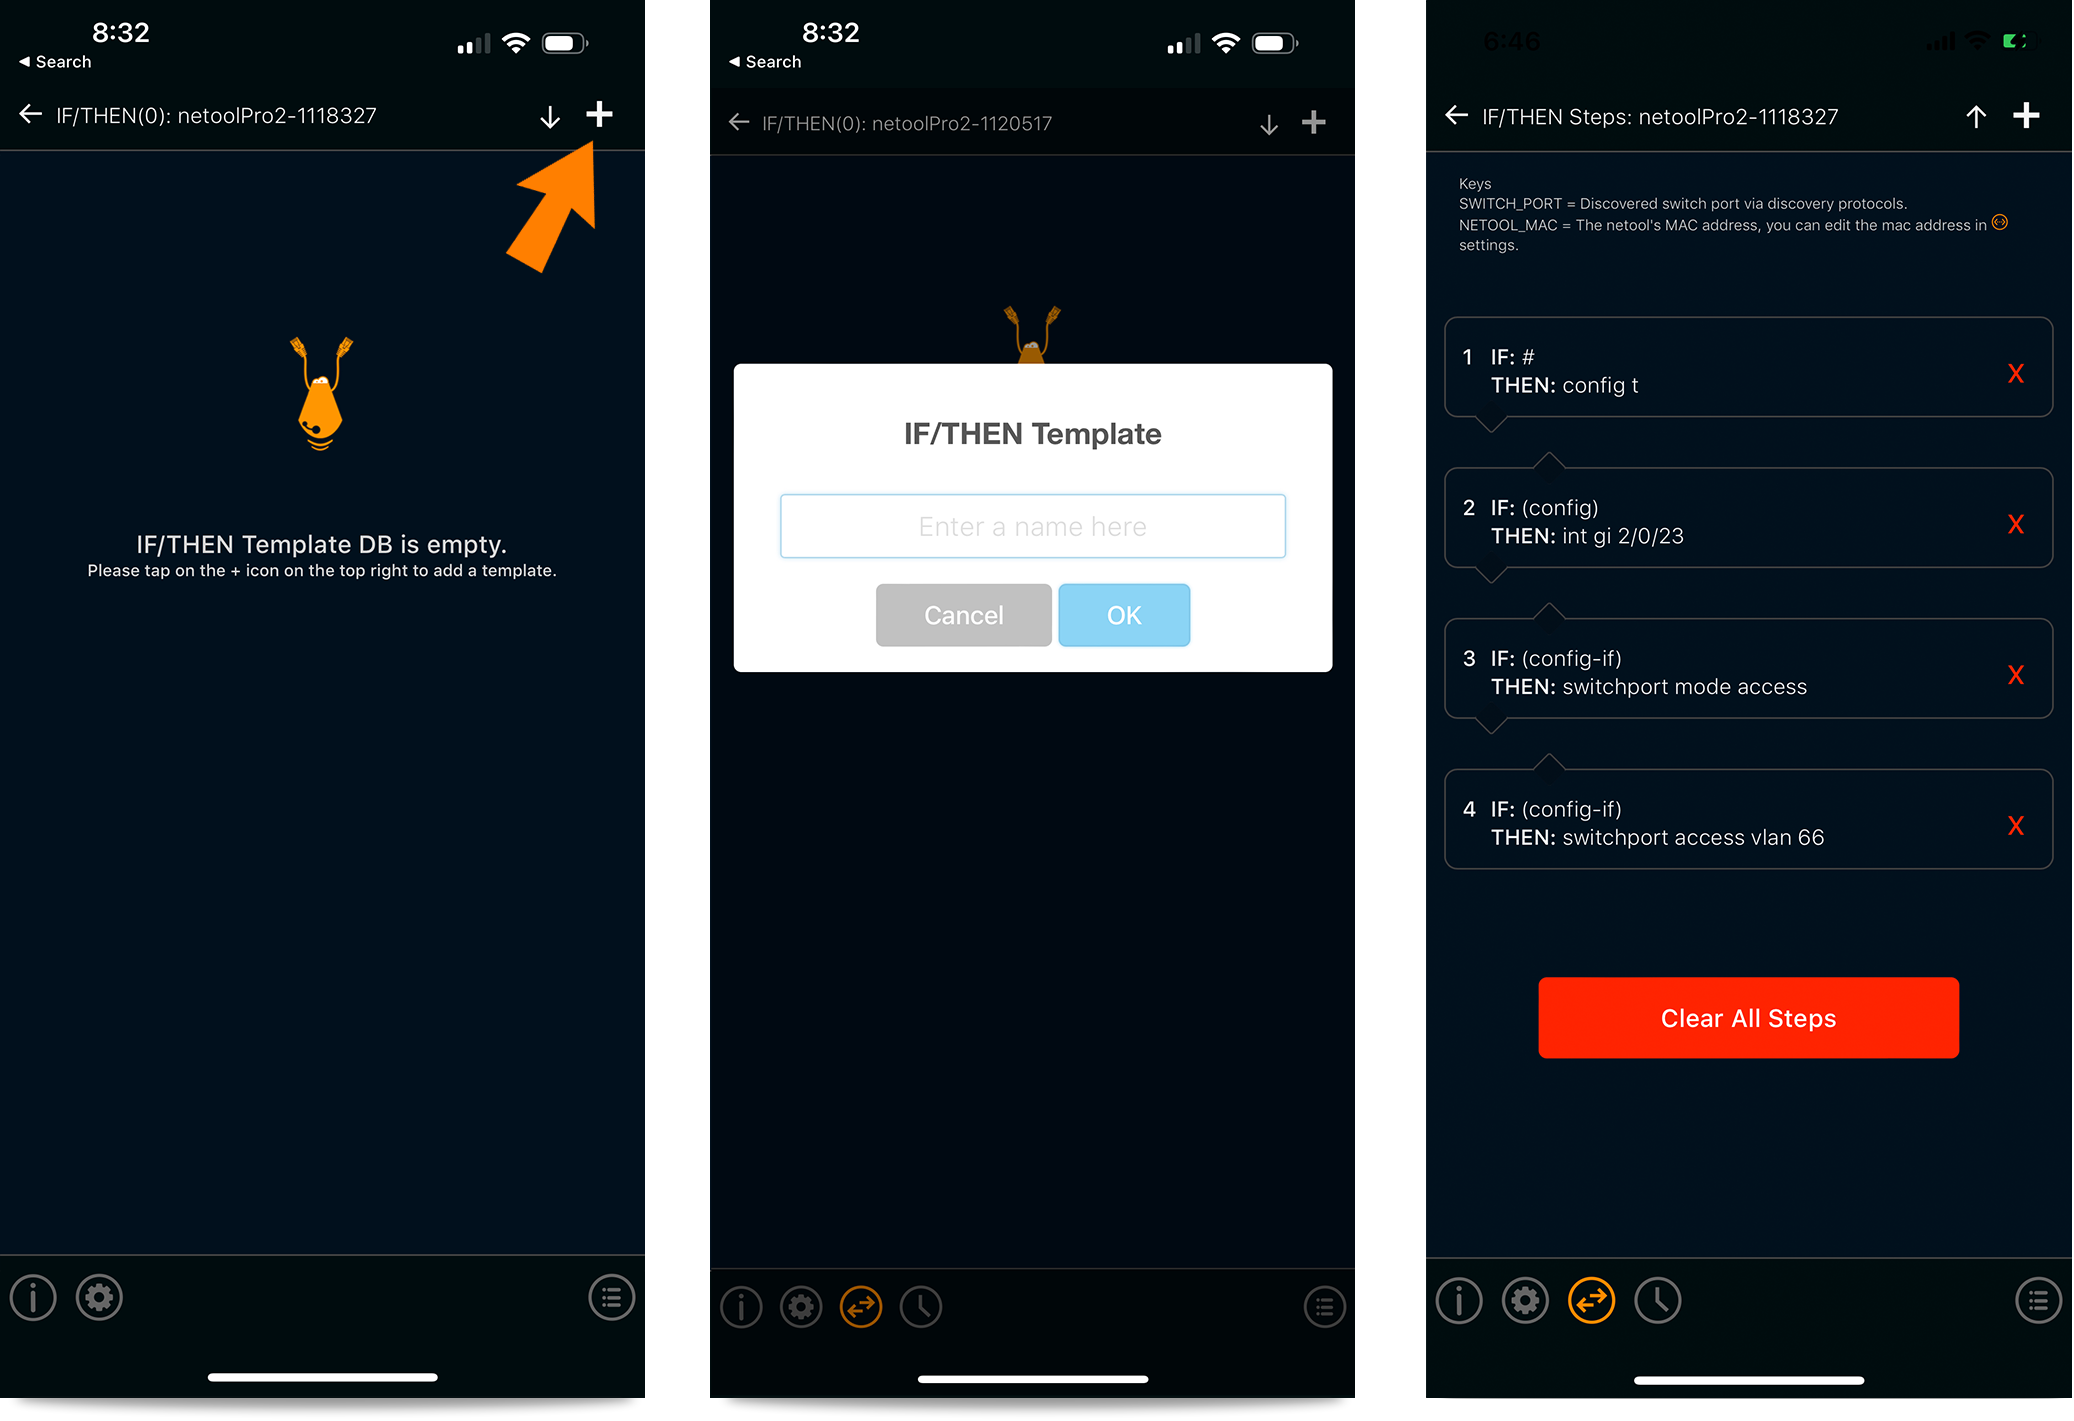
- Once added, a template will appear. Simply, tap it and begin making the statement.
- First the IF statement must be set to recognize unique characters( #, )#, if)#)
- Second the THEN statement would be the command of the switch that needs to be ran.
- Just keep adding steps until wish configuration is complete.
- If/Then Keys
- SWITCH_PORT: By adding this key to your than string, the netool.io Pro2 will automatically inject the discovered port interface that was found via the discovery protocol.
- NETOOL_MAC: By typing this in, it will auto fill with the netoolPro2 MAC Address.
- YouTube video example
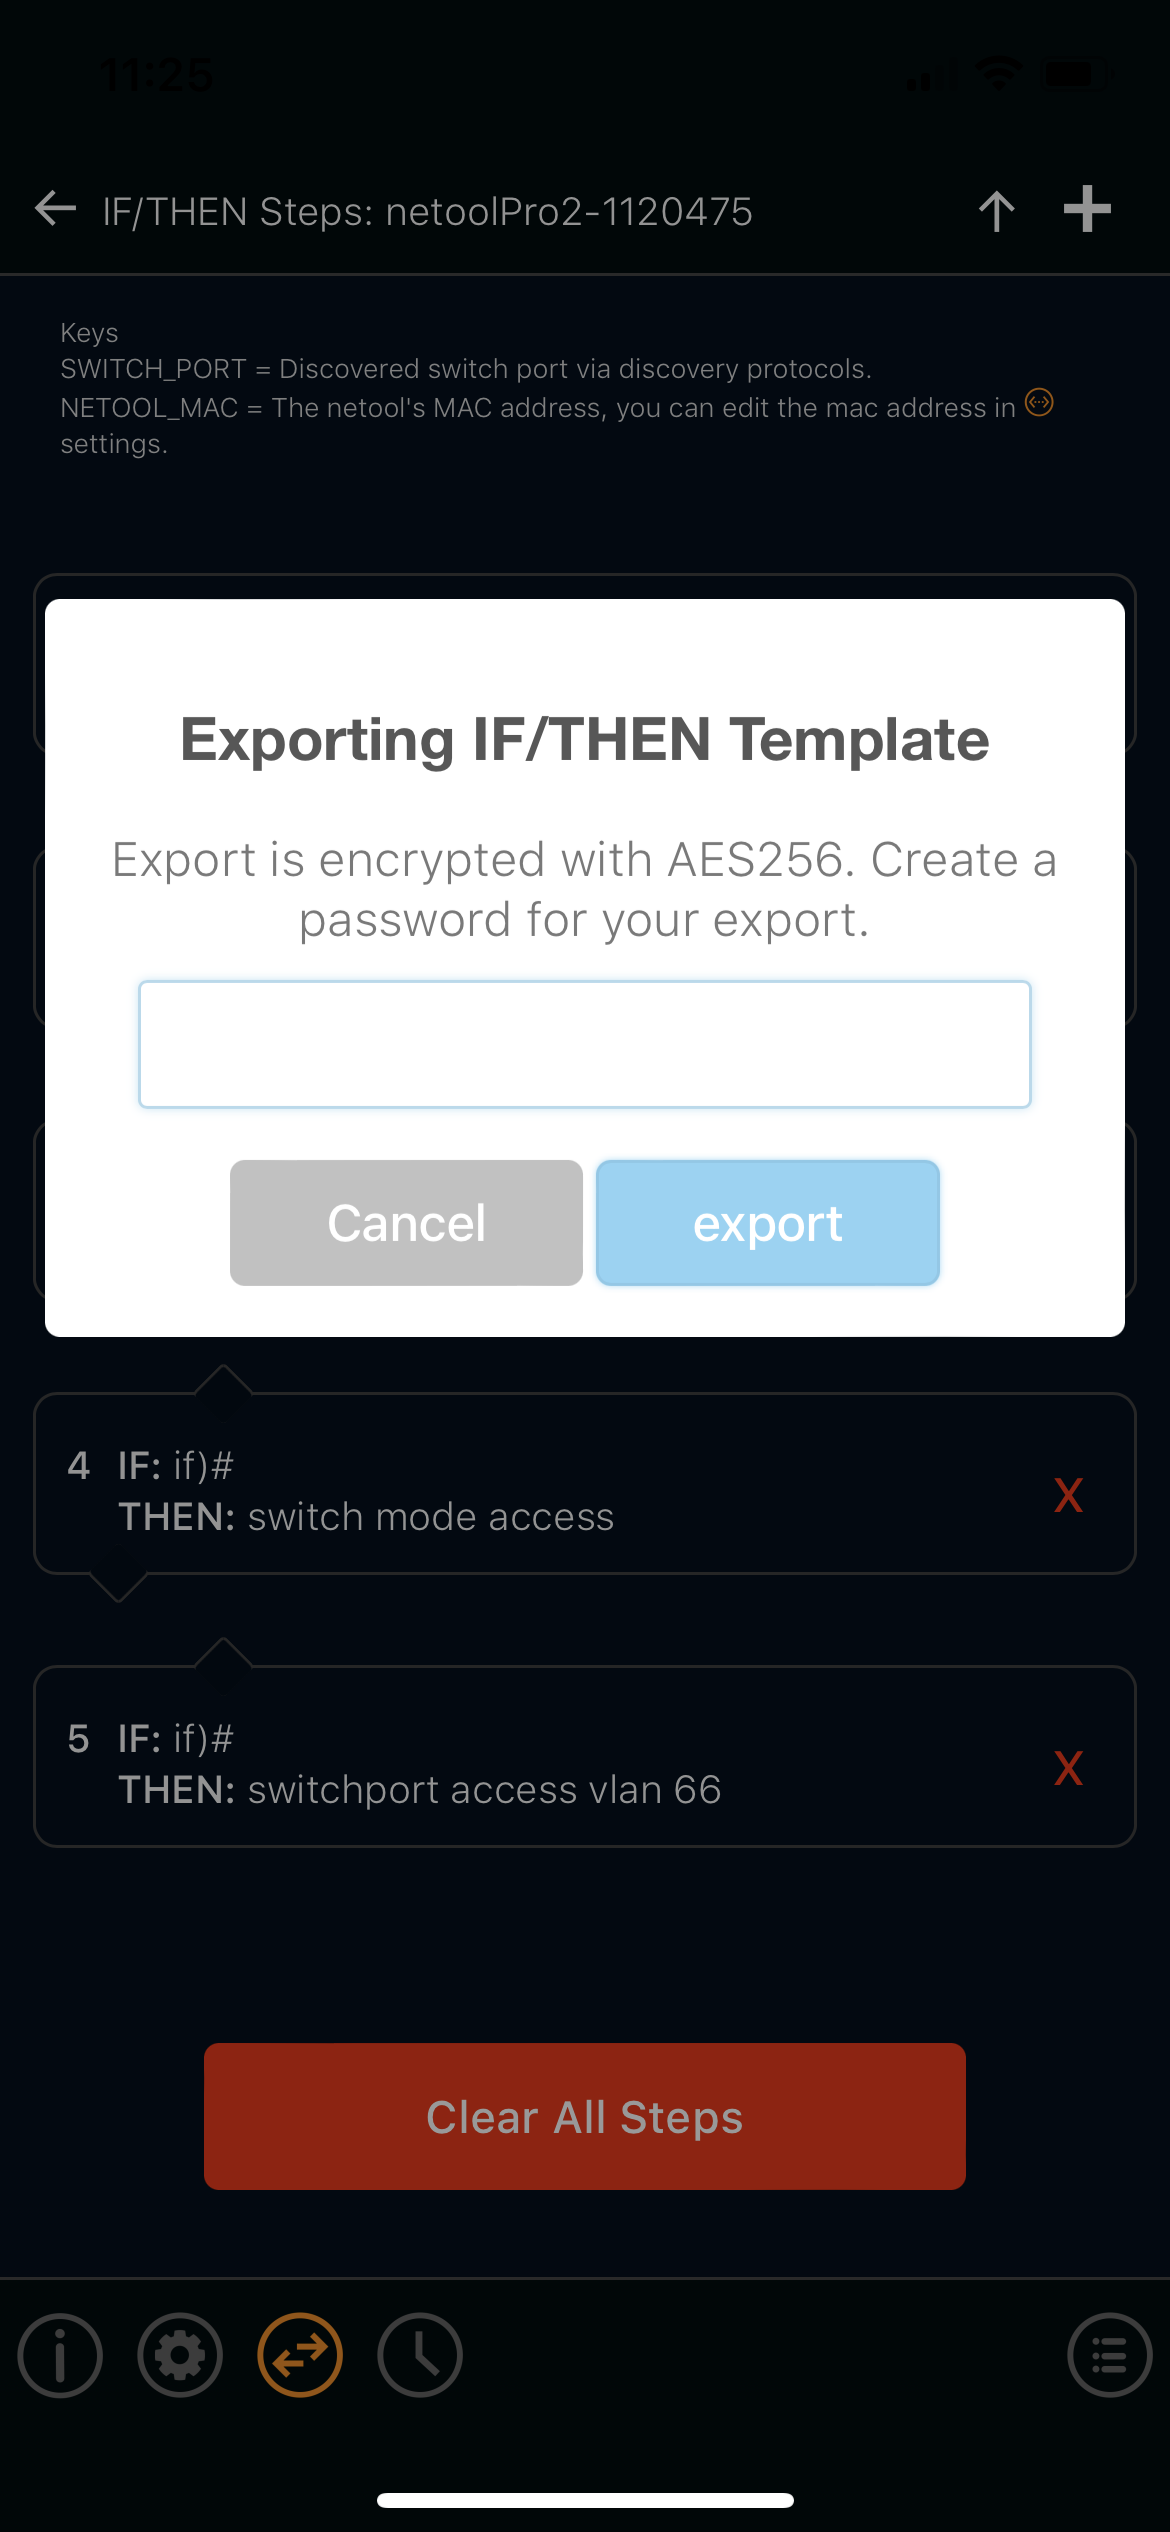
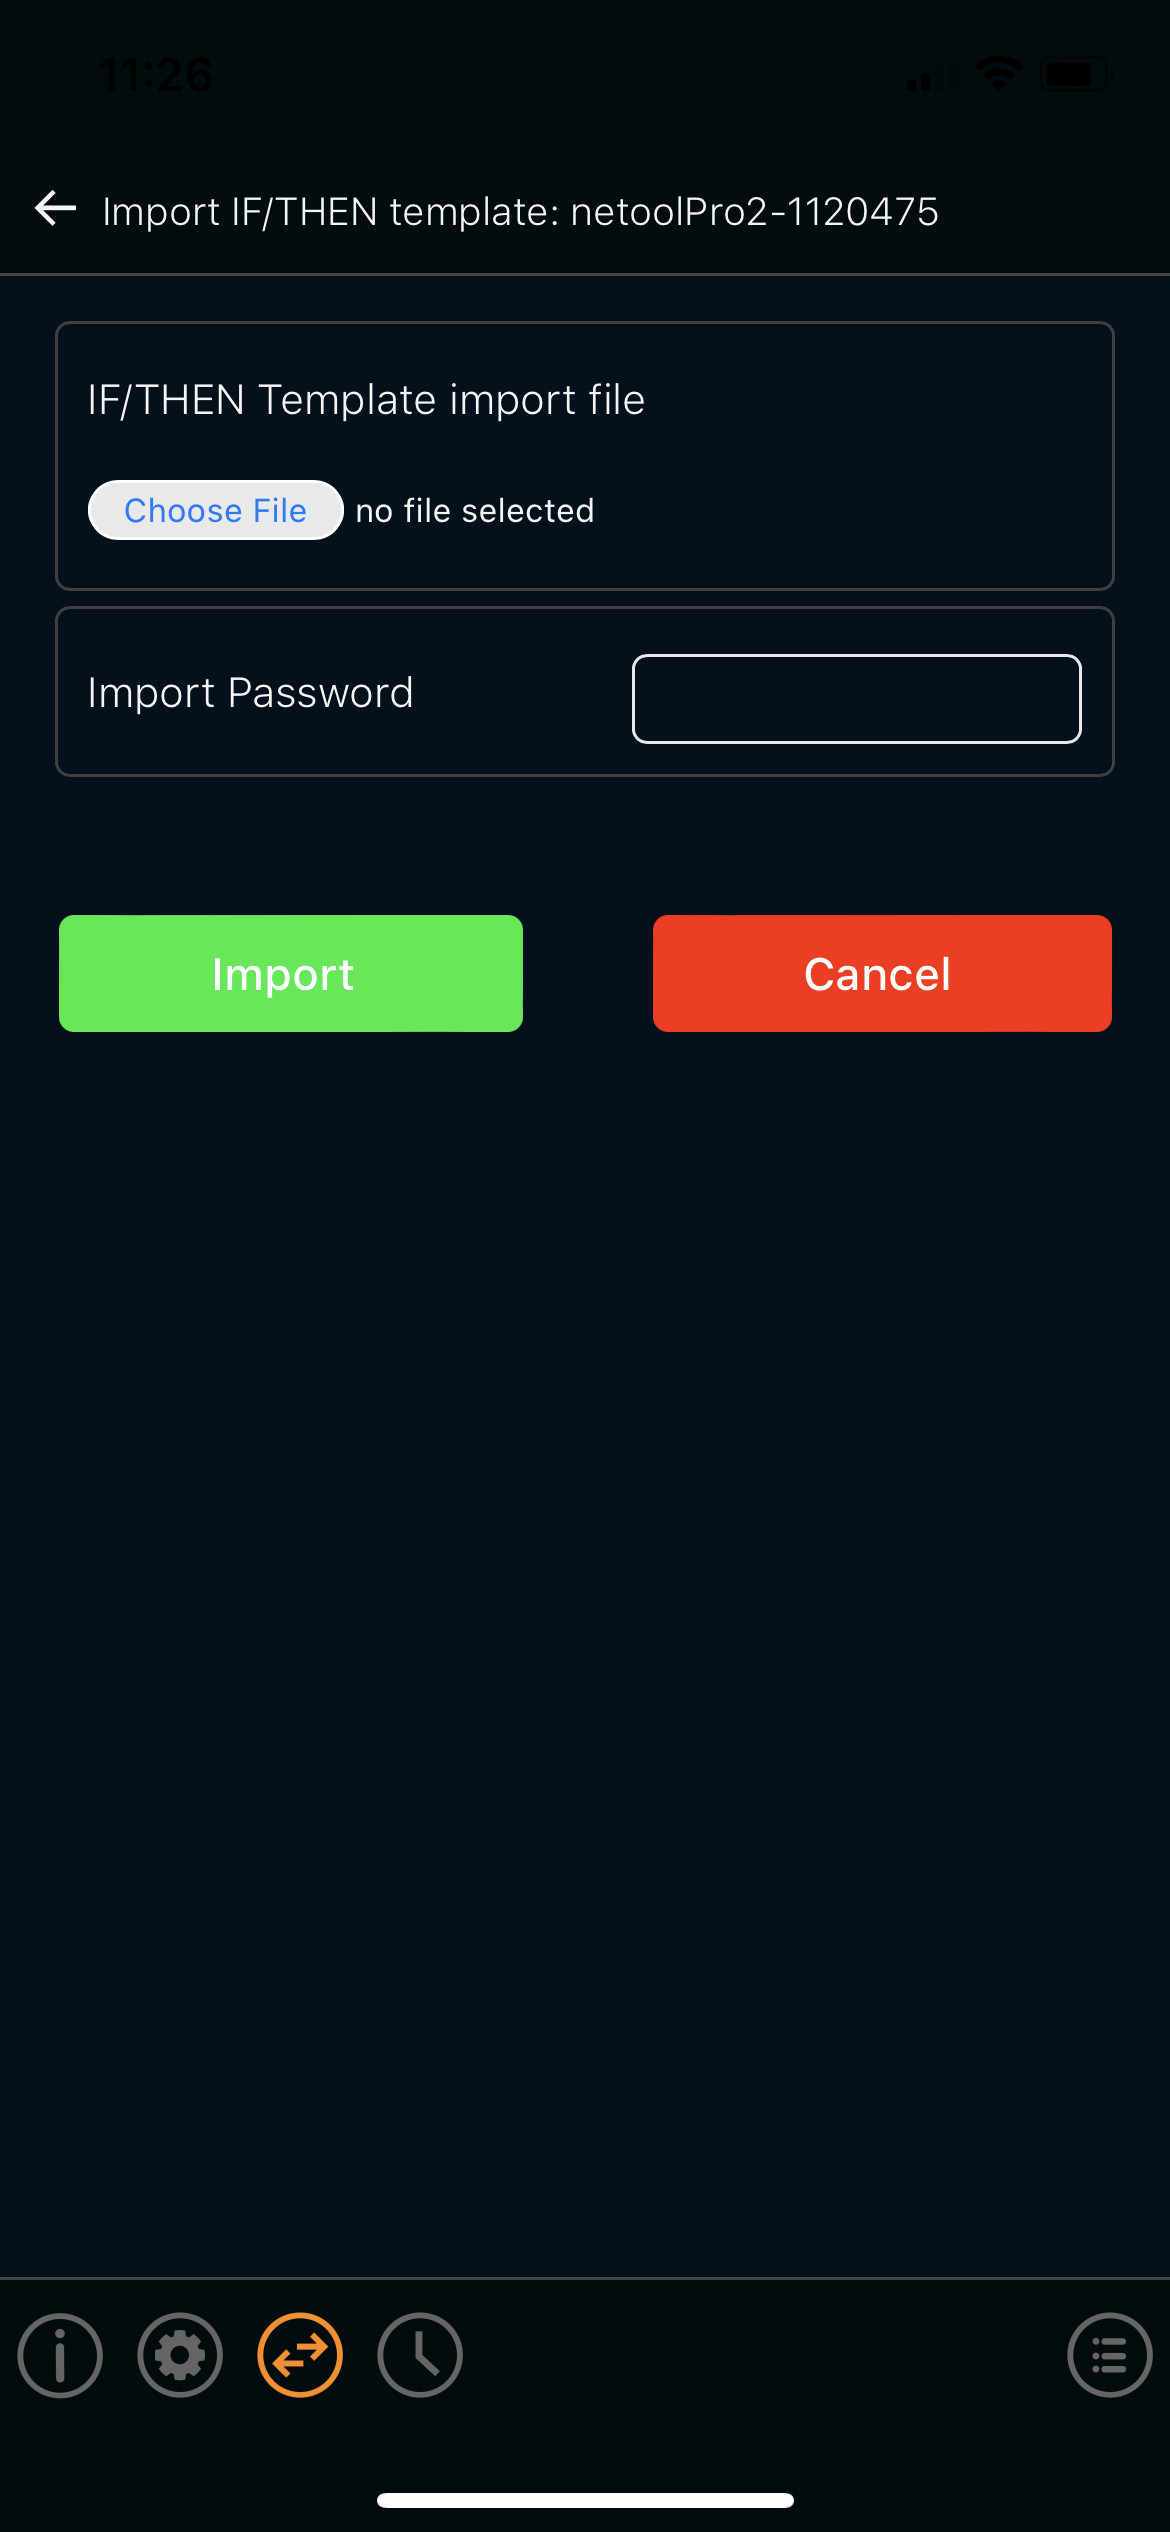
- These templates can also be imported or exported, form and to the netoolPro2
- Simply tap the up pointing arrow to export and the down pointing arrow to import.
¶ Switch Configure Queue
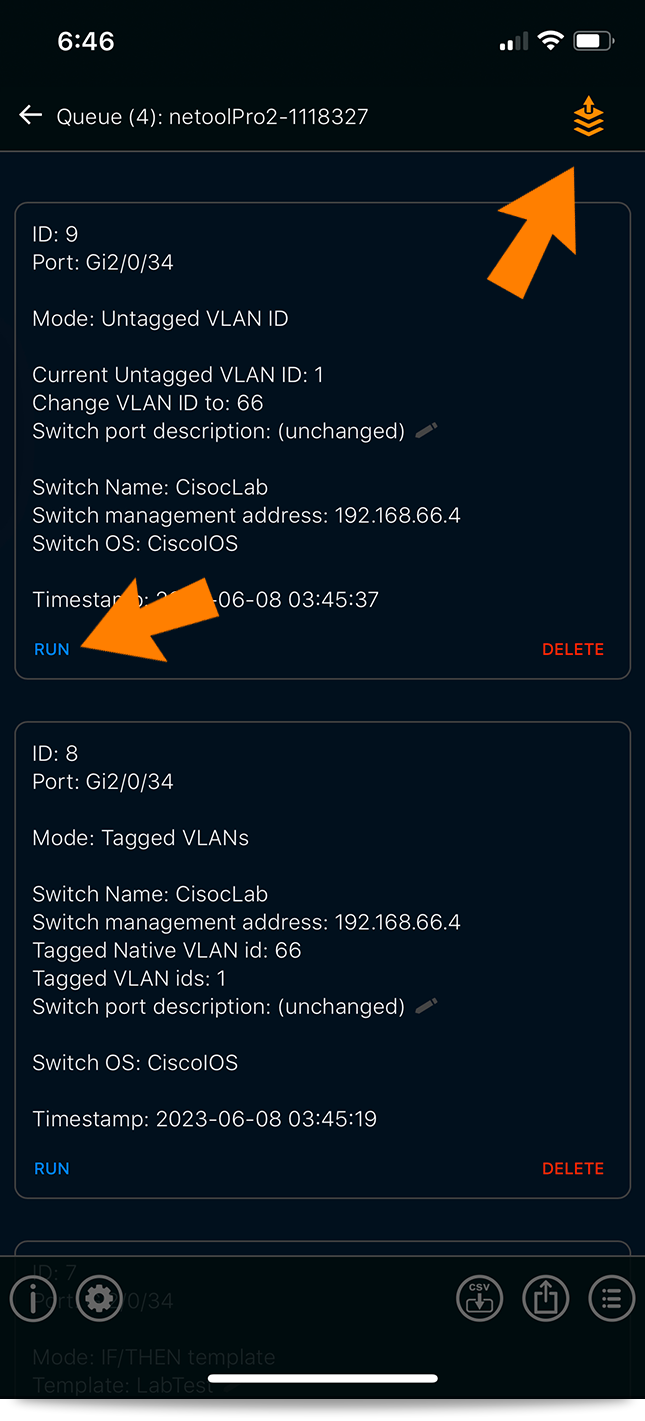
- Every time the auto queue gets applied a new queue change gets added to this menu
- Queued switch configuration changes can be ran one at a time by tapping the “RUN" icon or you can run all of the queued configuration changes in order by tapping the arrow with queue icon at the top right section of this screen.
¶ Switch Configure History
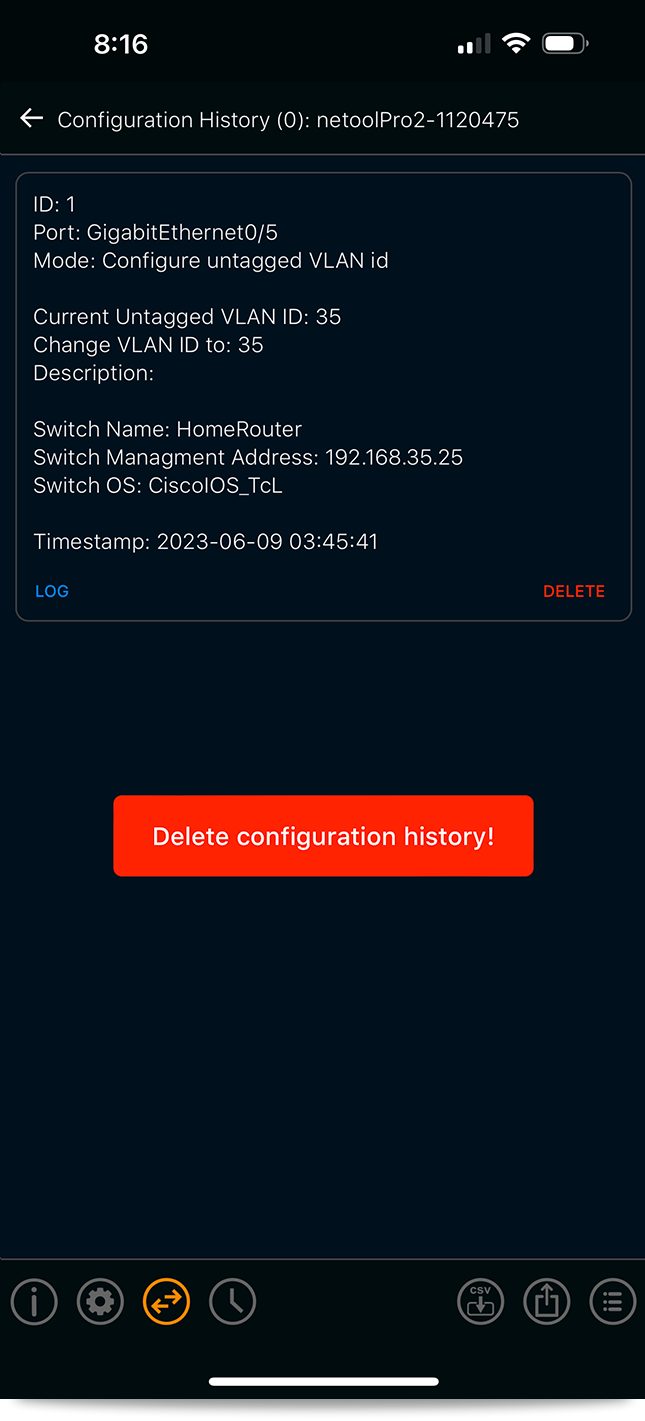
- This is the list of all changes ran on the netoolPro2.
- The icons can be deleted or logged.
¶ ARP Capturing
- To set the ARP capturing function, just tap on the “settings” icon and then tap “Toggle Switches” icon.
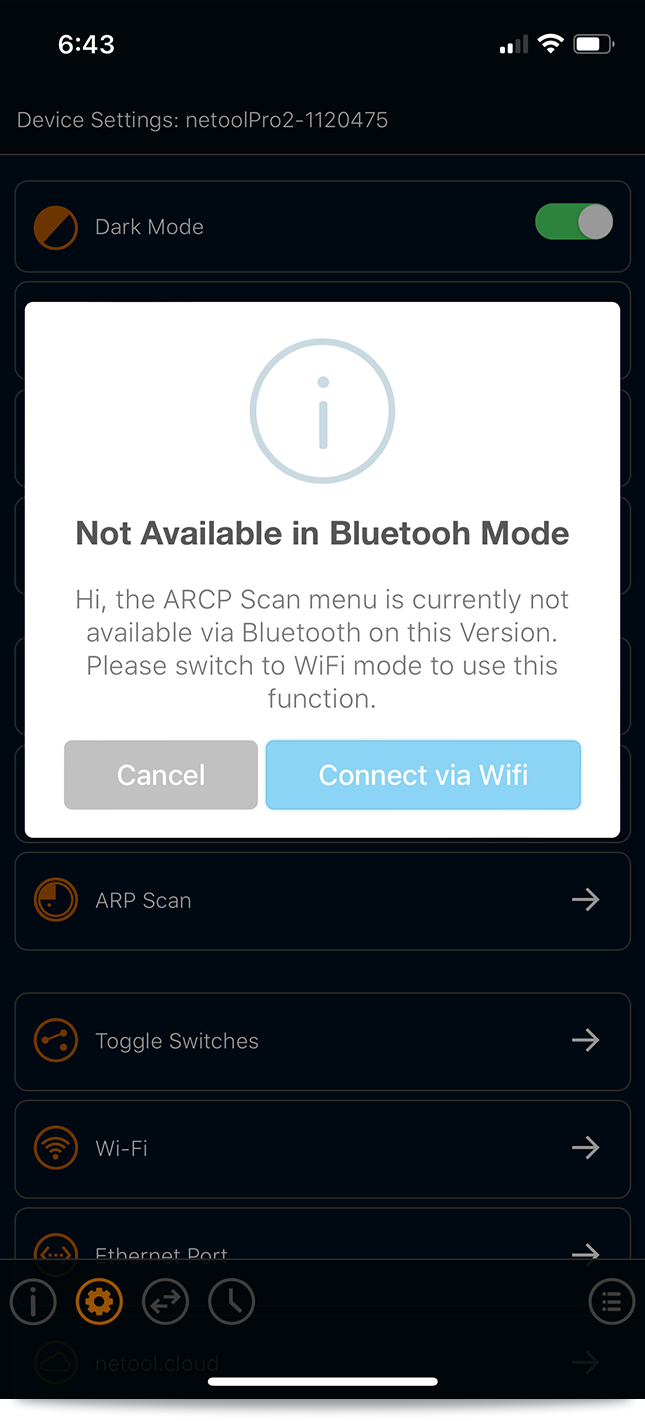
- To view the ARP scan and to use the ARP scan function, the netoolPro2 must be connected by WiFi.
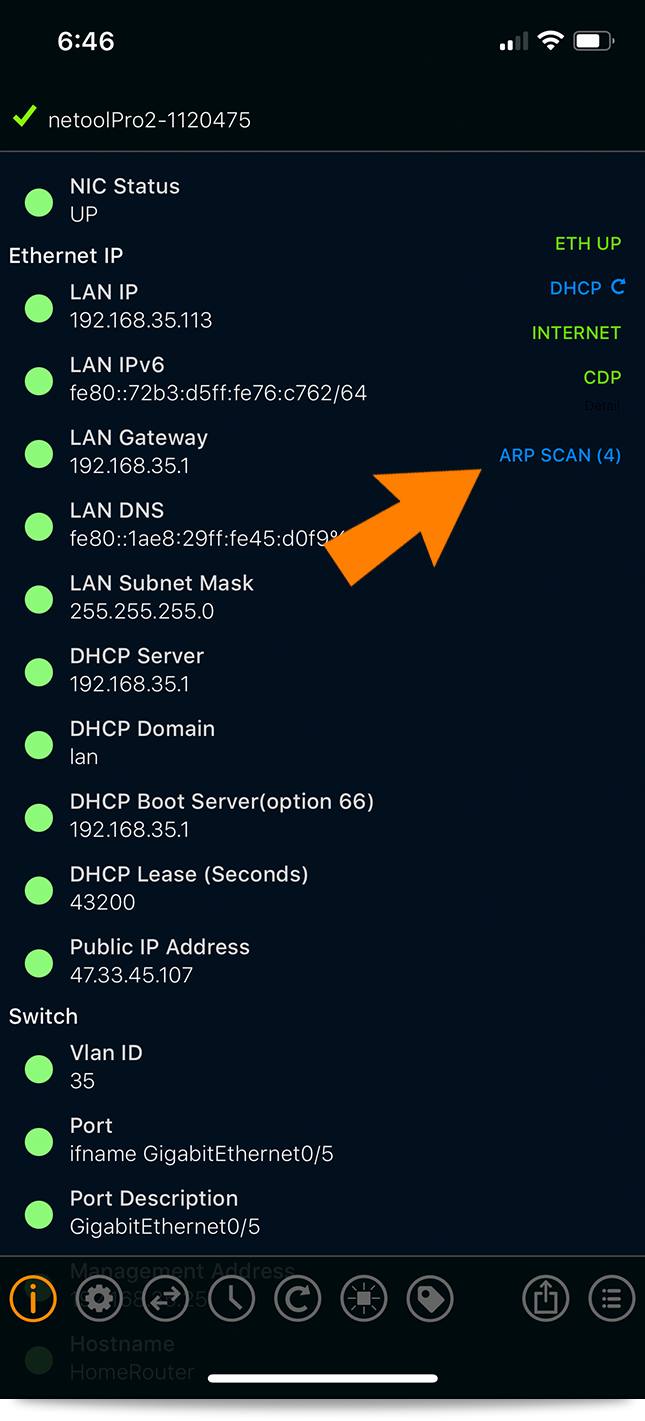
- Once set up, back on the home screen an ARP Scan icon will be see on the right-hand side, displaying how many ARP entries have been captured. This will varey in time, depending on the size of the subnet.
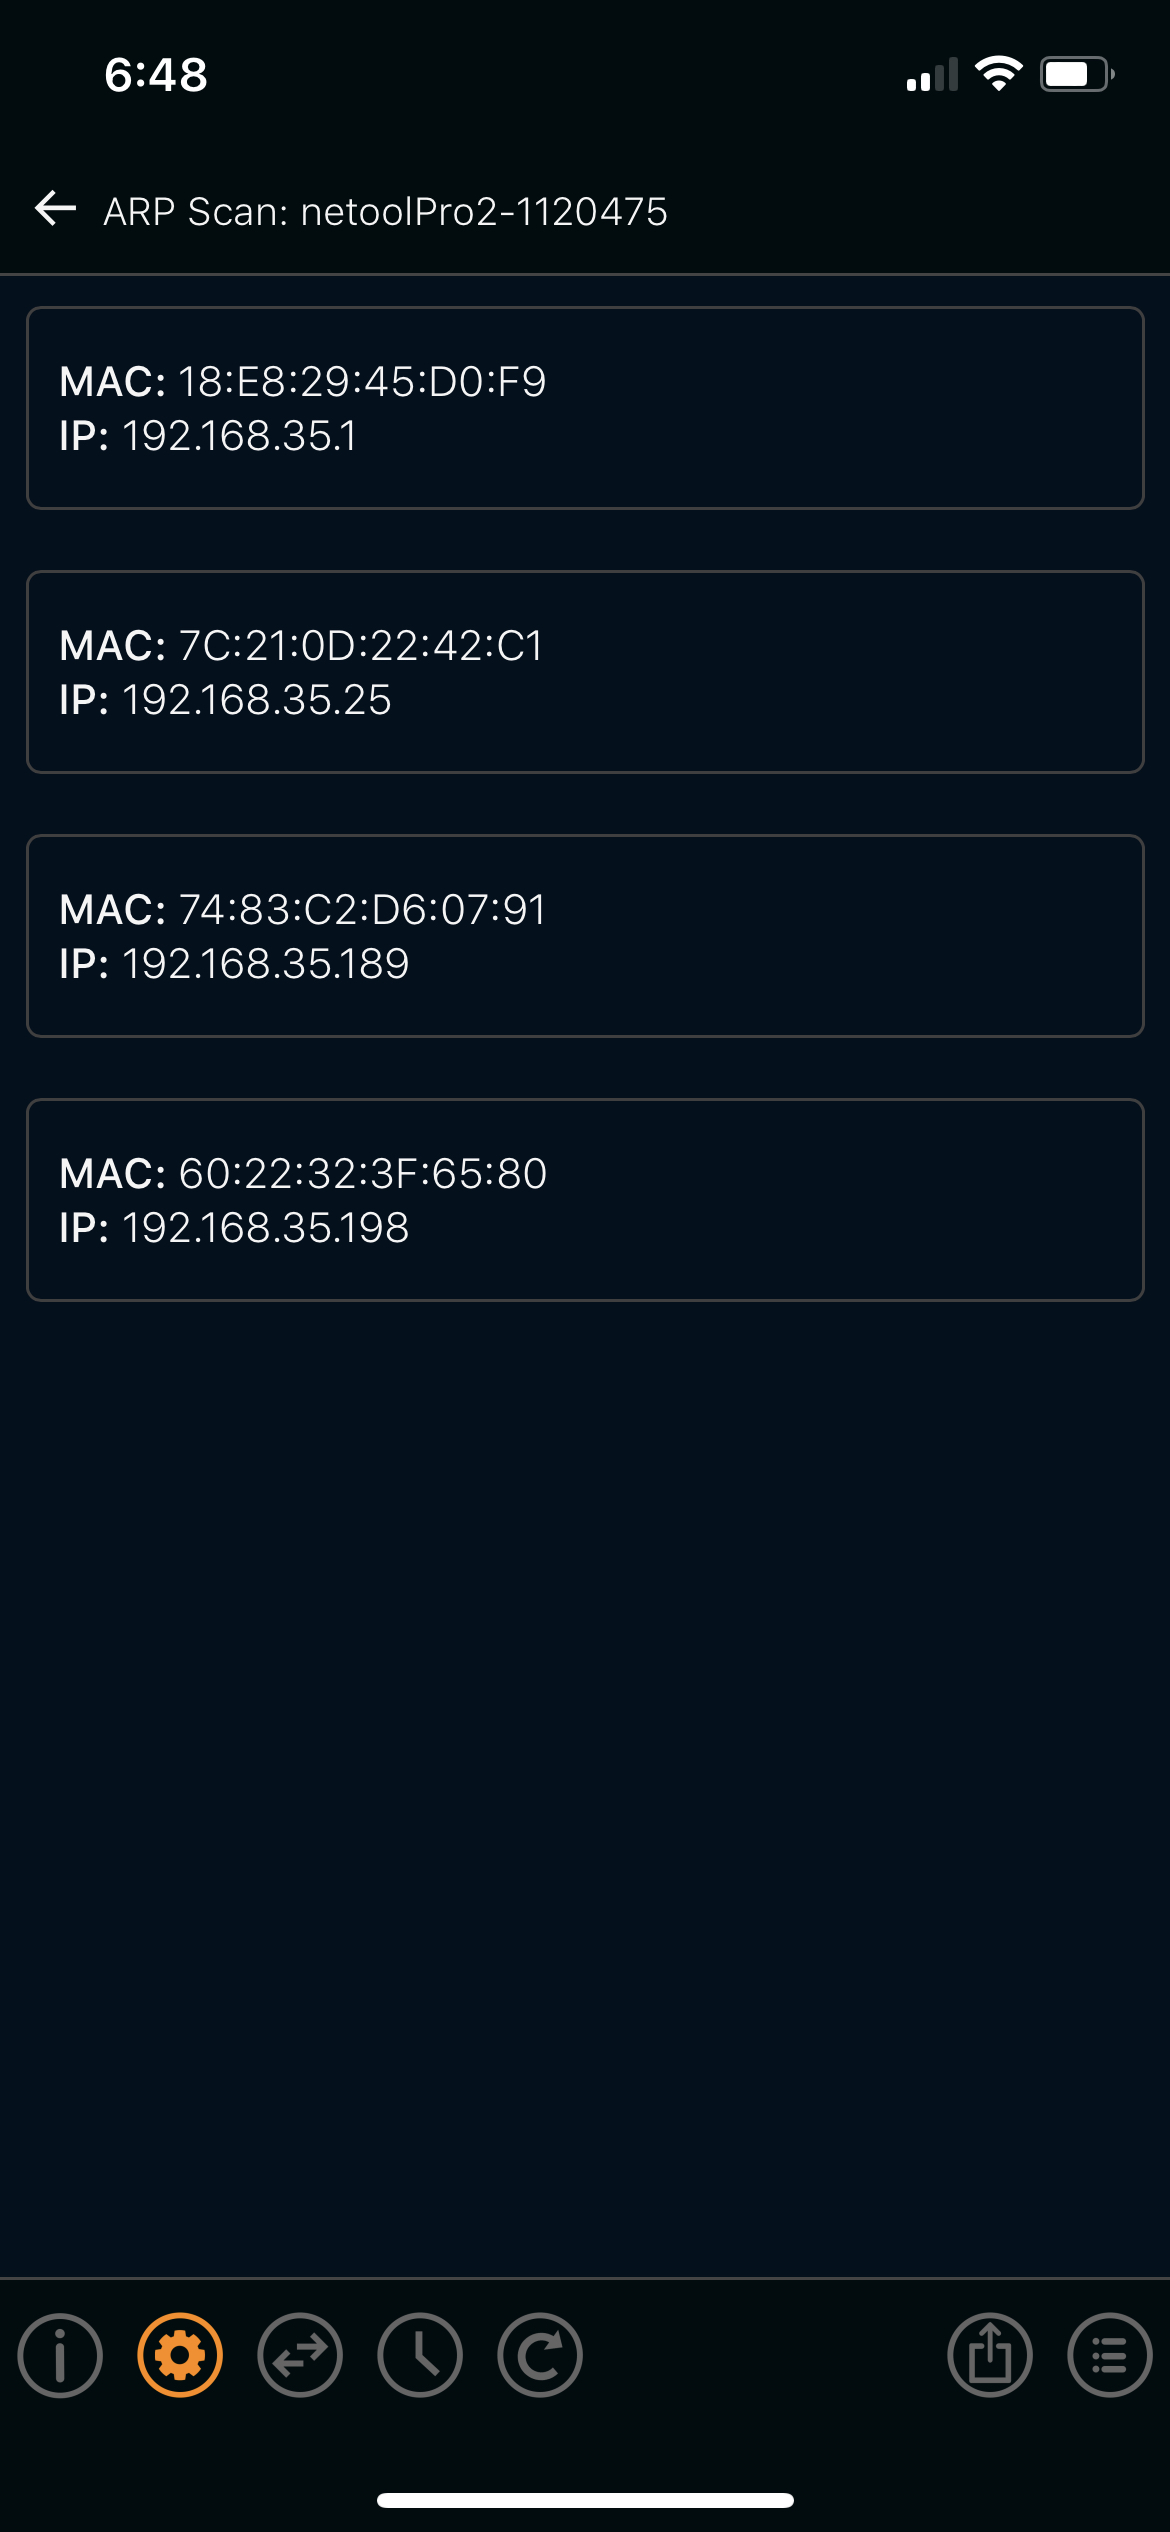
- By tapping the ARP Scan tab, a screen with all ARP captures will be displayed.
¶ Firmware Updates
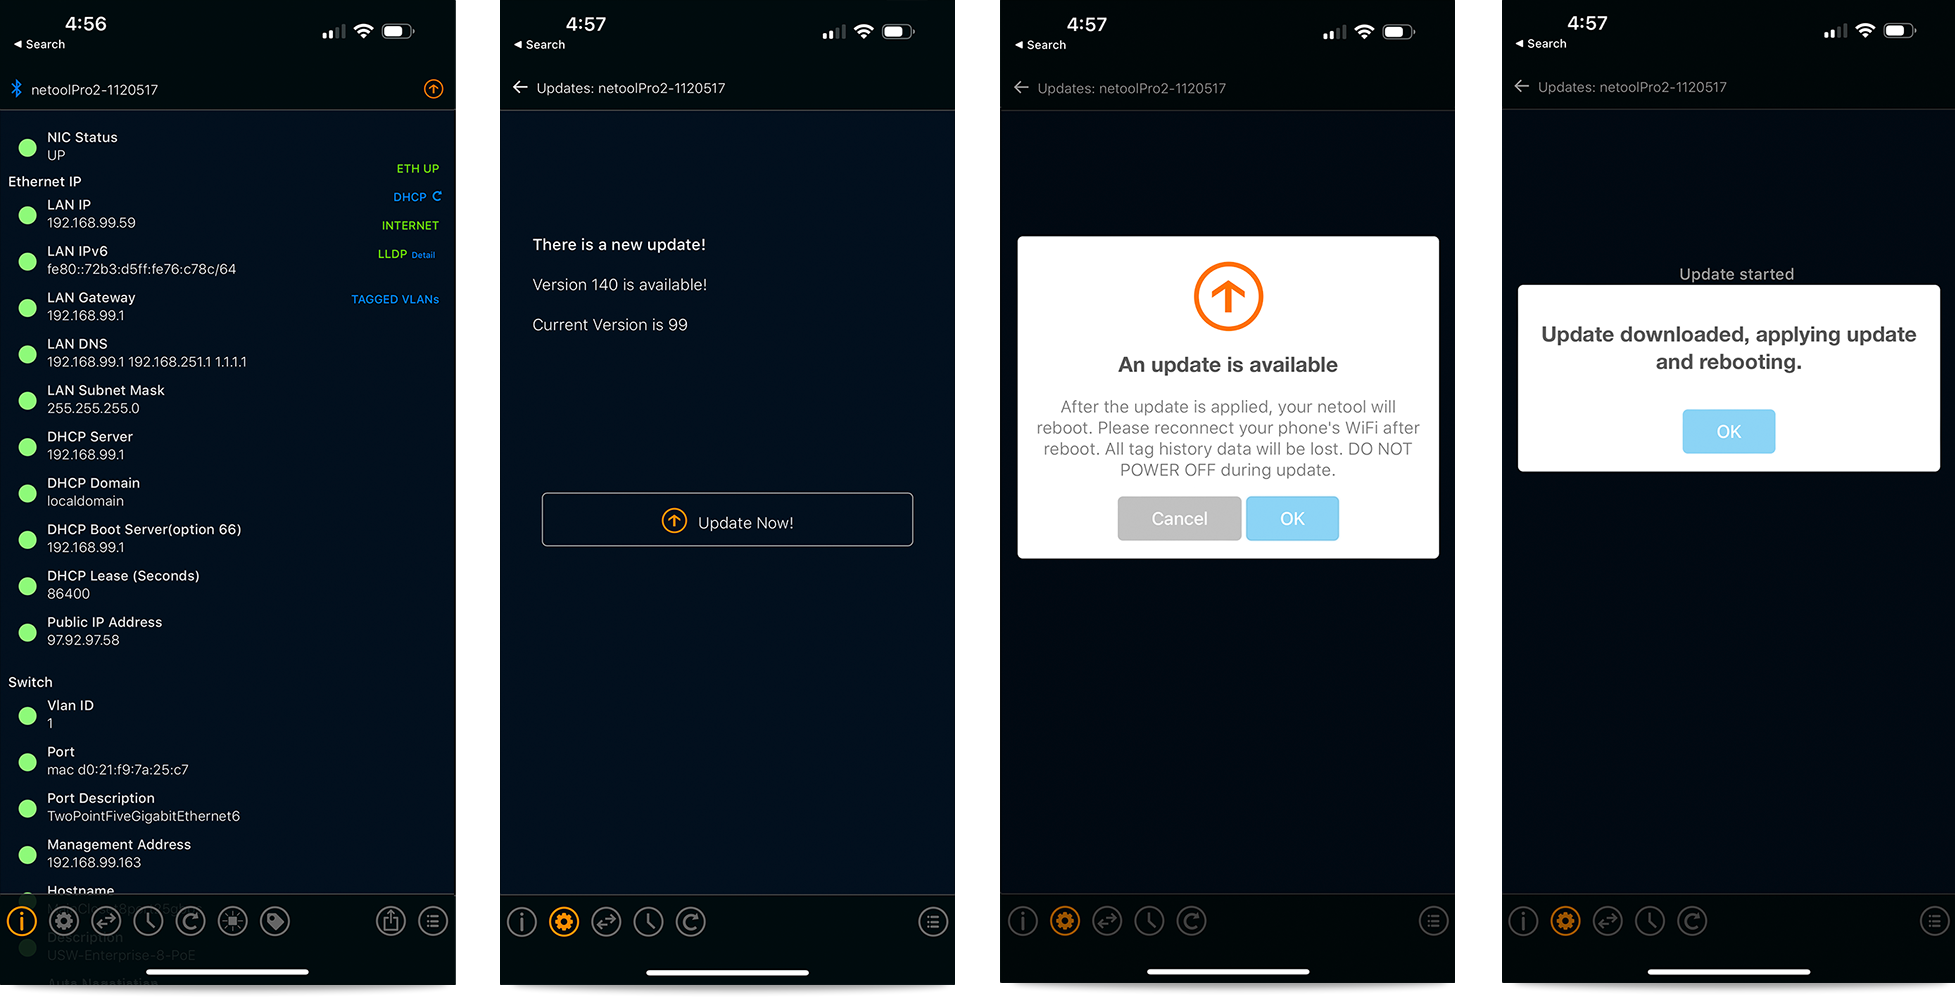
- With “Check for updates automatically” enabled in the toggle settings menu (see toggle settings menu section of this manual) your netool.io Pro2 will reach out and check the netool.io update server to see if there is a new version of the netool.io Pro2 firmware available for flashing.
- If there is an firmware update available, a orange update icon will appear at the top right corner of the main menu. You can also check for updates in the setting (Sprocket Icon) > Updates menu.
- When a firmware update is available you can apply the update by going to the (Sprocket Icon) > Updates menu and tapping on the “Update Now” button. This will start the update process and the Blue system light will start flashing randomly. DO NOT TURN OFF YOUR NETOOL until the netool.io Pro2 completely reboots. The blue light will be solid when the netool.io Pro2 reboots.
¶ Factory Reset
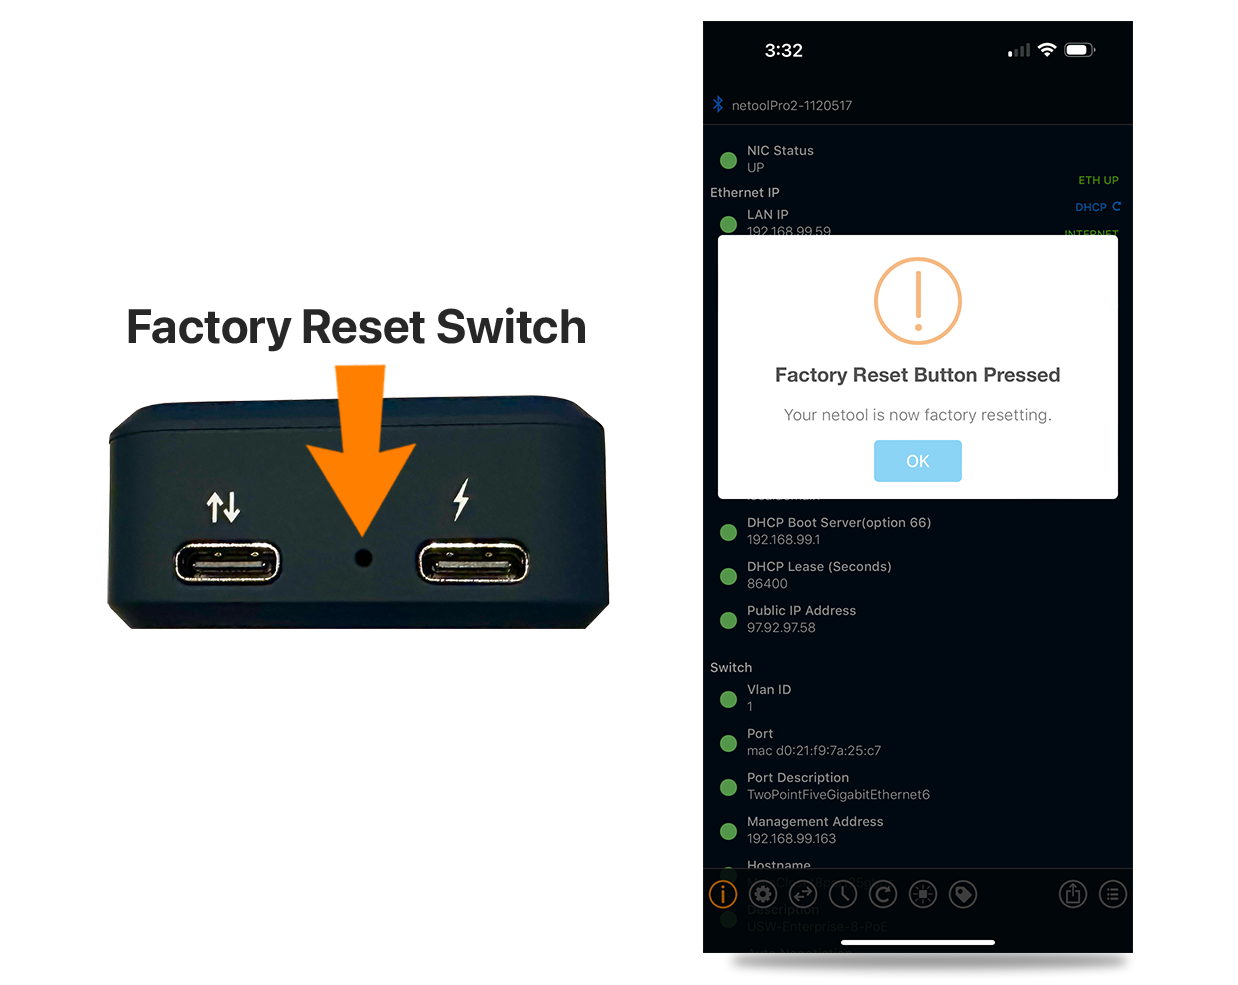
- To factory reset your netool.io Pro2, with the netool fully booted, hold down the factory reset button found at the bottom of the netool Pro2 between the two USB-C ports for more than 10 seconds.
- If you have your phone connected via Bluetooth and have the app open a dialog box will appear letting you know that your netool Pro2 is starting the factory reset process.
- Here is a video example on how to factory reset your netool.io Pro2